Describes the steps for registering new OSGi devices and providing them with the necessary settings.
The current document describes the steps for registering new OSGi devices, and providing it with all necessary settings for their further management through the system. This document focuses mainly on the usage of the Register New OSGi Device wizard. The basic principles and concepts of the initial provisioning and registration process are described in the Initial Provisioning of OSGi Devices document from Conceptual Guide.
Invoking the Register OSGi Device Wizard
To register a new OSGi device through the console, you must use the Register New OSGi Device wizard. To invoke the wizard and initiate the registration, go to the Device Management dashboard view, select the group the device has to be registered in and take one of the following steps:
- Click the Register OSGi Device button from the view toolbar
- Right-click the group and select OSGi Device -> Register OSGi Device from the popup menu.
When the command is fired, the Register New OSGi Device wizard opens.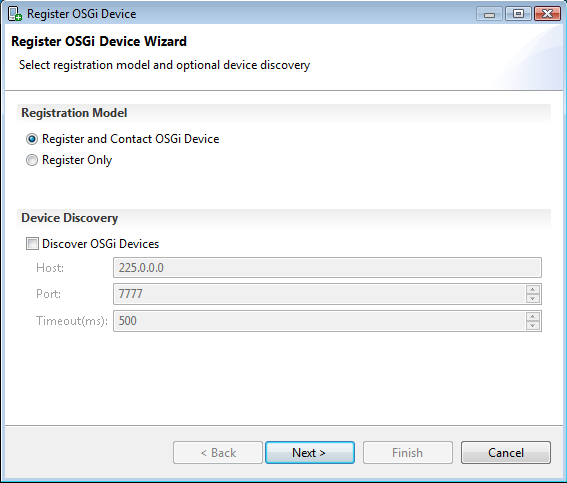
The OSGi Device registration wizard provides the following registration options:
- Register & Contact OSGi Device – This procedure establishes contact with the OSGi device, supplies it with provisioning properties, and registers it in the system
- Register Only – This procedure registers the OSGi device in the RM system without establishing connection with the device. This could be useful option if the device is currently off-line, for example.
The Discover OSGi Devices option is supplementary to the other. It allows you to discover OSGi devices available in your network. An OSGi device can be discovered only if its Provisioning Agent supports multicast discovery.
Using the Discover OSGi Devices Option
The procedure selected among the other two registration options will be performed over the selected discovered OSGi devices. The Discover OSGi Devices option has the following settings:
- Host – The multicast host to which the devices are joined. Default value: 225.0.0.0
- Port – The multicast port on which the devices are receiving data. Default value: 7777
- Timeout – The timeout in milliseconds for the discovery. Default value: 500.
Select the necessary option(s) from the wizard and, if choosing the Discover OSGi Devices option, adjust the discovery settings. When ready, press the Next button.
When you register multiple devices using this option, you must make sure that all devices have the same administration user account, i.e. user and password.
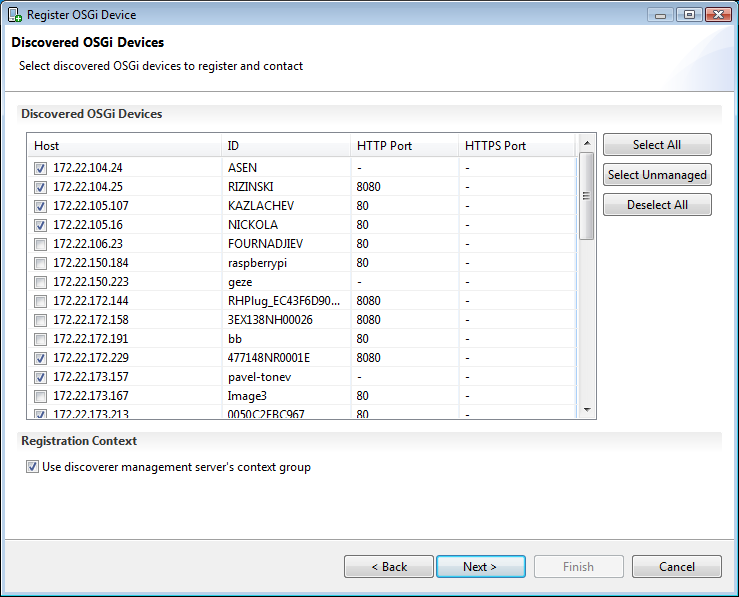
For each device from the list of discovered OSGi devices some properties describing its provisioning capabilities are displayed. Use this information to select the appropriate provisioning and communication settings for the device.
Property | Description |
|---|---|
Host | Shows the IP address or DNS name of the device's host. |
ID | Shows the unique device ID property from the provisioning configuration of the device. If this device is not managed and this property is not available, its value will be blank. |
HTTP Port | Shows the port used by the HTTP Service on the device. |
HTTPS Port | Shows the port used for HTTPS communication on the device (if such is available). |
The Registration Context pane contains a check box that allows you to define the location of the device management tree where the device will be registered: the Use discoverer management server's context group. If it is checked, the device will be placed in the device group managed by the MS that discovered the device. Otherwise, it will be placed in the currently selected group of the device management tree.
Performing the Register & Contact OSGi Device Procedure
This section describes the steps of the Register OSGi Device wizard in case the Register & Contact OSGi Device option is selected and as a result RM will contact the newly registered device.
1. Providing Initial Connection Properties
The first dialog that appears requires you to fill in registration properties related to the provisioning protocol settings and the user account that the backend will use to authenticate itself to the device(required by the device, see Provisioning of OSGi Devices: Provisioning Properties).
- Host and Port – These required fields describe the IP address or DNS name, and contact port of the device. If the device has already been found and selected through the Discover OSGi Device option, the Host and Port properties are already filled with the appropriate values.
- Initial transport – This property indicates the scheme that the backend will use to establish initial contact with the device and will push the provisioning properties to it. There are two possible options: HTTP and HTTPS. Note, however, that to be able to use HTTPS, the device must support HTTPS server side communication.
- Provisioning transport – This is the communication transport the device will use to perform provisioning data assignments. RM supports three provisioning transports (schemes) that can be used: HTTP, HTTPS and RSH. Note that you can use a specific scheme only if the corresponding URL handler is available on the device. Refer to Initial Provisioning of OSGi Devices for more information.
- Administration account (User and Password) – The administration user account existing on the contacted device. The RM backend will authenticate itself with it. Note: If the connected device does not require authentication with a user account, leave these fields blank.
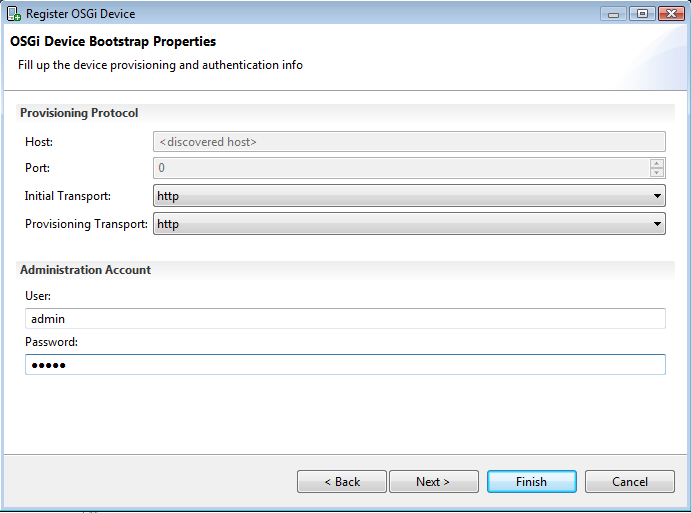
After filling the necessary properties in this dialog, you have submitted enough information for the registration and provisioning of the new device, so you can finish the Register New OSGi Device wizard at any time. All registration dialogs that follow are optional.
2. Providing OSGi Device Communication Properties
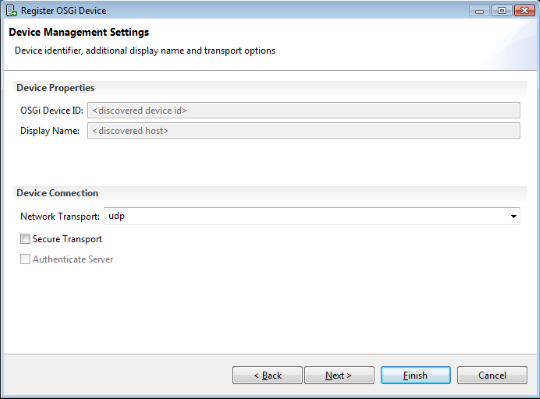
The second dialog prompts you to fill in properties related to the subsequent communication with the device after its registration in RM. The dialog contains the following properties:
- OSGi Device ID – The unique identifier of the OSGi device. Its value must be unique for the entire RM system configuration. If you don't assign a value to it, the system will generate a random unique ID for it.
- Display name – Defines the user-friendly name with which the device will appear in the device management tree. If you don't specify a display name, the device will be displayed with the device's IP address.
- Network transport – The transport scheme used for the communication with the device. There available options are: TCP, UDP, HTTP, SSLTCP, WS and HTTPS. In most cases, the TCP scheme is used. The HTTP scheme is useful when the device has dialup connection or is behind a proxy or a firewall. See OSGi Network Connectivity for more details.
If you don't specify the network transport, the default TCP scheme will be used
- Secure communication – This property indicates if the network communication with the device will be overlaid with RM's communication security mechanism (an SSL-like encryption and, optionally, authentication mechanism). See Secure Transport from OSGi Network Connectivity document for more details.
- Authenticate server – This checkbox property is enabled only if the Secure communication option is checked. It determines if the RM backend will have to authenticate itself to the device with a digital certificate.
3. Providing Optional RM Features
The next dialog allows you to supply the optional RM administration features that will be added to the device. All of these are optional but they allow the device to benefit from the management capabilities of the system. The possible options are:
Optional RM Feature | Description |
|---|---|
Alert Service | Enables device bundles to send alert messages notifying of errors or problems that require urgent human assistance. See the OSGi Device Alert document. |
Alert Pluggable Commands | Enables alert board agent dashboard pluggable commands. |
Application Management Agent | Enables support of service packages. |
Backup and Restore Agent | Provides a possibility to store the full set or a subset of the user and system configuration both on the device and on the RM. |
File Transfer Service | Enables backup files transfer to the RM. |
Functional Item Management Agent | Enables Functional Item to Control Unit Management from the RM. |
Backup Provider for Service Applications | Enables Service Applications Restore. |
Conditional Permission Agent | Provides control unit representation of Conditional Permissions state and management. |
Connection Scheduler | Ensures the mechanism for closing the unused connections with the managed OSGi device. For details refer to the Network Session Lifecycle section of the OSGi Network Connectivity document. |
Control Unit Management Agent | Enables the remote management of control units available on the OSGi device. See the Managing Device-Side Control Units document. |
CU Application Remote Management Interface | This agent enables the management of control units provided by the service applications. |
Http Tunnel | Enables support of HTTP Tunnel. For further details refer to the HTTP Tunnel description. |
JSON-RPC Agent | Enables support for JSON-RPC Tunneling. |
Linux System Agent | Provides features for management of certain aspects of the Linux OS of OSGi-enabled devices – process management, monitoring of mounted file systems and system performance. For details, see the OS System Management conceptual guide. |
Log Monitor | Ensures immediate delivery of error log messages generated by off-line OSGi devices, to RM backend. For further details refer to Log Monitor description in the Conceptual Guide. |
Monitoring Agent | Redirects the monitoring information available in the OSGi Monitor Admin service on the device. |
RM JMS Service | Provides an RM/JMS bridge on the OSGi device. |
OS Commands Support | Enables firing OS-specific commands on the device through the RM Management Script. |
Preferences Support | Enables storing Preferences on OSGi devices on the RM backend. |
Remote Driver Locator | Allows the system to automatically detect the suitable driver bundles according to the OSGi Device Access Specification. See RM Driver Locator document. |
Remote Log Extension Service | Enables device-related log messages stored in a log file to be retrieved from the RM backend. See Retrieving Logs from OSGi Devices |
Remote Log Service | Enables device-related log messages to be reviewed from the RM backend. See Retrieving Logs from OSGi Devices |
Resumable Bundle Install Support | Enables resuming the download of a bundle being installed onto the OSGi device framework in case of interrupted connection. |
SW Admin Agent | Enables the management of software components by using the Software Admin. For details, please refer to the Managing Software Components document. |
Subscription Deployment Package Plug-in | Enables the management of deployment packages included in service applications on client devices. |
OSGi Bundle Component Plug-in | Allows the (un)installation, starting and stopping of OSGi bundles included in service applications on OSGi frameworks. |
ZIP Package Management | Provides ZIP package management functionality. For details, please refer to the ZIP Package Management conceptual guide. |
WebSocket Remote Events Agent | Enables remote events push mechanism. |
You may see a subset or a different set of optional features from the ones listed in the above table displayed in the Optional Administration Features dialog! The list of available optional features displayed depends on the RM distribution packages you have installed.
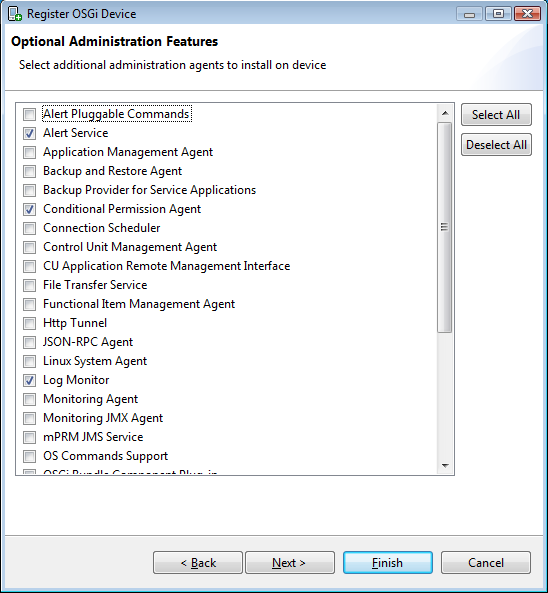
You can also activate optional features later after the device has been registered.
4. Defining Advanced Settings
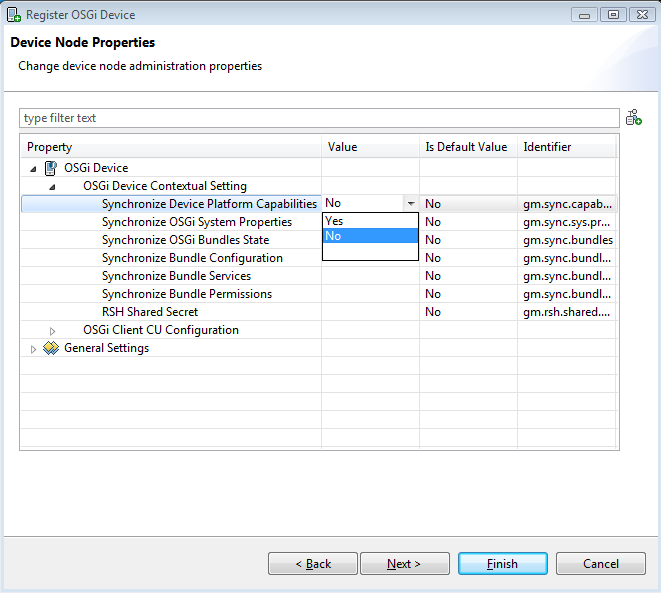
The next step is defining additional communication and synchronization settings related to the device. You can also alter these properties later, after the registration of the device in the RM.
The fourth dialog contains the following properties:
- Synchronize OSGi Device Platform Capabilities – If set to true, the Management Agent will constantly monitor the state of the device's platform, and will notify the backend of occurring changes.
- Synchronize OSGi Device System Properties – If set to true, RM will synchronize and store System Properties in the backend database. System Properties cannot be monitored runtime and therefore they are synchronized and stored in the backend only when explicit device state synchronization is triggered
- Synchronize OSGi Bundles State – Specifies whether the RM will store and synchronize OSGi bundle state data in the backend database.
- Synchronize Bundle Configuration – If set to true, the RM backend will constantly synchronize the current state of bundle configurations available on the device with the data stored in the RM database. If set to false, you will not see any information about the bundle configurations or the changes in their state on that device.
- Synchronize Bundle Services – If set to true, the RM backend will constantly update the information about the currently exported services on the device with the data stored in the RM database. If set to false, you will not see any information about the services exported on the device.
- Synchronize Bundle Permissions – If set to true, the Management Agent will constantly monitor the state of the bundle permissions available on the device, and will notify the backend of occurring changes.
- RSH Shared Secret – base 64 encoded shared secret, that is used by the RSH provisioning transport (if such a transport is used).
5. Defining OSGi Device Capabilities
The platform profile of an OSGi device consists of a set of properties with their values. A property can have more than a single value.
To add a new property to the device's platform profile:
- Click the
 button. A new row appears in the left pane. The left column contains the property name. The right column contains the property value(s).
 - Keep repeating the above sequence of steps to add as many properties as you consider necessary.
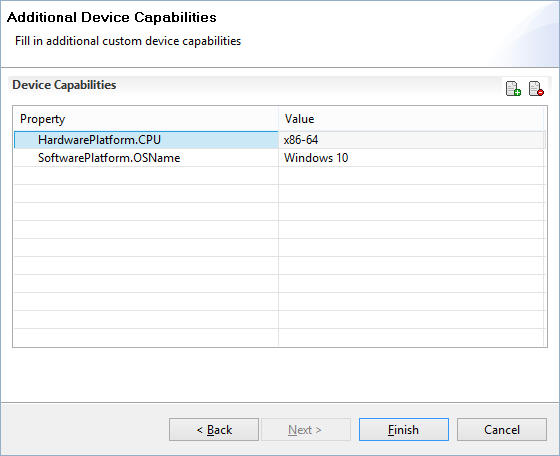
When you have added all necessary properties, click the Finish button. This will begin the registration and provisioning procedure of the device with all settings you have adjusted in all dialogs of the Register New OSGi Device wizard.
Performing the Register Only Procedure
The Register Only procedure involves registering an OSGi device with information supplied through the backend, without establishing contact with the device. This procedure can be used if the appointed device is currently off-line, which means that it cannot be contacted and provisioned. When appropriate, you can create a custom Provisioning Agent and run on the device. As a result, the device will be properly provisioned and will establish a connection with RM.
1. Providing OSGi Device Communication Properties
The first dialog prompts you to supply information related to the device's subsequent management through RM. This information will be used after the device has been provisioned and registered in the RM system.
This dialog is used in the same way as described in the Providing OSGi Device Communication Properties part of the Performing the Register & Contact OSGi Device Procedure above.
In the Register Only procedure, setting the OSGi Device ID property is mandatory!
2. Providing Optional Features
After setting the device's communication properties, you can define the optional RM administration features which the device will benefit from. The Optional RM Features dialog that appears is used in the same way as the Optional RM Features dialog in the Performing the Register & Contact OSGi Device Procedure above.
3. Defining Advanced Settings
The third step is defining synchronization settings for the subsequent management of the device. The synchronization properties have their default values so you may skip this step and go directly to the next dialog or finish the registration wizard. If you want to change these settings, use this dialog as described in the Defining Advanced Settings part of the Performing the Register & Contact OSGi Device Procedure.
4. Defining OSGi Device Capabilities
This dialog is used in the same way as described in the Defining OSGi Device Capabilities part of the Performing the Register & Contact OSGi Device Procedure.
Initial Provisioning Properties and Reprovisioning
You can view the initial provisioning properties of an OSGi device, by selecting the Initial Provisioning Properties child node of the device root node.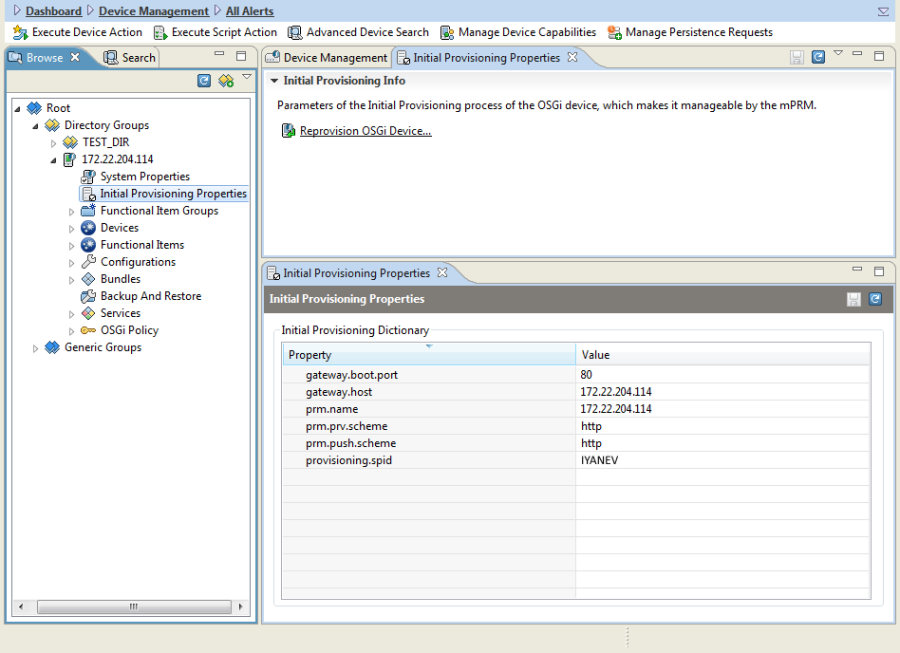
To change the initial provisioning properties select the Reprovision OSGi Device action from the Initial Provisioning Info pane on the right. The Register New OSGi Device wizard will open.