Configuration of the Backend Device Communication Components
The configuration of the Device Communication Service on the backend includes specifying the Transport Types, which will be used by MSs for communication with devices, and setting transport-specific parameters.
Supported Transport Types are listed in the Supported Network Transports property of the Backend Configurations for OSGi Management (PID: mprm.ms.gm, name: RM OSGi Device Manager Configuration). The value of this property is an array of strings with elements, indicating the Transport Types of enabled transports. By default, the value of this property is {udp, tcp, http, https, ssltcp, secure.udp, secure.tcp, secure.http, ws}, which means that the MS can communicate with devices through all of the built-in RM transports (UDP, TCP, HTTP, HTTPS, WS and SSL/TCP) and supports plain (not secured) and secure communication (through its built-in SSL/TCP and secure transports).
The system administrator can remove unnecessary Transport Types and add additional ones for custom Transport Services (how to develop a custom Transport Service is described in Developing a Custom Transport Service). The list of supported transports can be also modified for security reasons.
Every Transport Service can have different configuration properties, specific to the transport type. The most common configuration property, supported by all Transport Services, is the port number for receiving incoming requests. The port numbers of the built-in RM transports can be adjusted through the Backend Configurations for OSGi Management. Port names and their default values are shown in the table below.
Port Names | Default Value |
|---|---|
Plain UDP Port | 1501 |
Secure UDP Port | 1503 |
Plain TCP Port | 1501 |
Secure TCP Port | 1503 |
SSL/TCP Port | 2443 |
WS | 1505 |
Setup and Configuration of the Client Device Communication Components
The needed bundles of the Device Communication Services are installed during device Initial Provisioning. Therefore, RM takes care to install the appropriate set of bundles and to supply them with the proper configuration parameters, depending on the device registration properties. For more details of the device registration procedure and the initial provisioning see the Initial Provisioning of OSGi Devices document.
To enable RM to automatically deploy on the device the client-side of a Transport Service during provisioning, the bundle holding it should be added into the Http Accessible Group group of OSGi Bundles in the Software Repository. The client-side bundles of RM built-in Transport Services are placed into this bundle group by default.
Setup of the SSL/TCP Transport Service
On both sides you can install custom certificates that will be used during the communication over the SSL/TCP transport. Certificates are most conveniently set or exported from the Certificates dashboard view of the console. In case you want to do the configuration within your application, you can use the Certificate Management API as described in the Programmer's Guide of the System Package product documentation.
Making JSSE Available in the OSGi Device
As the SSL/TCP Transport client running on the OSGi device uses the JSSE API for SSL communication and credentials management, you have to make the JSSE API available in the OSGi environment. Add "javax.net.*" to the packages specified as value of the org.osgi.framework.bootdelegation system property prior to starting the OSGi device.
Requiring Authentication from the Device
By default, the SSL/TCP server on the backend does not require authentication from the client running on the OSGi device. To turn it on, open the console and go to the System Configuration view from the dashboard. On the left, go to the Configurations tree tab and locate the RM OSGi Device Manager Configuration. Then, activate the Require secure device authentication option and click Save.
To start communicating with a device, device's certificate or its issuer's one must be available in the Certificate Manager storage – in particular in the "mPRM TLS Server" domain.
Setting Server Own Certificate for Authentication to the Device
Setting the own certificate of the backend is done from the storage of the Certificate Manager by adding the certificate to the "mPRM TLS Server" domain. Make sure that your certificate is the only own certificate entry for the "mPRM TLS Server" domain – otherwise, it is possible that RM picks another own certificate for authentication to the SSL client. On the device, this certificate should be marked as trusted as described in the next section.
If the own certificate is not available there, import it – In the Certificates view importing an own certificate together with the private key can be performed in the two ways – by importing a PKCS#12 keystore, or by importing a certificate in X.509 format and then attaching its key pair. Refer to Certificate Management for details about importing certificates in the Certificate Manager.
You might also use the console to create a new own certificate adding it automatically to the Certificate Manager. Select a certificate group and use the Create RM Certificate option of the popup menu.
Exporting Trusted Certificates and Own Certificate for the Device
You can generate X.509 Trust Manager and X.509 Key Manager services exporting on the device the trusted certificates (e.g. of specific organizations using the RM system) and own certificate, and have them automatically included in a bundle (a Security Context Bundle). Next, you can install the bundle on the device in advance to starting initial provisioning and establishing connection.
To create a bundle exporting trusted certificates:
- If the certificates are not present in the certificate storage of RM, import them by using the commands of the Certificates view of the console dashboard.
- Select a group or a trusted certificate and use the Create Security Context option from the pop-up menu or from the Actions list.
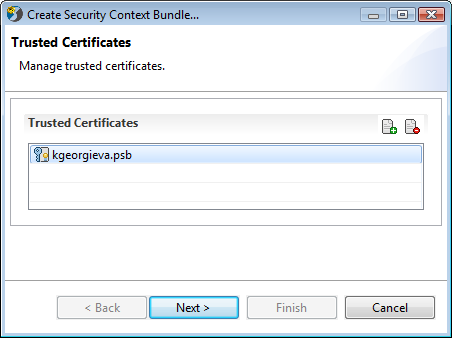
- In the Trusted Certificates page of the Create Security Context Bundle wizard specify the certificates to be trusted.
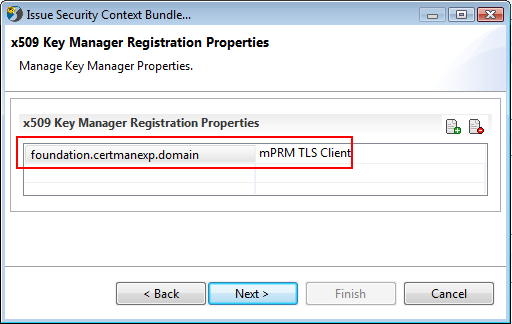
- In the X509 Manager Registration Properties page add the foundation.certmanexp.domain property with value "mPRM TLS Client".
- Finally, specify the location of the JAR file of the Security Context Bundle.
To create a bundle exporting an own certificate:
- If the private credentials of the device are not available in the certificate storage of RM, import them from the Certificates view of the console dashboard (as a PKCS#12 file, or separately as a certificate file and associated key file).
- Select the own certificate entry and use the Create Security Context Bundle option from the pop-up menu or from the Actions list.
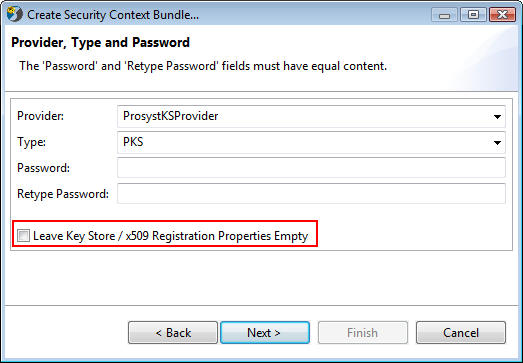
- In the Create Security Context Bundle wizard specify, if needed, the password for access to the private key. In this case, prior to deploying the Security Context Bundle on the OSGi device, set the device password on as value of the mprm.foundation.keyStorePass system property. Also to be able to enter the following properties, the "Leave Key Store" box must be unchecked.
- In the X509 Key Manager Registration Properties page of the wizard add the property "mPRM TLS Client" with value "KPH".
- Finally, specify the location of the JAR file of the Security Context bundle.
To make RM trust the device's certificate, the certificate of the immediate issuer or the device's certificate itself should be available in the "mPRM TLS Server" domain of the Certificate Manager.
Remove the key pair from the entry or make sure that the entry is not added to the "mPRM TLS Server" domain – otherwise, the own certificate might be used for authentication of RM to the device instead of the right RM certificate.
In a single Security Context bundle you can also combine trusted certificates and own certificates.
Setup and Configuration of the Secure Transport Services
The RM Device Communication Protocol allows extra privacy of the communication if there are security layers. It also supports optional client- and server-side authentication, based on RSA certificates when connection is established.
Making JSSE Available in the OSGi Device
As the Secure Transport uses the JSSE API to manage trusted and own credentials, you have to provide the API to the OSGi environment. Add "javax.net.*" to the packages specified as value of the org.osgi.framework.bootdelegation system property prior to starting the OSGi device.
Requesting a Secure Connection
Both connection sides can require authentication from the other side.
- If you want the MS to require authentication from the device, you must choose the Secure transport option during the configuration of the device (described in the Registering New OSGi Devices document) and set the gw.net.client.authentication property of the Backend Configurations for OSGi Management before the device configuration.
- If you want the device to require authentication from the MS, you must choose the Authenticate server option (described in the Registering New OSGi Devices or set the prm.authenticate provisioning property (described in the Initial Provisioning of OSGi Devices document) during the configuration of the device. Note that this option is available only if secure transport is enabled on the MS.
Configuring the Secure Connection
Once the secure connection between the device and the MS is required, to successfully establish it you have to provide the proper certificate credentials on both sides.
If device authentication is switched on, then you have to:
- Create an X.509 Key Manager service exporting the relevant own certificate, include it in a bundle (called Security Context Bundle) and install the bundle on the device. To automatically generate a bundle providing such a service:
- From the Certificates view of the console dashboard select the certificate and use the Issue Security Context option from the popup menu or from the Actions list.
If the certificate and its keys are not available as an entry in the certificate storage of RM, import the certificate and the associated keys (as a PKCS#12 file or as certificate and key files). You might also generate a new RM own certificate. - Set PKSProvider as provider and PKS as type.
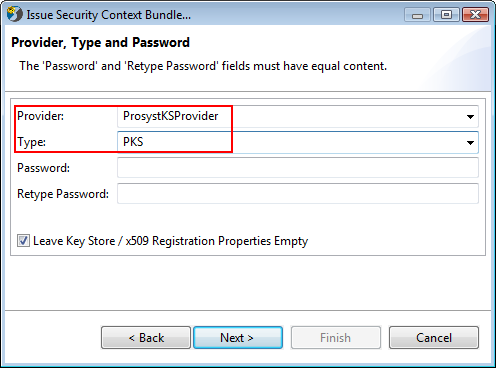
- Optionally set a password for access to the associated private key. In this case, before starting the Security Context Bundle in device's OSGi framework you have to set the system property mprm.foundation.keyStorePass with the key password as value.
- In the X509 Key Manager Registration Properties page of the Issue Security Context Bundle wizard add the property "RM Secure Transport" with value "KPH".
- Finally, specify the location of the generated bundle.
Make sure that the device's own certificate is not set as own for RM without a reason as RM might use the certificate to authenticate itself to a device – in certain cases this might cause some troubles in the authentication process. A solution is to remove the key pair from the certificate entry.
- Set device's certificate as trusted in RM – From the Certificates view of the console dashboard import the issuer certificate related to the device and add it to the "RM Secure Transport" domain. Instead of issuer's, you might set as trusted device's subject certificate as well.
If server authentication is required:
- Set the certificate as own for RM in the Certificate Manager – If the own certificate is available in Certificate Manager's storage (e.g. the default RM certificate), from the Certificates view of the console dashboard add the certificate entry to the "RM Secure Transport" domain. Make sure that this is the only own certificate entry belonging to the "RM Secure Transport" domain – otherwise the MS might use another certificate for authentication to the device.
If the own certificate and keys are not available as a record in the Certificate Manager, you can import them (as a PKCS#12 file or as separate certificate file and key file) or generate a own certificate with keys associated.
- Create an X.509 Trust Manager service exporting RM's certificate as trusted, include it in a bundle and install it on the device. To automatically generate a bundle providing such a service:
- From the Certificates node of the console select a group or a trusted certificate and use the Create Security Context option from the popup menu or from the Actions list.
If the server certificate is not available in the certificate storage, import the certificate in RM. - In the Trusted Certificates page of the Create Security Context Bundle wizard specify the certificates to be trusted. See figure Specifying Trusted Certificates.
- In the X509 Trust Manager Registration Properties page add the "RM Secure Transport" property with value "CV".
- Finally, specify the location of the JAR file of the Security Context Bundle.
You can also combine exporting trusted certificates and an own one in a single Security Context Bundle.
Network Sessions Configuration
The next three system properties can be set on the devices to modify the default behavior during device-initiated network sessions.
System Property | Value | Description |
|---|---|---|
| boolean | Specifies if the RM agent must try to establish a connection between the OSGi device and the MS or not. By default, its value is true. |
| <number_in_seconds> | Specifies the period in which the RM agent will try to establish a connection. By default, its value is 60 seconds. This system property will be used only if the value of the previous system property is set to true. |
| boolean | If this property is set to false, the Management Agent will not establish the connection with the RM backend automatically (only by explicit request). Default value: true. |