Provides a guide to managing certificates in RM through the console.
Overview
To manage the certificates available in RM, you need to go to the Certificates view from the console Dashboard. You can additionally order the available certificates in groups according to your personal approach.
Managing Certificates
Certificate General Properties
To view a certificate's properties, unfold a certificate group and select a certificate:
The next table contains a description of the properties.
Property | Description | |
|---|---|---|
Serial Number | A hexadecimal number which identifies the certificate and is unique in the scope of the certificates issued by a single certification authority. | |
Valid From | Time and date of validation | |
Valid To | Time an date of expiration | |
Signature algorithm | The algorithm used for signing | |
Issuer | The certification authority that issued the certificate | |
Issuer | C | The country of the issuer. |
CN | The name of the issuer. | |
E | The e-mail address of issuer. | |
L | The city of the issuer. | |
O | The name of the certificate issuer's organization. | |
OU | The department within the organization responsible for issuing certificates. | |
ST | The state of the issuer. | |
Subject | The receiver of the certificate | |
Subject | C | The country of the certificate owner. |
CN | The name of the certificate owner. | |
E | The e-mail address of the certificate owner. | |
L | The city of the certificate owner. | |
O | The name of the organization, owner of the certificate. | |
OU | The department which the certificate is granted to . | |
ST | The state of the certificate owner. | |
Certificate Chain | The chain of issuers that have signed the certificate. This property contains entries only if the issuer certificate has been added to the certificates storage of RM. | |
Certificate Domains | The domains the certificate is trusted within. | |
Additional Properties | The certificate's additional properties. You can add ones in order to deliver additional data with the certificate. |
Importing a Certificate
To import a certificate:
- Select the certificate group where you want to place the certificate.
- Select the Import Certificate command from the pop-up menu or click the Import Certificate action from the administrative toolbar at the top or from the Administrative Actions list on the right.
- Specify the certificate file location from the Import Certificate dialog. As a result, the Confirm Import Certificate dialog will appear where you can view the certificate you are about to import:

- Choose the group where you want to place the certificate from the Certificate Group drop-down menu. If you want to place the certificate in a new group, simply type the group's name in the Certificate Group combo box.
- Specify the domains of the certificate by clicking the
 button located at the top of the Certificate Domains pane and selecting the relevant entries from the Domains dialog.
 - Click OK to import the certificate.
Exporting a Certificate
To export a certificate, select it, and use the Export Certificate command from the pop-up menu or click the Export Certificate action from the toolbar at the top or from the Actions list on the right. As a result, you will be prompted to choose the location on the disk where the certificate will be saved.
Creating an RM Certificate
To generate an RM certificate, that is, to generate a certificate and a key pair with a single command, select a group node and then click Create RM Certificate from the toolbar of the view at the top or from the Administrative Actions list on the right. The following dialog will appear:
In this dialog, you have to identify the subject of the certificate with help of the properties described in the "Certificate General Properties" section.
If you do not specify the end date of certificate's validity, the certificate will be valid one month from the start date. If a start date is not specified either, then the certificate will be valid one month from the date and time of its generation.
Setting Certificate Domains
To set domains to a certificate:
- Select a certificate from the available ones.
- Click the button in the Certificate Domains pane on the right.
- Choose the domains you would like your certificate to be trusted of from the Domains dialog that appears.
If you want the certificate to be trusted of some other domain, potentially used by a third-party application, click New to create a new certificate domain. - Click OK to submit your choice.
Handling Revoked Certificates
You can view the revoked certificates of a selected issuer certificate from the Revoked Certificates tab on the right. It contains the following data:
- Revocation URL - Allows you to specify a local path or a remote URL to a published certificate revocation list (.crl) file, issued by the selected certificate owner and containing the serial numbers of invalid certificates from the Certificate Repository.
- Revoked by Certification Authority - Allows you to view revoked certificates, signed by the selected issuer certificate. Revoked certificates are subject certificates which were previously issued by a certification authority, later withdrawn and declared invalid. In this case, the certificates are publicly announced to be revoked at the specified Revocation URL.
- Explicitly Revoked Certificates - Allows you to explicitly revoke certificates by specifying their unique serial number.
To associate a CRL with an issuer certificate, fill in the CRL URL in the Revocation URL field and click the Save button.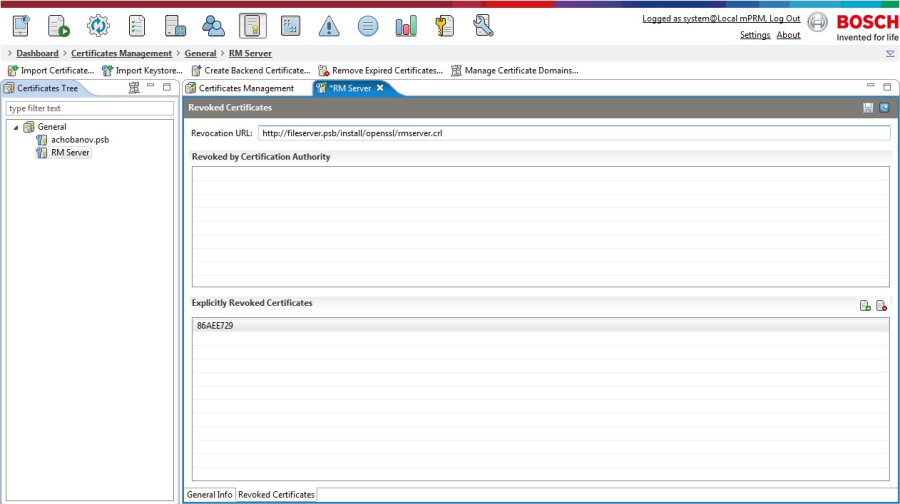
Moving a Certificate to Another Group
To move a certificate to another group, select a certificate and call Move Certificate command from the pop-up menu, or from the Actions list on the right. As result, you will be prompted the Select Certificate Group dialog to choose a group from the available ones. If you want to place the certificate to an entirely new group, type the new group's name in the Certificate Group text field.
Removing a Certificate
To remove a certificate from the Certificate Repository, select the certificate you consider you do not need any more, then call Remove Certificate from the administrative toolbar, from the pop-up menu or from the Actions list on the right.
To remove the certificates whose validation periods have expired from a group, select a group and call Remove Expired Certificates from the administrative toolbar at the top, from the pop-up menu or from the Administrative Actions list on the right.
Managing Certificate-Related Entities
Certificate Groups
You can arrange the available in RM certificate in groups according to your personal approach. A certificate group exist only when there are certificates in it, if you empty a certificate group it will be automatically deleted from the Certificates view. You can create a new certificate group when moving or importing a certificate into it. You just have to enter the new certificate group name in the corresponding text field.
Managing Certificate Domains
You can view the available certificate domains by selecting a group and calling the Manage Certificate Domains command from the toolbar or from the Administrative Actions list on the right. A Domains dialog will appear listing the domains presently saved in RM.
By default, Remote Manager provides the following domains:
- mPRM RAS - Holds certificates that will be used for authentication of remote access client (RAC) applications.
- mPRM TLS Client - Holds certificates that the TLS client of RM will use to authenticate itself to a connected server as well as to verify the trust of certificates received from the server.
- mPRM TLS Server - Holds certificates that the TLS server of RM will use to authenticate itself to connected clients as well as to verify the trust of certificates received from the clients.
- mPRM Secure Transport - Holds certificates that will be used for authentication in a secure communication between the OSGi devices and the Management Servers.
To add new certificate domain:
- Select a group node and click the Manage Certificate Domains button from the toolbar at the top.
- In the Domains dialog, use the button and enter the new certificate domain name.
- Click OK.
To remove a certificate domain from RM, again use the Manage Certificate Domains command - select the domain there and click the  button.
Importing a Keystore
By using RM you can import the key entries for a certificate chain and associated certificate chain from a file-based key store located on the local file system or on the internal network.
You can import JKS, PKCS12 and PKS (Provisioning Key Store) keystores (see "PKS Store Type" under Certificate Management).
PKS stores being import should have been previously generated with the help of the console by using the Export Keystore command.
Importing the key entries (private key plus certificate chain) of a key store in RM is possible only if all of them have the same key password.
To import a key store into RM:
- Select a certificate group.
- Call the Import Keystore action from the pop-up menu, from the toolbar at the top or from the Administrative Actions list on the right. As a result, the Import Keystore dialog will appear:
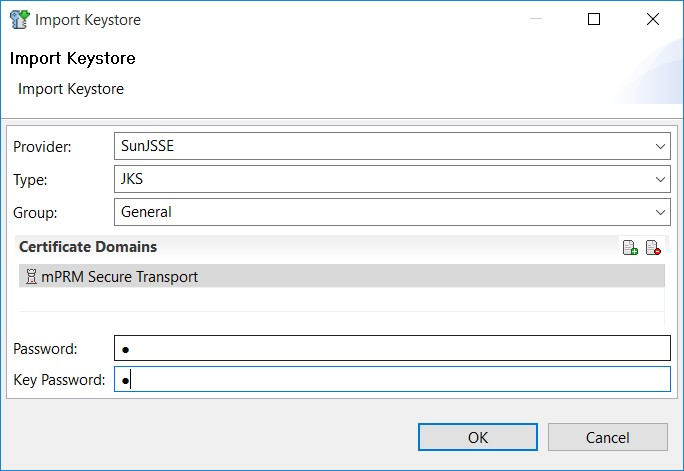
This dialog prompts you to specify the following properties of the key store you want to import and of the certificate entries which will become available in the Certificate Repository as a result from the import:- Provider - The key store implementation provider. The supported providers are "SUN", "SunJSSE" and "ProsystKSProvider".
- Type - The key store type. The selected type must match the selected provider - "JKS" for "SUN", "PKCS12" for "SunJSSE" and "PKS" for "ProsystKSProvider".
- Group - The group where the certificates contained in key store will be placed.
- Certificate Domain - The certificate domains where the certificates contained in the key store will be applicable to.
- Password - The key store password.
- Key Password - The key password shared by all key entries in the store.
- Click OK to confirm the entered key store properties. As a result you will be prompted to the Import Key Store file chooser to specify the key store's file.
Exporting a Keystore
RM allows you to export in a file key store single certificates or the certificates contained in a whole certificate group or domain. To export a key store:
- Select a certificate, certificate group or domain.
- Call the Export Keystore command from the pop-up menu, from the toolbar at the top, or from the Administrative Actions list on the right. The Export Keystore dialog will appear:
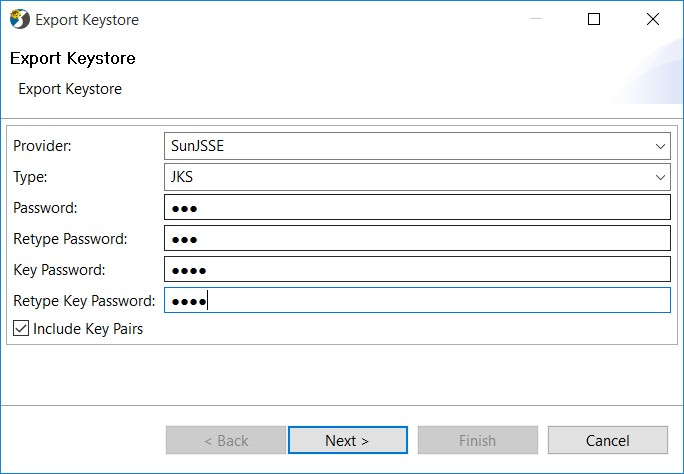
Here you have to specify the provider ("SunJSSE", "SUN" or "ProSystKSProvider") and respectively the type ("JKS", "PKCS12", "PKS") of the key store, and enter the needed passwords. Check the Include Key Pairs option if you want to include the keys for the certificates that will be exported in the key store. - Click Next to confirm the entered key store properties. As a result, you will be prompted to the Export Keystore file chooser to enter the name and location of the key store file.
Creating a Security Context Bundle
You can create a Security Context bundle to export trusted and own certificates along with their key pairs. A Security Context bundle can include three types of certificate-related entities:
- A Key Pair Holder to keep the key pairs of the own certificates. The Key Pair Holder registers as an OSGi service a
javax.net.ssl.X509KeyManager. - A Certificate Verifier for the certificates with questionable authenticity. It registers as an OSGi service a
javax.net.ssl.X509TrustManager. - A Key Store Holder to keep the related key and trusted certificate entries. It registers a
com.prosyst.mprm.util.keystore.osgi.KeyStoreHolderservice.
For details on the Key Pair Holder and Certificate Verifier modules, refer to the Certificate Management document from the Conceptual Guide.
When creating a Security Context, you can provide registration properties for all the above certificate-related entities. However, you are supposed do that only for those entities that match your current needs. For example, you can register only a Key Pair Holder and a Certificate Verifier. In this case, a KeyStoreHolder service will be registered too, without any registration properties. If you do not provide any registration properties for these entities, an ordinary key store will be created.
Basically, you can follow two approaches in creating a Security Context bundle:
- "Create" a Security Context - Include certificate entries (with available certificates and keys) that already exists in the Certificate Repository.
- "Issue" a Security Context - Include new certificate and keys, generated internally by RM and if required signed by an own certificate stored in the Certificate Repository. The Security Context can include trusted certificates as well.
To create a Security Context bundle:
- Select a node from the Certificates view.
If you will create a Security Context with a certificate existing in RM as the own certificate and key, select the relevant own certificate node.
If you will create a Security Context with a new certificate that will be issued by RM as the own certificate and keys:
Select the certificate node of the own certificate that will be used to sign the "issued" certificate
Select any group node and specify the issuer certificate later.
- Start the wizard for Security Context generation:
To "create" a Security Context bundle with an existing certificate entry as the own certificate, call the Create Security Context command from the pop-up menu or from the Actions list on the right. The Create Security Context Bundle wizard will appear.
To "issue" a Security Context bundle with a newly-generated certificate as the own certificate, call the Issue Security Context command from the pop-up menu or from the Actions list on the right. The Issue Security Context Bundle wizard will appear.
- For "issued" Security Context bundles only. In the Key Pair Holder dialog of the Issue Security Context Bundle wizard, specify properties of the generated certificate, described in the "Certificate General Properties" section. Click Next.
- In the Trusted Certificates dialog, select the trusted certificates which you want to additionally verify using the Certificate Verifier that will be created. Click Next.
- In the dialog that follows, specify the keystore provider and type, enter a locking password at Password and confirm it at Retype Password . This is required to protect the keys held in the Key Pair Holder. Click Next to proceed. See "Exporting a Key Store" for description of the properties.
- Specify the properties that the Security Context shall register the Key Store Holder with in the Key Store Holder Registration Properties screen. Click Next.
- Specify the properties that the created Key Pair Holder will register the javax.net.ssl.X509KeyManager with in the X509 Key Manager Registration Properties screen.
Applications using Key Pair Holders usually are associated with specific certificate domains, and to distinguish the proper X509KeyManager services, they check the registration properties of those services. As in most cases, you will need a Key Manager service for certificate login and for client authentication to RM of OSGi-enabled devices, we'll concentrate on the registration properties for these use cases:
For certificate login, specify the next two properties:
Key: mPRM RAC, Value: KPH
Key: User, Value: <user_name>
where <user_name> is name of the user which will log in to RM by using certificate credentials.
For client authentication over the Secure Transport Service, specify the registration property:
Key: mPRM Secure Transport, Value: KPH
- In the next screen, X.509 Trust Manager Registration Properties, enter the registration properties which the Certificate Verifier will register a
javax.net.ssl.x509TrustManagerwith. Click Next.For Certificate Verifiers which will be used by the Secure Transport Service on an OSGi-enabled device, set the registration properties:
Key: mPRM Secure Transport, Value: CV - Next, specify the Security Context bundle JAR name and location in the file chooser that appears and click Finish.