Contains a user's guide to managing OSGi bundles in the scope of the Software Repository.
Accessing the Content of the OSGi Bundles in the Software Repository
To view, create or edit the properties of an OSGi bundle, your user account must have the appropriate role.
For more information about the roles see Access Roles from the Software Repository module.
See the documentation of the User Management package for more details about user management.
To manage the OSGi Bundles in the Software Repository from the console:
- Log in to the RM control center from the console with the appropriate user account.
Wait until all components in the console are shown successfully.
- From the Dashboard select the Software Repository view or click the
 button at the top.
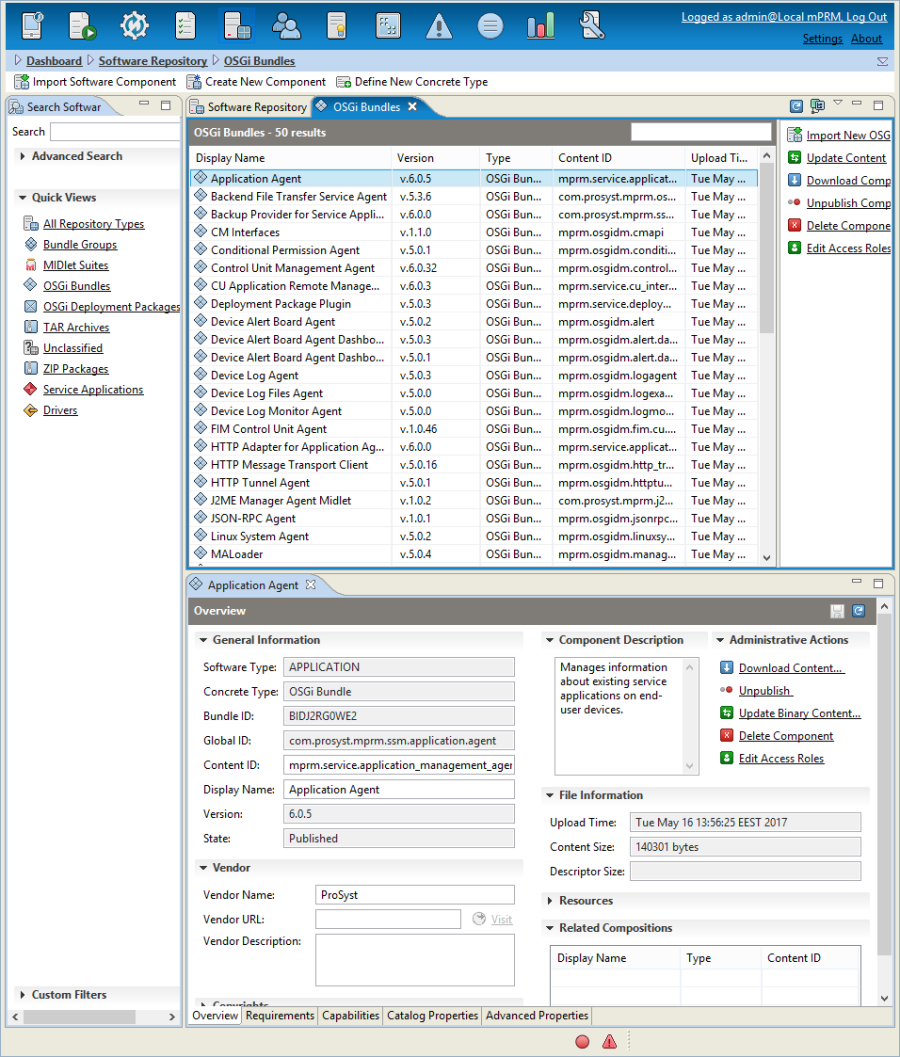
On the left, the Software Repository view shows the available repository search options. On the right, the OSGi Bundles list contains all available OSGi bundles. Beneath the list, you can view the attributes of a selected OSGi client bundle.
OSGi Bundle Attributes
General Characteristics
The common attributes of the OSGi bundle (Figure 1) are displayed in the console and managed as described in the Software Repository Management through the console.
Custom Characteristics
The additional functionality provided to the Software Repository for management of OSGi bundles includes the representation and maintenance of their specific properties. These properties are available in the Advanced Properties tab for a bundle.
Manifest
The Software Repository allows you to view and edit the manifest properties of an OSGi bundle. They can be accessed from the Manifest node of the Advanced Properties tab for a selected OSGi bundle.
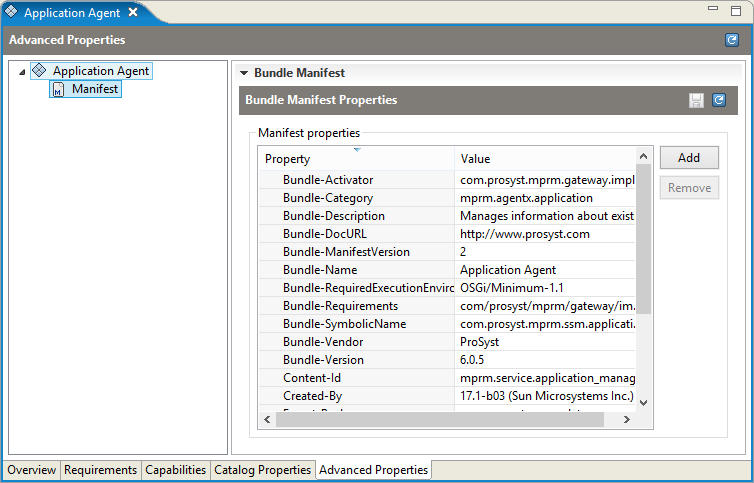
If the bundle JAR of an OSGi Bundle is signed, you cannot edit its manifest properties.
You can change all headers except the ones for the name, version and vendor of the bundle.
To add a new manifest header:
- Click the Add button in the Bundle Manifest Properties pane of the selected bundle manifest.
A row with two fields appears.
- Type the header name and value respectively in the Property and Value text fields.
- Click Save to validate the changes.
To remove a header from the manifest, select the header in the Bundle Manifest Properties pane and click the Remove button.
Conditional Configuration
An OSGi bundle variant can also have a conditional configuration that applies to a range of device platforms filtered by a set of platform requirements. A conditional configuration wraps configuration properties' values that automatically replace the ones in the original configuration if the OSGi bundle is deployed on a platform matching the criteria in the requirements set. You can preliminary define conditional configurations for a bundle in an XML holding the platform requirements and the configuration properties to change. This XML should be placed in the bundle JAR. For more information about the conditional configurations of an OSGi bundle, refer to Conditional Configurations.
To define and modify a conditional configuration in the Software Repository, the target bundle should provide a metadata XML file according to the Bosch Digital implementation of the OSGi Configuration Admin service or in accordance with the XML schema defined in the OSGi Metatype Service from the OSGi Service Platform Service Compendium, Release 4.
The conditional configurations of an OSGi bundle are shown as nodes in the Advanced Properties tab for the selected bundle. The Software Repository allows you to add, remove or edit a conditional configuration.
For each conditional configuration there is a set of platform requirements which can be viewed and edited from the <Conditional_Configuration_Name> node. There are also one or more configuration dictionaries associated with it which are displayed as subnodes of the respective <Conditional_Configuration_Name> node and bare the name of the bundle configuration. For each configuration dictionary a separate property editor loads.
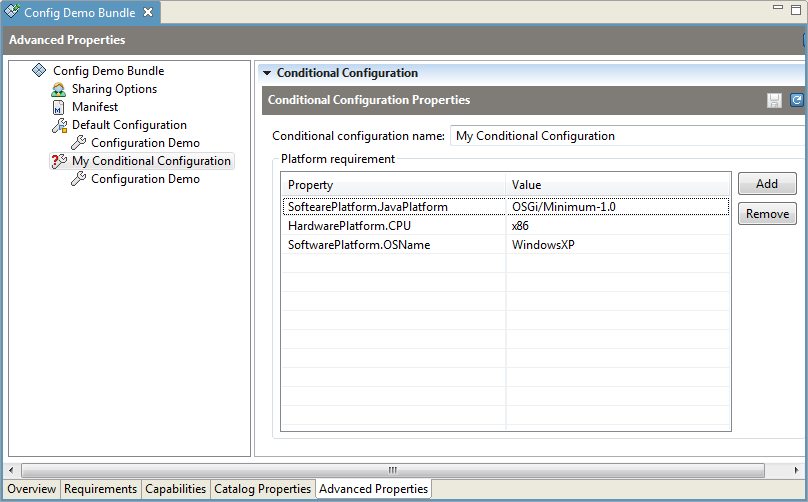
To create a new conditional configuration:
- Select the root that represents the OSGi bundle from the Advanced Properties tree.
- Right-click it and and use the Create Conditional Configuration option from the popup menu.
A Create Conditional Configuration dialog appears.
- Type the name of the new conditional configuration in the Conditional configuration name text field.
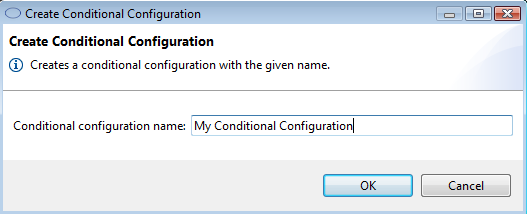
- Click OK to finish the task. Otherwise, use Cancel.
- As a result, the new conditional configuration will appear under the selected OSGi bundle.
To edit the platform requirements of a conditional configuration:
- Select the node representing the conditional configuration.
- Press the Add button in the Platform Requirements pane.
A row with two empty text fields appears.
- Type the requirement attribute in the left text field.
- Specify the value of the platform requirement in the right text field.
- Click Set to save the changes you made. Otherwise, use Reset.
To remove a requirement, select it from the Platform Requirements pane and press the Remove button. To save the changes, select the Save button.
To change the name of a conditional configuration, type the name in the Conditional configuration name text field. Click the Save button.
To edit bundle configuration properties or configuration entries:
- Select the subnode representing the bundle configuration under the conditional configuration node.
- Modify the properties of the bundle configuration:
- Check the box next to the property to edit.
- If the property can have more than one value, use the Add button to add a new element or the Remove button to remove one. Use the up and down arrows to go through the available components.
- If the property is a single object, edit its value straight in its text field.
- Use Save to save the changes.
To remove a conditional configuration, right-click on the selected conditional configuration and use the Remove conditional configuration option of the popup menu. The selected conditional configuration is removed from the Software Repository.
In addition, there is an option to restore the default conditional configuration of an OSGi bundle. To use this option, right-click on the specific OSGi bundle node and select the Restore Original Conditional Configurations option from the popup menu. The default conditional configuration from the OSGi bundle JAR is restored.
Configurations
You may extend the existing configuration of an OSGi bundle with a configuration variant so that to meet specific situations. A configuration variant holds values of the configuration properties that satisfy some specific requirements on bundle deployment. For example, turning off security to save system resources if the target device resides in an area where extra security already exists. More information about configuration variants is available in the "Bundle Configurations" section of the OSGi Bundles in the Software Repository document.
You can view configuration variants of a bundle from the Default Configuration subnode of the selected bundle. By default, the predefined configurations are shown as subnodes of the Default Configuration node.
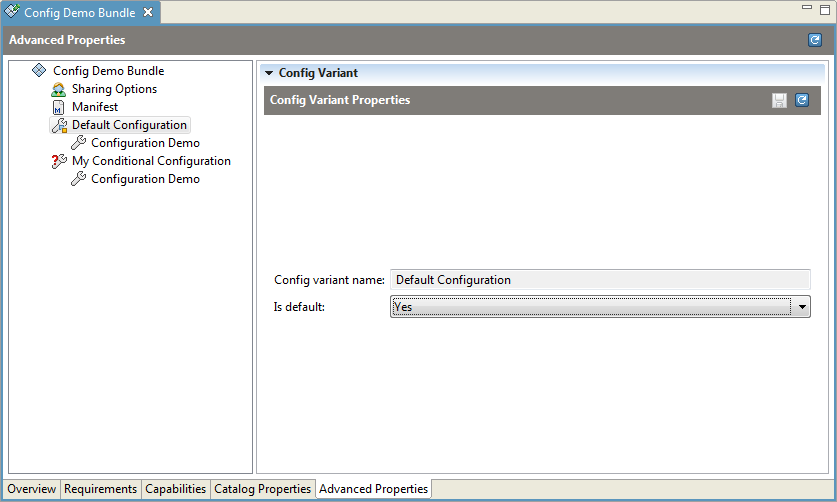
There is always one configuration variant, the one set as default (shown through the Default Configuration node under the specific OSGi bundle). The default configuration is automatically passed when the bundle is installed on a device. Initially, the default configuration is the one, stored in the XML file. You can also edit the default configuration to satisfy additional installation needs.
To make a variant default:
- Select the node representing the configuration variant which you want to become the default one.
- Select the Yes option from the Is default combo box.
- Click the Save button at the top to apply the change.
The selected configuration variant becomes the default one for this OSGi bundle.
You cannot remove the default configuration variant.
To define a new configuration variant:
- Select the OSGi bundle root from the Advanced Properties tab shown for a selected bundle.
- Right-click on the bundle node and use the Create Configuration Variant option from the popup menu .
- Type the name of the configuration variant in the Variant name text field.
- Click OK to confirm creating the configuration variant. Otherwise, use Cancel.
The newly created configuration variant appears as a subnode of the specific OSGi bundle. The available configuration properties for it appear as a separate node under the <Configuration_Variant_Name> one. Select this configuration sub-node to view the properties and to be able to edit them. To modify a configuration variant:
- Select the node representing the configurations properties.
The properties appear underneath in the Configuration Properties pane.
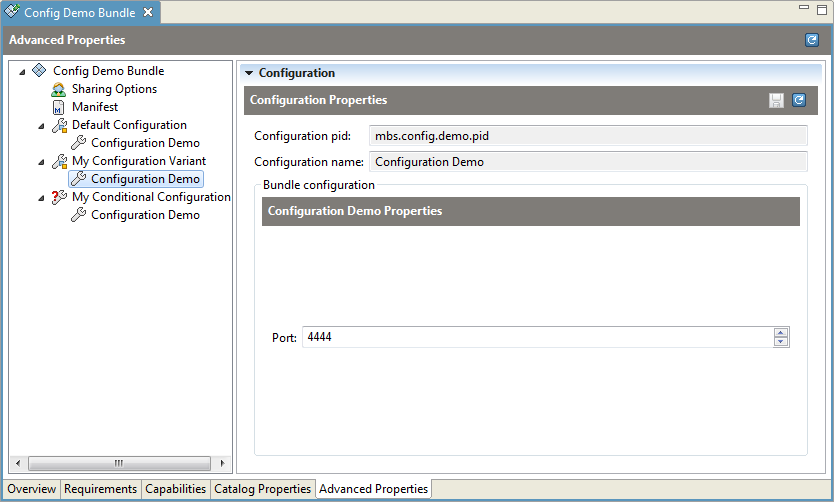
- Specify the values of the properties you want to modify in the configuration variant.
- If there is a check box, check it to be able to edit the corresponding property.
- If the property can have one or more values, use the Add button to add a new element or the Remove button to remove one.
- If you want to change the value of a single object, type its value straight in the text field against the property name.
- Press Save at the top to save the changes.
For a factory configuration besides editing an existing configuration (as described above), you can create a new one:
- Right-click the specific factory configuration node and select the Add Configuration option from the popup menu.
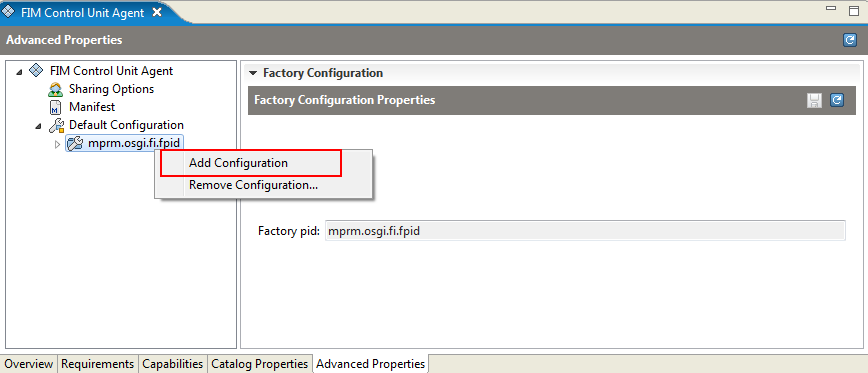
The new bundle configuration appears under the <Factory_Pid> node.
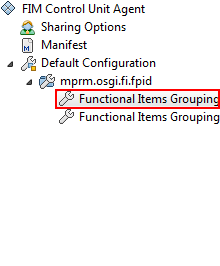
- You can now edit the properties of the configuration. See the steps described for editing bundle configuration properties in Conditional Configuration.
Driver
RM allows the administrator to specify the properties of a driver bundle so that it is located and installed on a device, which needs it. In this way, the driver vendor can benefit from the RM Driver Locator capabilities.
To declare a bundle as a driver:
- Select the OSGi bundle from the Software Repository dashboard view and go to the Advanced Properties tab at the bottom.
- Right-click the selected OSGi bundle node and call the Device Driver command from the popup menu.
A Device Driver dialog appears prompting the user to enter ID of the driver.
- Type the device driver ID in the Driver ID text field.
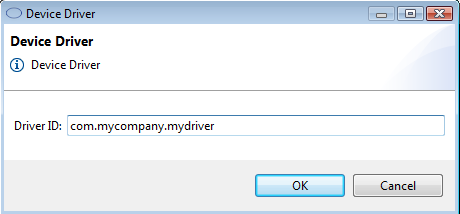
- Confirm with OK.
As a result a Driver subnode will appear under the selected OSGi bundle in the Advanced Properties tab. The Driver node allows you to enter the properties of devices the driver is designed for.
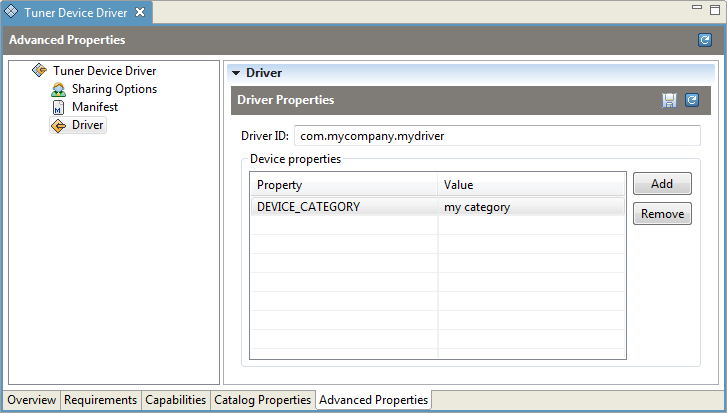
To edit the driver ID, type the desired value in the Driver ID text field and press the Save button to confirm.
To edit the driver properties:
- Select the Driver node under the specific OSGi bundle.
The device driver properties appear in the Device properties pane.
- Press the Add button.
A row with two columns appears.
- Enter the property name in the left field. Type the property value in the right field.
- To save the changes press the Save button.
To remove a property/value pair of device driver properties, select it from the Device properties pane and press the Remove button. To save the changes, press the Save button.
Full description of the possible features follows:
Property | Description |
|---|---|
DEVICE_CATEGORY | A marker property indicating that this service must be regarded as a Device service by the device manager. A device category is a mark of the specific features of a device service and enables interoperability between device management bundles that are based on the same underlying technology. |
DEVICE_CLASS | A marker property indicating the class. |
DEVICE_MAKE | Specifies the make of the device. |
DEVICE_MODEL | Gives information about the model. |
DEVICE_REVISION | An indicator of the specific revision of the device. |
DEVICE_SERIAL | A unique serial number for this device. If the device hardware contains a serial number, the driver bundle is encouraged to specify it as this property. Different Device services representing the same physical hardware at different abstraction levels should set the same DEVICE_SERIAL therefore simplifying identification |
The system administrator is able to add additional device specific properties as well, such as DEVICE_DESCRIPTION , which describes the actual hardware device to end users.
Permissions
You can specify the permissions in advance that a bundle needs to operate properly on a device with security on. When deployed on the device, the bundle will request the permission from the security management module there. Briefly, a permission has a class name, target and action. Refer to the Managing Permissions on OSGi Devices document for more information on permissions in RM.
To view the permissions that the OSGi bundle must have on the device(s), go to the Advanced Properties tab at the bottom of the console and select Permissions subnode of the selected OSGi bundle. The permissions of the bundles are listed in the right pane.
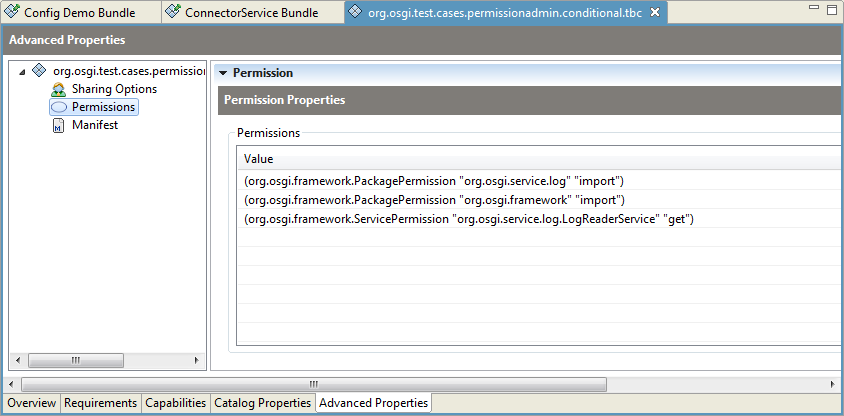
The current version of the RM does not support editing the OSGi bundle permissions.
Certificate
If the bundle JAR is signed, you can view the signer own certificate from the Certificate subnode shown in the Advanced Properties tab for the selected bundle at the bottom of the Software Repository dashboard view.
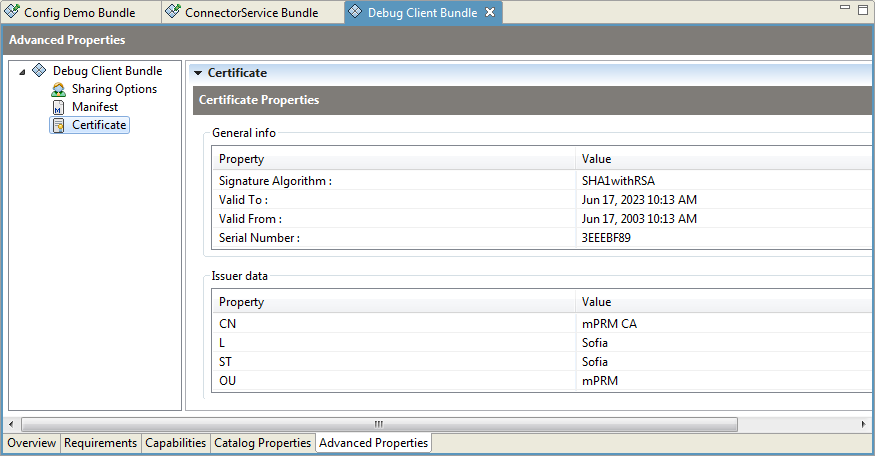
You can add the OSGi bundle certificate to the Certificate Database. Right-click the Certificate subnode and select the Publish Certificate option of the popup menu.
As a result, the certificate will be added to the RM Certificate Database.
Managing OSGi Bundles
Adding OSGi Bundles to the Software Repository
You can import OSGi bundles, residing on local paths, into the Software Repository. To add a new OSGi Bundle, execute the following operations:
- Go to the Software Repository dashboard view and select OSGi Bundles from Quick Views on the left. The list of OSGi bundles will appear on the right in the OSGi Bundles pane.
- From the OSGi Bundles pane click the Import New OSGi Bundle action.
The Import Components wizard dialog appears.
- Click the Add button and select the bundle(s) to import from your local file system. When ready, press Next to process the importing of the OSGi bundle.
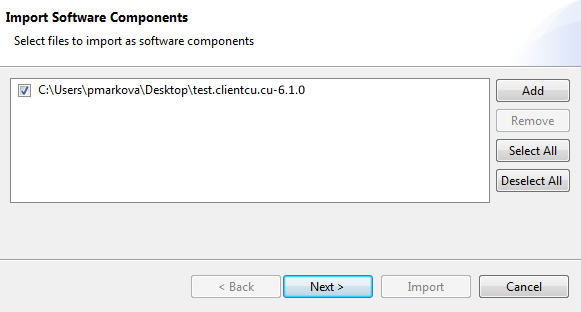
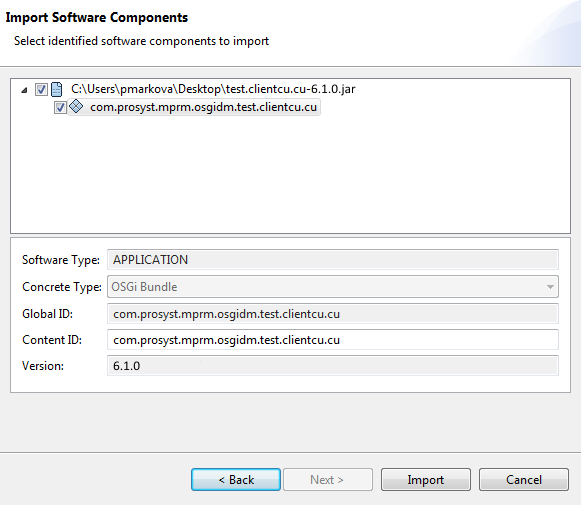
- The next dialog shows the client bundle properties of the OSGi bundle that will be added to the Software Repository. Optionally, you can change the content ID of the imported OSGi bundle by typing the desired one in the Content ID text field. Press Next to continue with importing.
- The next screen of the wizard is displayed when the import operation is completed and provides information about its results. There you can view the general characteristics identified by the Software Repository during the first stage of the process.
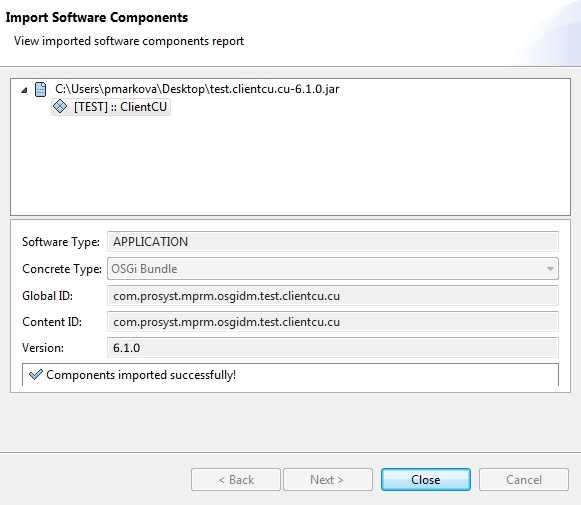
- Click Finish to confirm.
The bundle you have imported appears as an entry in the OSGi Bundles list in the Software Repository.
Updating OSGi Bundles
You can also update an OSGi Bundle, following these instructions:
- Select the bundle in the OSGi Bundles list.
- Use the "update OSGi bundle" command of the Software Repository:
- Select the Update Content action from the action list on the right.
- Right-click on the selected OSGi bundle and choose the Update Content option from the popup menu.
- Specify the location of the update OSGi bundle in the file chooser that appears.
- Press OK to confirm your selection. Otherwise, use Cancel.
Removing OSGi Bundles from the Software Repository
To remove an OSGi bundle from the repository:
- Select it from the OSGi Bundles list.
- Use the "delete" command of the Software Repository:
- Invoke the Delete Component action from the action list on the right.
- Right-click on the desired OSGi bundle and select the Delete command from the popup menu
The Delete Confirm dialog appears.
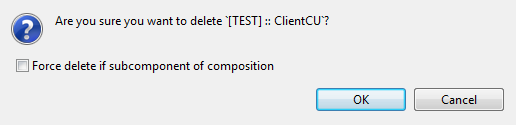
- Select OK to confirm the OSGi bundle removing or Cancel to cancel it.
The selected OSGi Bundle is removed from the Software Repository.