Overview
TR-069 devices registered in RM are placed in a hierarchical tree created according to the system administrator's needs or preferences. Some of the advantages that this arrangement brings are:
- The load of managing a large number of devices registered in the system can be distributed among a set of management servers, each responsible for its own branch of the tree.
- Searching for a particular device is much easier.
- You can define management scripts and rules over a whole set of devices that are forming a separate branch of the tree.
The TR-069 devices are placed in the device management tree, shown in the Device Management dashboard view.
For each device, which has connected to RM at least once, the Management Console provides a user-friendly representation as a root node containing functional nodes. The functional nodes include device information, authentication information, a generic parameter browser, optional CPE methods and components created by means of tree-to-CU mapping (such as the Managing Software Modules).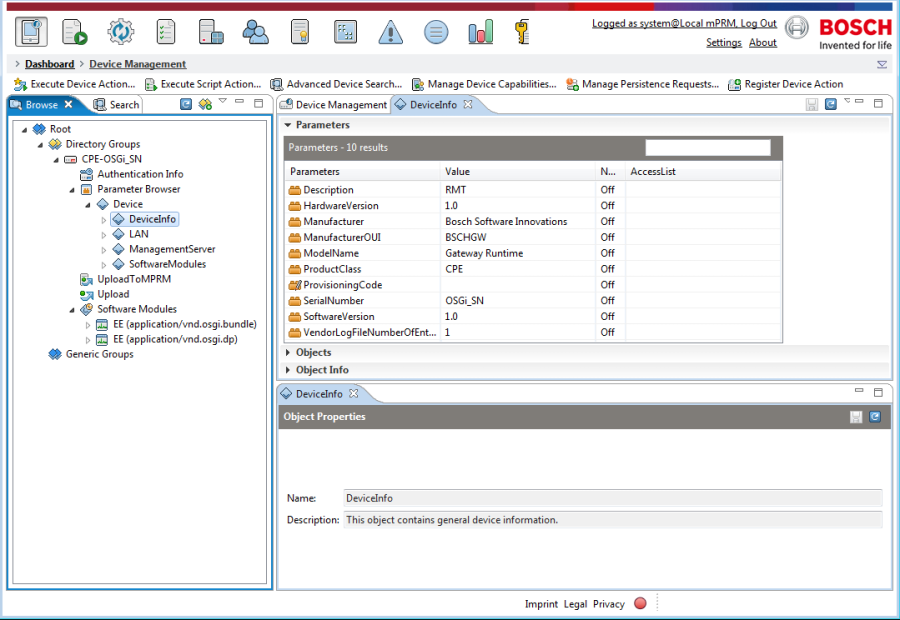
Figure 1: . General view of registered TR-069 devices in mConsole.
Managing a Device Node
This section describes the actions, that can be executed over a TR-069 device.
Device Status and Properties
TR-069 devices are labeled with their product class and serial number as <product_class>-<serial_number>. Depending on its connection status, each device is shown as  when it is online and as
  when it is offline.
In general, for a selected device the following information is shown:
- General device properties tab showing: information about the device, such as serial number, OUI, product class, manufacturer, etc.; alerts and logs related to the device; pending management operations; and device capabilities. The Device Info expandable pane is populated with data from the TR-069 Device Manager, while the information in the other ones (Device Alerts, Device Logs, Device Preferences, Pending Operations, etc.) is generally provided by the RM generic device management system.
- Device node properties tab containing settings for configuring TR-069 communication, security, authentication and general behavior. See the "Inheritable TR069 Device Properties" from the TR-069 Device Management Configuration document for a full description of the node settings.
Registering a New TR-069 Device
To have a TR-069 device registered in a special group when the device connects to RM for the first time:
- Click the Register TR069 Device action from the administration toolbar, or right-click on the group the new device will be inserted in or on the device root node and select TR069 Device -> Register TR069 Device from the popup menu.
- In the shown Register TR069 Device dialog, specify the Organization Unit Identifier (OUI), product class and serial number of the device. Confirm with OK.
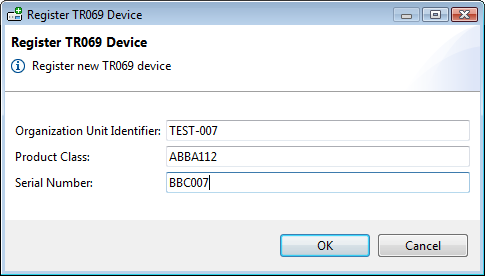
Figure 2: . Specifying the properties of the device to register.
As a result, the newly-defined device will be inserted in the device tree with empty DeviceInfo and AuthenticationInfo nodes. The information there and the other functional nodes will be populated after the device contacts RM over the TR-069 protocol and the backend is able to retrieve the needed data.
The general information about registering a TR-069 Device can be found in the Conceptual Guide - see Registering a TR-069 Device from the TR-069 Device Management Model document.
Connecting a TR-069 Device
To initiate a connection to a registered TR-069 device, right-click on it and use the Connect command from the popup menu. As a result, RM will try to contact the device and trigger an instance session. On success, the backend will launch for execution the management operations pending on the device.
Synchronizing a TR-069 Device
Synchronizing a TR-069 device means requesting explicit update of the information about the state of all its components and properties. Normally, you don't need to request synchronization in order to get up-to-date information about the device because RM takes care of synchronizing the information stored on the RM backend with the real state of the device.
To request synchronization of a device:
- Right-click on a TR-069 device from the management tree.
- Select the Synchronize command from the popup menu.
Rebooting a TR-069 Device
Right-click a TR-069 device and select the Reboot command from the popup menu.
Unregistering a TR-069 Device from the Device Tree
To remove a device from the list, right-click on the target device and use the Unregister command from the popup menu and confirm with Yes. As a result all the information of the device will be deleted from the system and the device will not apper in the tree.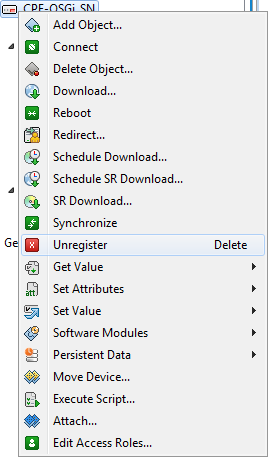
Figure 3: . Unregister action from the context menu of a TR-069 device.
You can also use the Delete short-cut key instead.
Getting Device and Authentication Information
RM shows the most important device properties and authentication settings in separate nodes within the device tree.
The Device node is under the Parameter Browser and its Device Info node contains information about description, hardware version, manufacturer, etc, provided at the Parameters pane to the right of the Console: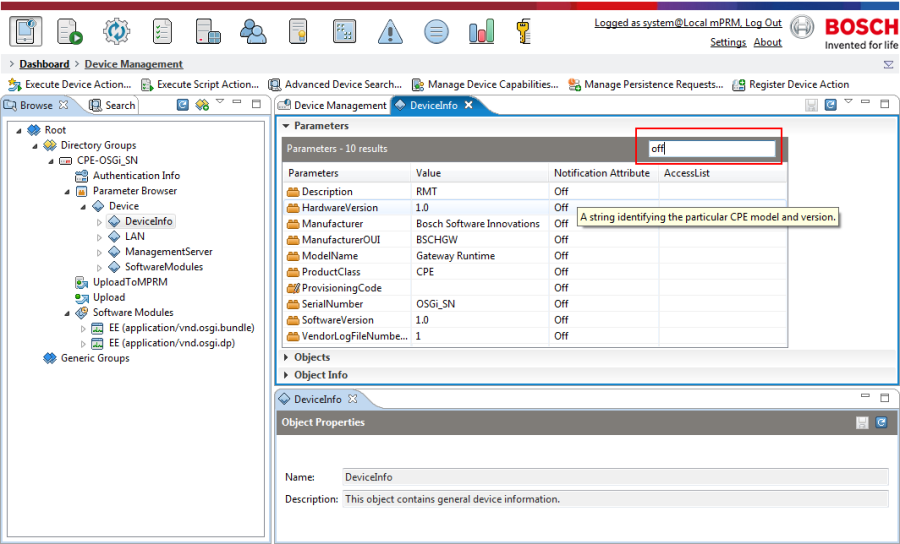
Figure 4: . DeviceInfo parameters pane view.
The field in red above provides search for a string in every column.
When selected, the Authentication Info node opens a pane to the right with the TR069 Device Authentication Properties. It shows if the connection is over HTTP or HTTPS and which authentication mechanism is used along with the user name and the certificate the device has specified: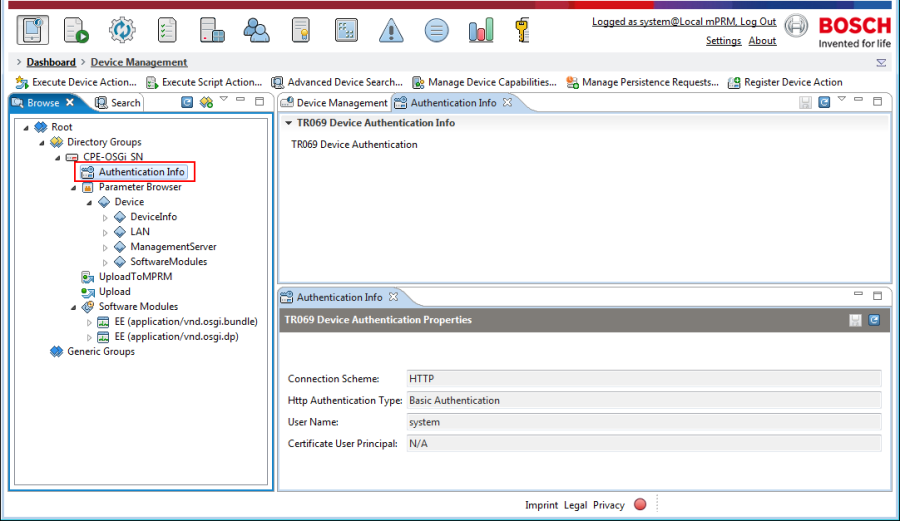
Figure 5: . TR069 Device Authentication Properties pane.
Managing TR-069 Device Parameters
The Management Console provides a visual interface to RM's generic browser for device parameters. The parameters tree communicated from the device are shown in the Parameters pane in the right side of the Console, when the ManagementServer under the node of Parameter Browser attached to the device root node, is selected. The Console shows the DMT node properties sent by the device the last time it has connected to RM. The commands available on a node are defined in the TR-069 Protocol specifications.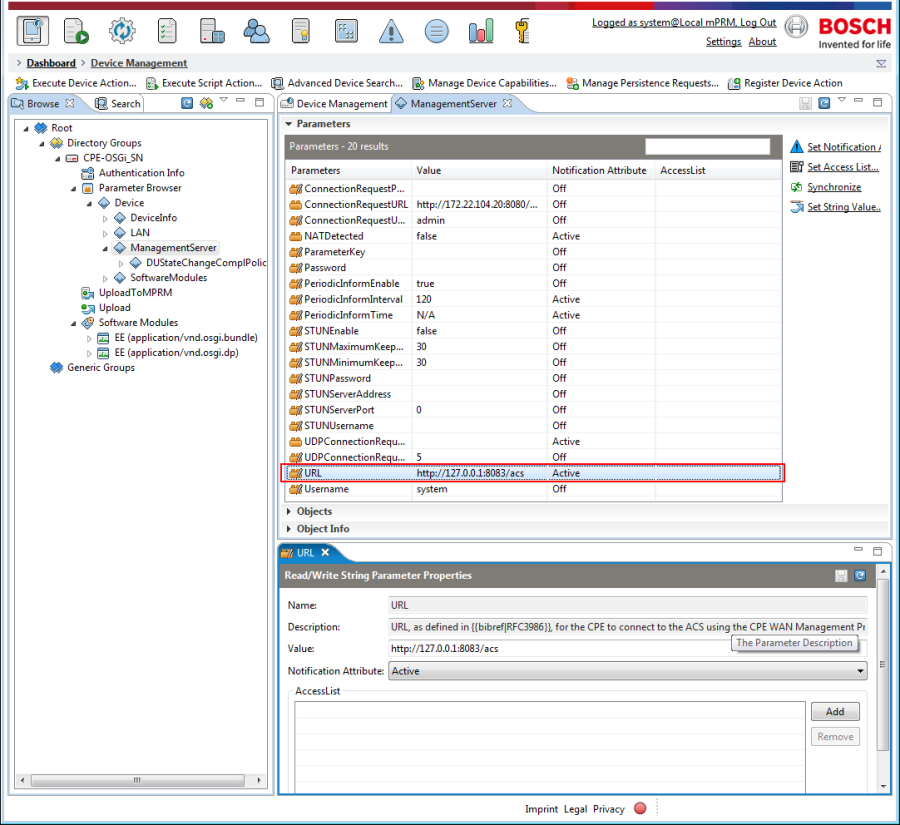
Figure 6: . Modifying TR-069 device properties.
To save the new value of the properties, click on the icon in red.
Parameter Browser Nodes
Following is a table showing how the Parameter Browser visualizes the nodes of a TR-069 device:
Icon | Node Type |
|---|---|
| Multi-object parent node |
| Multi-object node |
| Object node |
| Read-write parameters |
| Read-only parameter |


For an object node, its descendants (other objects or parameters) are shown as its sub-tree. When selecting the object, its properties appear on right including:
Child objects and parameters
The Management Console shows only child nodes of the first six types returned for the node.
- Object Properties with Name and Description of the object
For a parameter node, you can view its value and attributes, that is Name, Description, Value, Notification Attribute and AccessList.
Changing a Parameter Value
To modify the value of a read-write parameter, simply select it from the device tree, and in the Value field from the parameter properties tab on the right choose the new value from a pre-defined list or type it. Click the Save button to apply the changes.
Managing Attributes
The attributes of objects and parameters can easily be changed.
The Management Console offers two approaches in setting attributes - for a single parameter or for all parameters within a sub-tree:
- For a single parameter, simply select it and modify the relevant attribute on the right within the parameter properties tab (see also the following figure. Modifying TR-069 device properties):
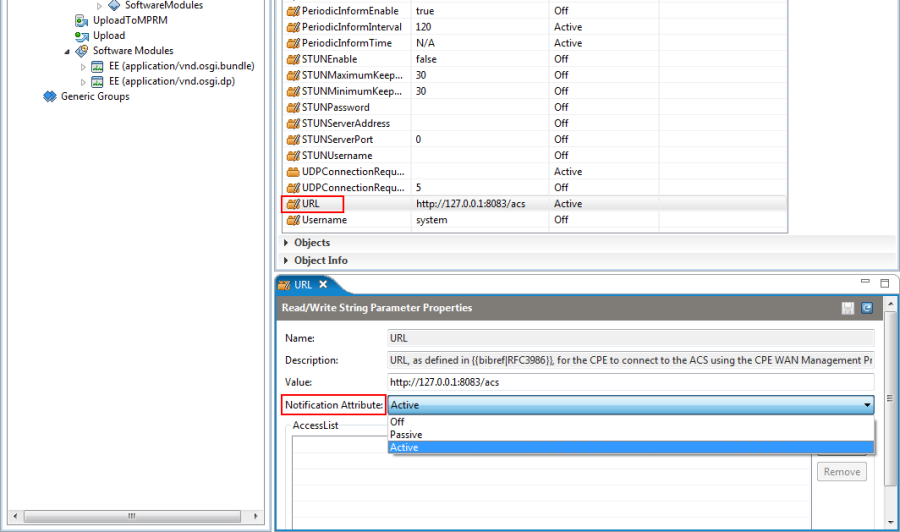
Figure 12: . Setting the attribute for a single parameter.
- For a sub-tree, right-click on the root node of the sub-tree and select Set Attributes from the popup menu. In the Set Attributes dialog that appears, modify the target attributes and click OK:
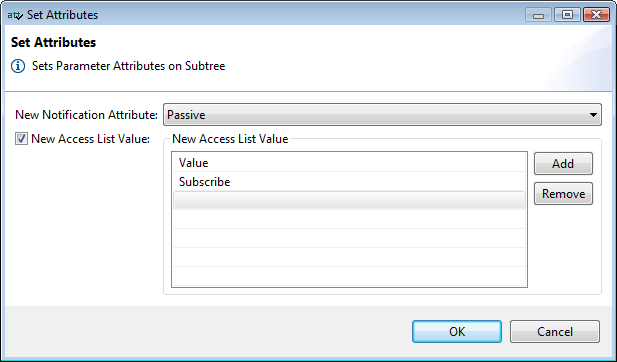
Figure 13: . Setting the attributes of all parameters within a branch.
Setting Notification
The notification attributes TR-069 node are important node settings as they enable receiving signals about changes in important device characteristics. To configure notification:
- For a selected parameter, modify the Notification Attribute field shown on the right.
- For a selected sub-tree, choose the proper value from the New Notification Attribute combo box (see the figure above).
The possible values for notification are as follows:
- Do Not Change - for objects only. The current value of the Notification Attribute for each contained parameter will not be changed.
- Off - the device need not inform RM when the value of the specified property(/ies) change.
- Passive - whenever the specified property value changes, device must inform the RM. This information is sent the next time when a session is established to the RM.
- Active - whenever the specified property value changes, the device initiate a session to the RM to inform it about the changes.
Modifying the Access List
The access list defines the entities for which write access to the specified property(ies) is granted. If there are no defined entries, access is only allowed from RM. Currently, the TR-069 standard defines only a single entry called Subscriber.
To change the access list:
- For a selected parameter, modify the Access List shown on the right.
- For a selected sub-tree, populate the New Access List as shown above.
Adding an Instance of a Multi-Object Node
An instance of a multi-object node can be added where the AddObject CPE method is supported. The resulting sub-node will be populated with the default values of the member parameters.
To generate a multi-object instance on a device, right-click the multi-object parent node from the Parameter Browser and select Add Object from the popup menu.
Downloading Content to a TR-069 Device
From the Software Repository
To download a file stored in the RM Software Repository:
- Right-click the TR-069 device node from the device management tree and select the SR Download command from the popup menu. A SR Download dialog appears.
- In the SR Download dialog, select the software depository with a click on the icon in red below:
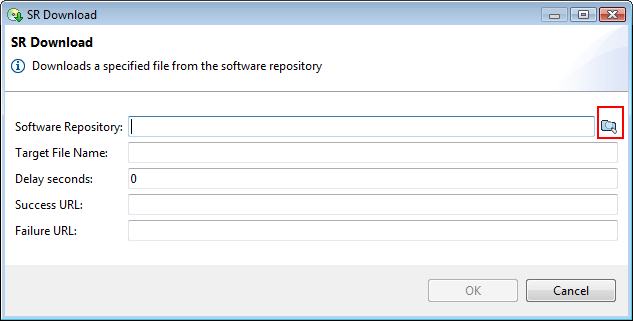
Figure 14: . SR Download dialog box.
- Choose the file from the Software Repository to place on the device:
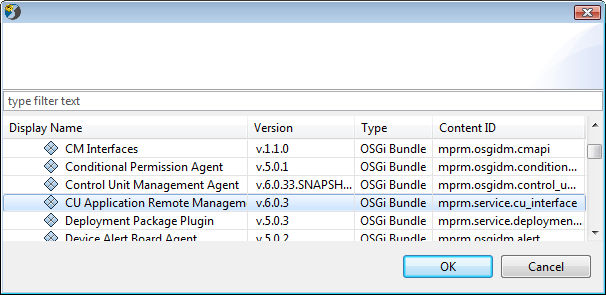
Figure 15: . Downloading content from the RM Software Repository to a device.
- Specify a target name for it if needed and click OK:
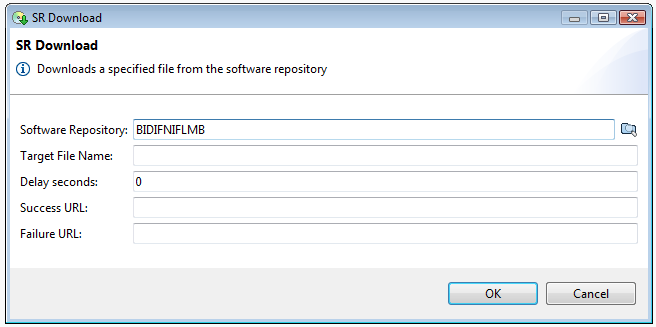
Figure 16: . SR Download dialog box.
As a result, the file will be transferred on the target CPE device. The RM ACS will manifest to the CPE a type defined in the TR-069 specification as configured in the TR-069 Download Manager Configuration.
From a Location External to RM
To download a specific file from a location on a custom Web server:
- Right-click the TR-069 device node from the device management tree and select the Download command from the popup menu. A Download dialog appears.
- In the Download dialog, specify the following download settings and click OK:
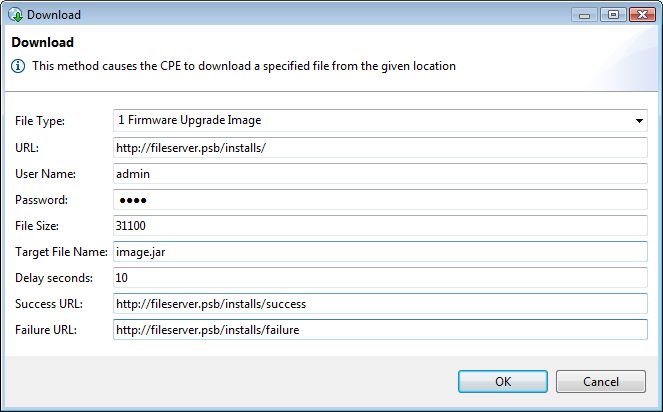
Figure 17: . Downloading content on the device from a Web server
- File Type - The content type according to the TR-069 standard:
- Firmware Upgrade Image
- Web Content
- Vendor Configuration File
- Tone File
- Ringer File
- URL - The URL where the content is published.
- User Name - The user name that the TR-069 device is to use to authenticate to the Web server.
- Password - The password that the TR-069 device has to use to authenticate with the Web server.
- File Size - The size of the file to be downloaded.
- Target File Name - The name of the file to be used on the target file system. This argument may be left empty if the target file name can be extracted from the downloaded file itself, or from the URL argument.
- Delay seconds - The seconds for delay.
- Success URL - If the download completes successfully, the device will redirect the user's browser to the given URL. Valid only if the download has been initiated from a browser-based application.
- Failure URL - If the download does not complete successfully, the device will redirect the user's browser to the given URL. Valid only if the download has been initiated from a browser-based application.
Upon success, a confirmation dialog will appear.
Redirect Action
The Redirect action allows redirection to different ACS with potentially different user. It can be invoked from the context menu of the CPE device.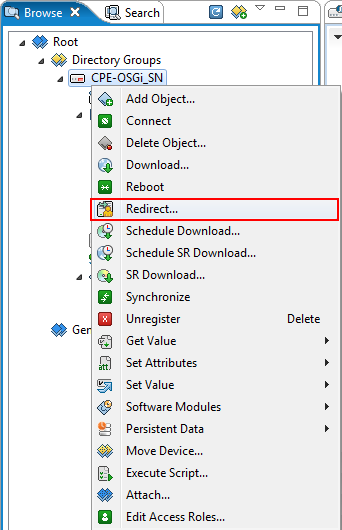
Figure 18: . Redirect action from TR-069 device context menu.
A dialog box appears and the URL of the target ACS should be specified, along with the User Name and the password, used to authenticate the CPE when making a connection to the ACS using the CPE WAN Management Protocol.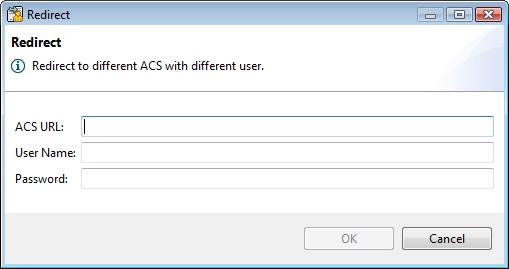
Figure 19: . Redirect dialog box.
Calling CPE Methods
The CPE mandatory methods AddObject, DeleteObject, Download, Reboot, GetParameterValues, SetParameterAttributes, SetParameterValues can be called directly from the context menu of the device after a right-click on it: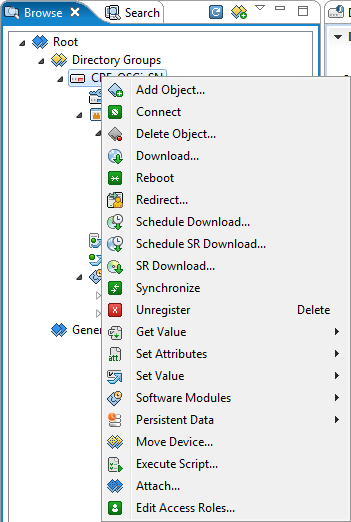
Figure 20: . CPE Methods view from the TR-069 device context menu.
When the dialog box of the chosen method appears, fill in the necessary information accordingly.
Calling Optional CPE Methods
If a device supports certain optional CPE methods, defined in the TR-069 specification or added by a device vendor, the Console conveniently shows them as separate nodes under the device root.
To call the method, right-click on its node and select the method from the popup menu. Next, fill in the required arguments and click OK.
Node | CPE Method according to TR-069 |
|---|---|
| FactoryReset |
| Upload |
| ScheduleInform |
| GetQueuedTransfers |
| GetOptions |
| SetVouchers |
| - |


Task Execution
The user can execute an action on a group of devices simultaneously by using Scripting and Rule-Based Automation features of RM. In particular, the user starts task execution for content download, setting values of parameters and handling deployment units (see Managing Software Modules).
To make a group of devices execute some of the supported mass actions, right-click the group from the device management tree and select the action from the TR069 Device sub-menu. Follow the wizard to specify the target and configure precisely the execution of the resulting operation. The result from the task execution and rule details are provided in Execution Status box and more information - in Overview and Tasks tabs.