Provides general guidelines on using the Remote Manager administrative frontend interface.
Administrative UI Interfaces
The IoT Remote Manager comes with Web-based interface one can deploy typically on a single location and then accessed by the involved users over HTTP:
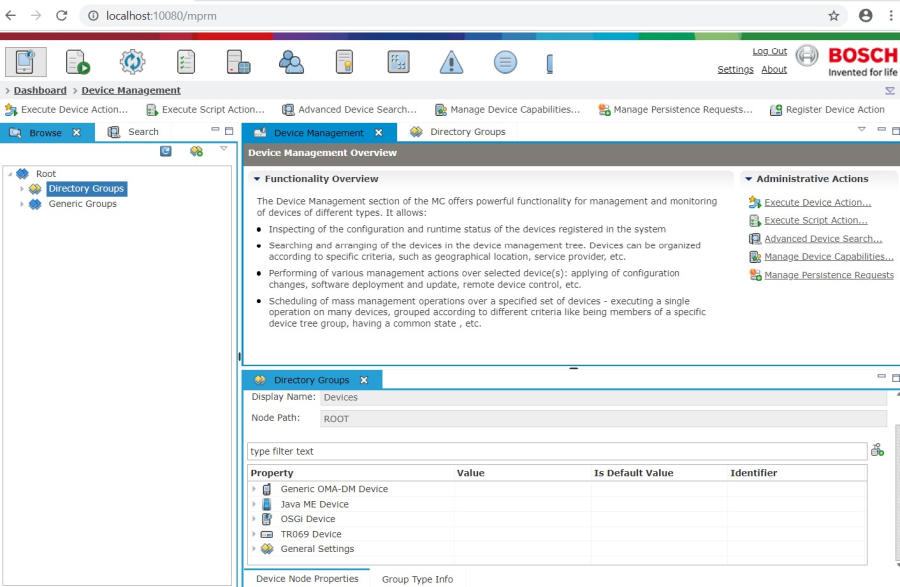
Starting the Console
Starting the Standalone Console
The console could be started: Either through the Management Console (MC) shortcut in RM's program folder in the Start menu, or by executing the console script located in the bin directory of the RM's installation.
Starting the Web Console
Start the Web Console on the dedicated host by using the Web Management Console shortcut in RM's program folder. Also by executing the consoleweb script located in the bin directory of RM's installation.
To reach the Web Console, use a Web browser and enter the following URL:
http://<console_host>:10080/mprm
Where <console_host> stands for the IP address or the DNS name of the host where the Web console is running.
Configuring the Web Console for HTTPS
To enable the use of the Web console over HTTPS follow the below steps:
- Go to the mrpm_root/bin directory and edit the file used to start the Web Console: either consoleweb.sh, consoleweb.bat or consoleweb_bg.
- Go to the line that starts with "java"
- Add the following parameters before the "-jar .\plugins\org.eclipse.osgi_3.7.2.jar -consoleLog -debug -clean" line:
- -Dorg.eclipse.equinox.http.jetty.https.enabled=true
- -Dorg.eclipse.equinox.http.jetty.https.port=10443 (the port to listen for https connections)
- -Dorg.eclipse.equinox.http.jetty.ssl.keystore=./keystore/httpskeystore (the location of the keystore, in this case it is in rm_root/bin/consoleweb/keystore, httpskeystore is the name of the file)
- -Dorg.eclipse.equinox.http.jetty.ssl.keypassword=test (keypassword for the keystore, defined when the keystore is created)
- -Dorg.eclipse.equinox.http.jetty.ssl.password=test (password for the keystore, defined when the keystore is created)
- After the start script is modified put the keystore in the specified location.
To start the Web Console over HTTPS go to *https://webconsole_location:https_port/mprm*
Additional information about creating the required keystore can be found at: https://docs.oracle.com/javase/tutorial/security/toolsign/step3.html
Connecting to RM
When you open the console, your first task is to connect to RM.
- Select an RM server from the available server's list in the left pane.
- Click the Login button.
To log out from RM, use the Log Me Out action at the top right corner of the console.
Console Components
Dashboard
The central point of navigation in the console is the dashboard. It contains links to the dashboard views which build up the functionality of RM accessible to users.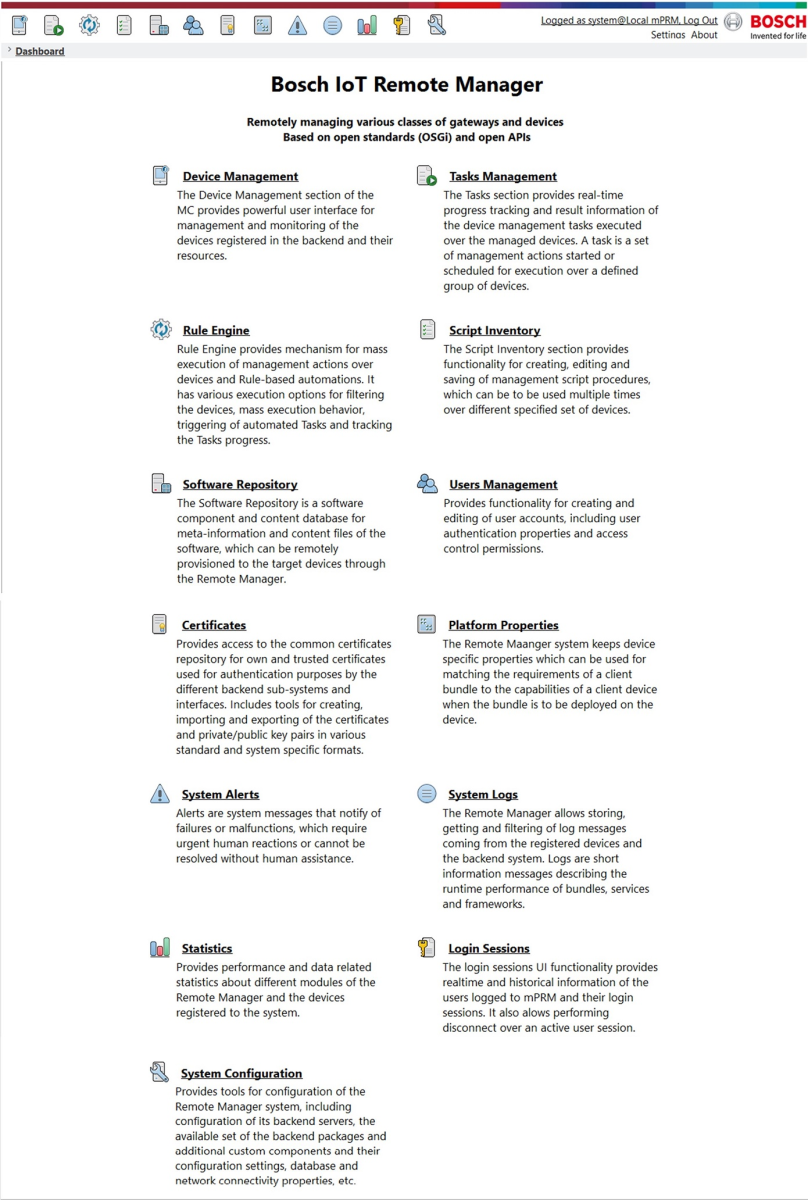
When connected to an RM system the following functional views are available from the dashboard:
Node | Description |
|---|---|
Device Management | Provides means to manage the devices registered in RM. |
Tasks Management | Real-time progress tracking of the device management tasks. |
Rule Engine | Real-time progress tracking of the RM Rules Engine. |
Script Inventory | Provides functionality for creating, editing and saving of management script tasks. |
Software Repository | Allows you to save software components for deployment on specific devices. |
Users Management | Enables user administration throughout the RM system. Non-administrator users can only change their password and manage their preferences and service subscriptions. |
Certificates | Provides access to the Certificate Manager, which stores certificates, used for signing software components and for certificate-based authentication. |
Platform Properties | Device specific properties. |
System Alerts | Allows the administrator to monitor the system by checking alert messages about problems or errors occurring somewhere in the system. |
System Logs | Allows you to view the generated logs on the RM system. |
Statistics | Shows statistics generated in RM. |
Login Sessions | Real-time and historical information for the users' login sessions. Also alows disconnection of an active user session. |
System Configuration | Allows configuration of the RM backend system in terms of database storage, distribution of hosts, etc. |
Basic Elements in a Dashboard View
Basically, a dashboard view in the console consists of the following elements:
- Dashboard buttons - Provide shortcuts to the dashboard views of the console.
- Navigation bar - Contains the navigation path to the active element. Click on an element within the path to open to it quickly.
- Toolbar - Contains shortcut buttons to the currently available administrative actions.
- View navigation area - Provides navigation within the view.
- Main area - Displays the functionality provided by a selected component from the view navigation area.
- Actions list - Shows the actions that you can presently execute.
- Monitoring bar - Signals that there is an alert or error and provides quick access to the it.
- Status bar - Shows the execution status of an operation.
The following figure illustrates the console: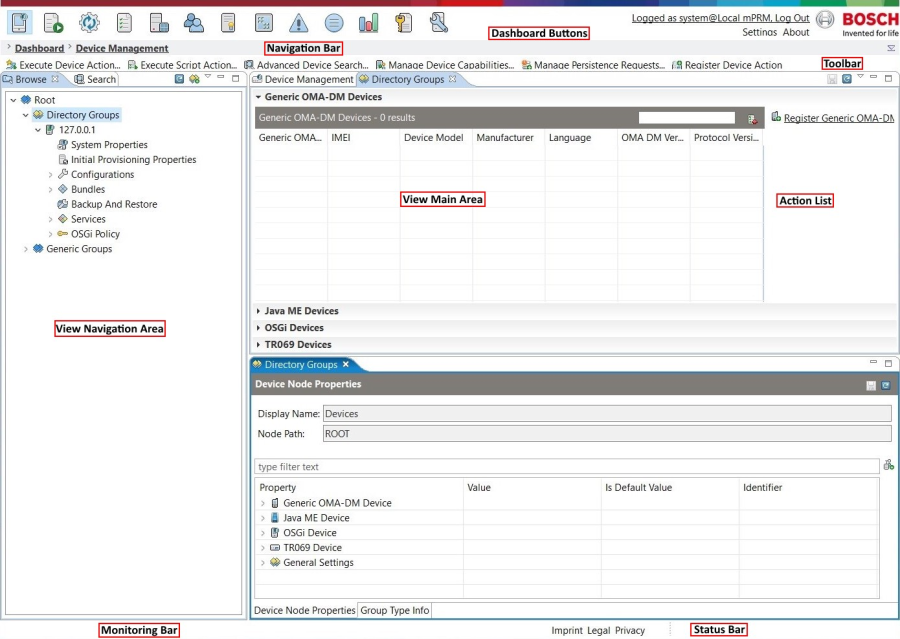
RM Server Connection Properties
When you choose a server, its connection properties will appear in the right panel: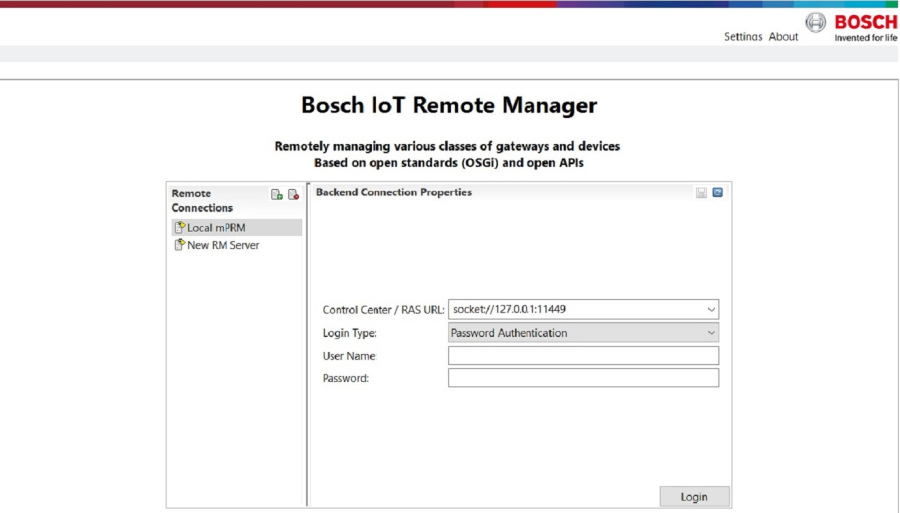
The provided properties are as follows:
- Login Type - Shows the connection's login type.
- Password Authentication means that the console will authenticate itself to the RM server only on a basis of the supplied user account in the User Name & Password fields.
- Certificate Authentication - External Certificate File means that the console authenticates itself by using certificate credentials (certificate chain and keys) owned by the specified user in the form of a PKCS#12 file.
- Certificate Authentication - Security Context Bundle means that the login certificate credentials of the user are provided in the form of a Security Context Bundle holding user's private key and certificate.
- Control Center/RAS URL -The URL of the RM control center or of a remote access server which will handle incoming MC requests. Connecting to the control center will allow you to perform system configuration operations (configure server nodes, install new packages, change network mapping or configure database storage). Otherwise, a remote access server and the control center are interchangeable. Use one of the following connection types:
- For plain connection over TCP - socket://<rm_server_host>:11449 Should be used in trusted environments, where the interception of the console-to-RM backend connections does not constitute a security risk. Provides the best performance.
- For secure connection over SSL - ssl://<rm_server_host>:11443 Should be used to establish a secure certificate-based console-to-RM backend connection. The credentials for the secure connection must be supplied in a password protected key store, loaded from the local file system either as a bundle or as a standalone keystore in PKCS12 format. Connection over SSL requires additional configuration on both the console and RM backend - refer to the "Connecting to RM over SSL" section above for more information.
- For plain connection over HTTP to a specific server port - stream://<rm_server_host>:80/httptrprt?transport=http
Should be used, when a firewall between the console and the RM backend will allow connections only to a backend host's HTTP server port, and security over the connection is not crucial.
- For secure connection over HTTPS to a specific server port - stream://<rm_server_host>:443/httptrprt?transport=https
Should be used, when a firewall between the console and the RM backend will allow connections only to a host's HTTPS server port. The credentials for HTTPS connection are the same as with the SSL connection.
<rm_server_host> stands for the DNS name or IP address of the host running the mPRM RAS server or CC.
- Authentication Certificate - For Certificate Authentication - External Certificate File only. Contains the path to the PKCS#12 file containing user's private key and own certificate.
- User Name - Contains the name of the user account.
- Password
- Password authentication - The password matching the user name.
- Certificate authentication - The password for accessing user's private credentials (user's key pair in particular).
- Key Pair Holder - For Certificate Authentication - Security Context Bundle only. Contains the path to the Security Context bundle carrying the certificate credentials of the user.
- Authentication Certificate - For Certificate Authentication - External Certificate File only. Contains the path to the Security Context bundle carrying the certificate credentials of the user.
- Key Pair Holder - For Certificate Authentication- Security Context Bundle only. Contains the path to the Key Pair Holder bundle containing the certificate credentials of the user.
- For SSL and HTTPS connection
- Transport Credentials - Shows the type of certificate credentials used for secure connection to the RM backend (SSL or HTTPS). Security Context Bundle means that the own and trusted credentials are supplied in the form of a Security Context bundle, and External Certificate File - in the form of a PKCS#12 file. Depending on the type of transport credentials, the following additional settings are shown:
- Transport Credentials is equal to Security Context Bundle
- Transport Credentials - Shows the type of certificate credentials used for secure connection to the RM backend (SSL or HTTPS). Security Context Bundle means that the own and trusted credentials are supplied in the form of a Security Context bundle, and External Certificate File - in the form of a PKCS#12 file. Depending on the type of transport credentials, the following additional settings are shown:
Security Context Bundle - Contains the path to the security context bundle holding the own and trusted certificate for login.
- Transport Credentials is equal to External Certificate File
Trusted Certificates - Contains the path to directory where the certificates of the RM backend are placed.
Transport Certificate - Contains the path to the PKCS#12 file holding user's keys and certificate.
Certificate Password - Contains the password to access user's private key.
Adding a New Server
To add a new server:
- Click the
 button at the top of RM Connections.
 - Type the new server's name in the Name text field of the displayed Create New Server dialog. Click OK to submit the information you have entered. The new entry will appear in RM Connections.
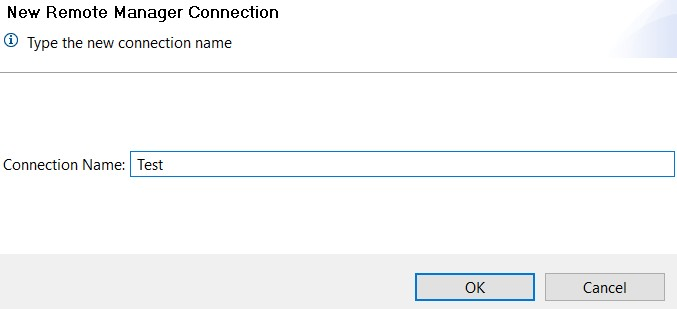
- Back in the login screen of the console, select the newly-added server entry and modify its connection properties as required.
- Click Save in the RM Connection Properties pane to apply the entered settings.
Editing Server Connection Settings
You can edit the connection settings only of servers which are not connected to the RM.
To edit the connection settings of an RM server, select it on the left and modify its settings. Save the changes by using the Save button at the top of the RM Connection Properties pane.
Login by Using an External Certificate File
Certificate authentication to the RM backend by providing a certificate file in the console involves logging into RM by presenting a user's certificate and keys.
Preparing and Registering the Certificate File
- You have a ready PKCS#12 file
- Add the file or the issuer's certificate if available to the Certificate Repository of RM by using the Certificates dashboard view of the console and assign it to domain "mPRM RAS". Import it as a keystore - use the Import Keystore action from the toolbar, specify as provider SunJSSE and as type PKCS12, and fill in the store and key passwords. Note that the two passwords must match for successful login.
- Create a user account in the RM user management system with name equal to the common name (CN) attribute of the user's certificate. Go to the Users Management dashboard view of the console, and click the Add User action from the toolbar.
As by default the created certificate entry will be associated with a private key, make sure that the entry is not included in other domain than the "mPRM RAS" one. Otherwise, the certificate and keys might be used to authenticate RM in another secure communication session which might lead to potential faults.
- You have a JKS keystore containing keys and certificate
- Add the file or the issuer's certificate if available to the Certificate Repository of RM by using the Certificates dashboard view of the console and assign it to domain "mPRM RAS". Import it as a keystore - use the Import Keystore action from the toolbar, specify as provider Sun and as type JKS, and fill in the store and key passwords.
- Create a user account in the RM user management system with name equal to the common name (CN) attribute of the user's certificate. Go to the Users Management dashboard view of the console, and click the Add User action from the toolbar.
- Export the file in PKCS#12 format - from the Certificates dashboard view select the certificate and use Export Keystore on the right. Set as provider SunJSSE and as type PKCS12, fill in the common password for the key and store and specify the location of the file. Note that the two passwords must match for successful login.
- For testing purpose generate a new certificate by using RM
- Go to the Certificates dashboard view of console, click a group and select Create RM Certificate from the toolbar. Specify certificate information and assign the certificate only to the "mPRM RAS" domain. Another option is if you have the issuer certificate already present in the certificate storage (along with its key pair) - assign the issuer certificate to domain "mPRM RAS" and create a certificate signed by this issuer by using the command Issue RM Certificate.
- Create a user account in the RM user management system with name equal to the common name (CN) attribute of the user's certificate. Go to the Users Management dashboard view of the console, and click the Add User action from the toolbar.
- Export the file in PKCS#12 format - from the Certificates console dashboard view, select the certificate and use the Export Keystore action from the Actions list on the right, set as provider SunJSSE and as type PKCS12, fill in the password for the key and store and specify the location of the file. Note that the two passwords must match for successful login.
Copy the certificate files to the computer running console in case it is on another host.
Performing Login by Using the Certificate File
1. Use the button to add a new server account.
2. Specify server account name and click OK.
3. Select the newly-created server entry in the login screen to specify the URL to the RM backend and configure the certificate login:
- Set Certificate Authentication - External Certificate File as Login Type.
- Next to the Authentication Certificate click the browse button
 and locate user's PKCS#12 file in your file system.
 - In User Name specify the name of the user to login. It must match certificate's CN and must be present in the user management system of RM.
- In Password type the password protecting the PKCS#12 file.
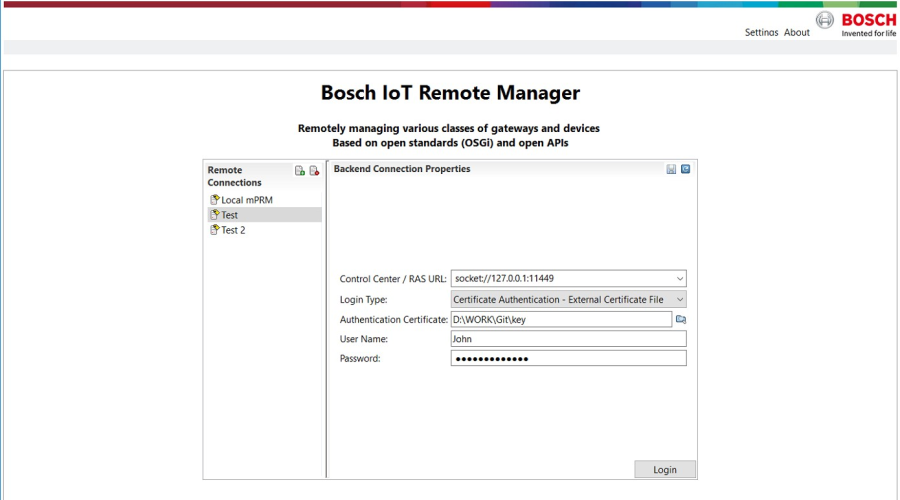
4. Click OK to complete.
5. Log into RM by using the Login button.
Certificate Login by Using a Security Context Bundle
As previously described, certificate login requires presenting a user's certificate chain to RM for authentication. The certificate chain should be packed in a Security Context bundle and this bundle should be installed on the console at login. Such a bundle should register a Keystore Holder service in the console's OSGi framework with the following registration properties:
- "RM RAC" - Should have value "KPH"
- "User" - Should have value the name of the user trying to log in. The user account must be available in the RM user management system.
Preparing the Security Context Bundle
To create a Security Context bundle, take the following steps:
1. Provide the certificate issuer's keys and certificate chain and add the certificate to the Certificate Repository of RM (e.g. by using the Certificates node of the console). Assign the certificate to domain "mPRM RAS".
2. Provide a Security Context bundle (implementing a Keystore Holder) holding the keys and certificate chain for the user account.
Use the following options of the console's Certificates dashboard view:
- To generate a Security Context bundle for a certificate already added to the Certificate Repository and associated with a key pair, select it and use the Create Security Context command from the popup menu or from the Actions list on the right. In the shown wizard, under Key Store Holder Registration Properties provide the registration properties of the Keystore Holder as described above. Next, specify the location of the Security Context Bundle JAR file.
- To generate a Security Context bundle for a brand new keys and certificate signed with a certificate from the Certificate Repository, select the issuer certificate and use the Issue Security Context command from the popup menu or from the Actions list on the right. In the shown wizard, specify the certificate attributes such as common name, organization, expiry date, etc. If you may also specify a password for protecting the keys. Next, under Key Store Holder Registration Properties specify the above service registration properties and specify the path to the generated key pair holder JAR file.
To be able to use the issued key pair holder successfully, make sure that the issuer certificate has an associated key pair in the Certificate Repository.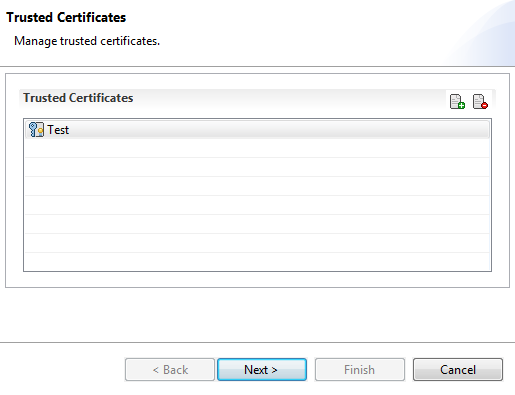
3. From the Users Management dashboard view of the console create a user account in the RM user management system with name equal to the common name attribute of the user's certificate.
4. Copy the bundle JAR file to the computer running the console in case it is on another host.
Performing Login by Using the Security Context Bundle
1. Use the button to add a new server account.
2. Specify server account name and click OK.
3. In the login screen of the console specify the URL to the RM backend and configure the certificate login:
- Set Certificate Authentication - Security Context Bundle as Login Type.
- Next to the Authentication Certificate click the browse button and locate user's Security Context bundle JAR file in your file system.
- In User Name specify the name of the user to login. It must match certificate's CN and must be present in the user management system of RM.
- In Password type the password protecting the keys in the bundle.
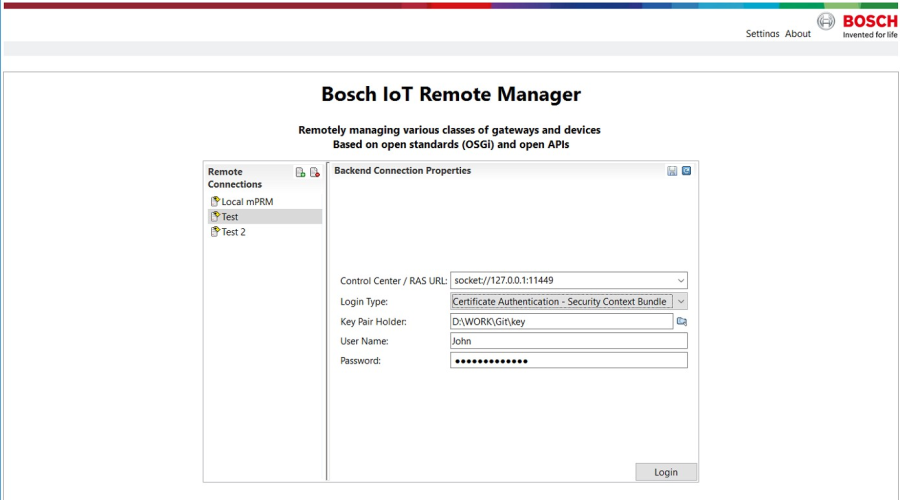
4. Click OK to complete.
5. Log into RM by unfolding the server account node.
Connecting to RM over SSL
This section describes the steps needed for successful connection of the console to RM over SSL, that is, connecting to RM by using ssl://<host>:<ssl_port> URLs in the connection settings (see "Console Server Connection Properties" above).
Configuring the Backend Host for SSL Connection
Enable SSL on the Backend Server
First, to be able to communicate with a control center (CC) or a remote access server (RAS) over SSL, make sure the CC host or the RAS host(s) is configured to accept SSL connection. The host should be configured with a proper connection URL as to support the SSL communication scheme, e.g. by using the console (see Backend Host Configuration -> Setting Host Connection URLs).
Define Own Crtificate
In not already available in, provide an own certificate chain which the backend being an SSL server will use to authenticate to the console. Add the server certificate chain (PKCS#12 file, JKS keystore or plain certificate file) to the Certificate Repository of RM, e.g. by using the Certificates dashboard view of the console. In case the certificate is in a separate file from the key pair, associate the proper key pair with the root certificate of the chain by using the Set Key Pair option in the console.
Add the certificate to the "mPRM TLS Server" domain. To be sure that the backend will authenticate by using the specified certificate, make sure that "mPRM TLS Server" domain does not include any other key-containing certificate entry.
Export the Backend Certificate
Export the certificate of RM dedicated to SSL connection to a folder on the console host. The folder might also contain other trusted certificates.
Enable Client Authentication
Optionally, if needed you can configure the CC or RAS host to require authentication from the console by presenting a trusted certificate chain, that is, a certificate chain whose first issuer certificate or owner certificate is added to the "mPRM TLS Server" domain.
To activate client authentication, set the system property mprm.sslconn.needClientAuth to true in the default.prs file located in the bin/mserver RM directory on the relevant host. To apply the property value, restart the RM server on that host.
Login over SSL by using External Certificate Files
Prepare an Own PKCS#12 File and Trusted Certificate Files
- You have a ready PKCS#12 file for authentication of the console
In not already added to RM, add the file or the issuer's certificate to the Certificate Repository of RM by using the Certificates dashboard view of the console. Import it as a keystore - right-click a certificate group and use the Import Keystore command from the popup menu, specify as provider SunJSSE and as type PKCS12, and fill in the store and key passwords.
Assign the console certificate to domain "mPRM TLS Server". Make sure it does not have a key pair set.
- You have a JKS keystore containing keys and certificate for authentication of console
- In not present in RM, add the file or the issuer's certificate to the Certificate Repository of RM by using the Certificates dashboard view of the console. Import it as a keystore - right-click a certificate group and use the Import Keystore command from the popup menu, specify as provider Sun and as type JKS , and fill in the store and key passwords.
- Assign the console certificate to domain "mPRM TLS Server". Make sure it does not have a key pair set.
- Export the file in PKCS#12 format - from the Certificates console view select Export Keystore from the toolbar, set as provider SunJSSE and as type PKCS12 , fill in the password for the key and store and specify the location of the file.
- For testing purpose generate a new certificate by using RM
- Go to the Certificates dashboard view of the console, click a group and select Create RM Certificate from the toolbar. Specify certificate information and assign the certificate only to the "mPRM TLS Server" domain. Another option is if you have the issuer certificate already present in the certificate storage (along with its key pair) - assign the issuer certificate to domain "mPRM TLS Server" and create a test certificate signed by this issuer by using the command Issue RM Certificate.
- Export the file in PKCS#12 format - from the Certificates console dashboard view select Export Keystore, set as provider SunJSSE and as type PKCS12, fill in the password for the key and store and specify the location of the file.
Copy the certificate files to the computer running the console in case it is on another host.
Perform the SSL Login by using the Certificate Files
- Use the button to add a new server account.
- Specify server account name and click OK.
- In the next dialog specify the SSL URL to RM. Several new options appear in the connection settings.
- In the Transport Credentials, choose External Certificate File.
- In the Trusted Certificates field, specify the location of the folder containing the backend trusted certificates.
- If client authentication is on, in the Transport Certificate specify the location to the PKCS#12 file containing the own certificate and key pair of the console.
- Type the password for accessing the console keys in the PKCS#12 file in the Certificate Password field.
- Specify the login type along with the relevant login credentials.
- Click OK.
- Log into RM by using the Login button.
Login over SSL by using a Security Context Bundle
Prepare a Security Context Bundle
The console uses Key Pair Holder services to retrieve own credentials required for an SSL connection to the backend and Certificate Verifier services to verify the trust of the certificate coming from the backend. Hence, in the console OSGi framework you have to install a Security Context bundle containing a Key Pair Holder service providing the own credentials (own certificate chain and keys) for authentication to RM and a Certificate Verifier service providing trusted certificates expected from RM.
Most conveniently, use the Certificates dashboard view of the console to create a bundle holding a Key Pair Holder service and/or a Certificate Management Certificate Verifier service as described in the Certificate Management user's guide - you might unite the two services in a common Security Context bundle.
To have a Key Pair Holder service in the bundle, the certificate must be associated with a key pair as described in the "Define Own Certificate" above.
1. In general, use the Create Security Context command to base the services on a certificate already added to RM or use the Issue Security Context menu command to base the services on a newly created certificate signed with an issuer certificate selected in Certificates. In both cases, the certificates within the Security Context bundle must belong to the "mPRM TLS Server" domain.
Produced bundles will be based on the certificates available in the Certificate Repository, so prior to starting bundle generation add the needed certificates to RM.
2. In the next dialog, set provider ProsystKSProvider and store type PKS. Leave the password fields empty. Select Next.
3. Next, if client authentication is required, under X509 Key Manager Registration Properties provide the registration property of the Keystore Holder
foundation.certmanexp.domain=mPRM TLS Client
4. Next, under X509 Trust Manager Registration Properties set the following property of the Certificate Verifier:
foundation.certmanexp.domain=mPRM TLS Server
5. Finally, specify the location of the Security Context Bundle JAR file.
6. Copy the JAR file to the console host in case the RM console is running on another computer.
Perform the SSL Login by using the Security Context Bundle
- Use the button to add a new server account.
- Specify server account name and click OK.
- In the next dialog specify the SSL URL to RM. Several new options appear in the connection settings.
- In the Transport Credentials, choose Security Context Bundle.
- In the Security Context Bundle field, specify the location to the Security Context Bundle JAR file containing the trusted backend certificate and the own certificate and key pair is client authentication is required.
- Specify the login type along with the relevant login credentials.
- Click OK.
- Log into RM by using the Login button.
Connecting to the RM over HTTPS
Connecting to RM over HTTPS implies the same certificate configuration as over SSL (see the "Connecting to RM over SSL" section).
Removing a Registered Server
To remove a registered server, select it from the list and click the  button at the top of the RM Connections pane.