Describes the steps for adding, removing and altering users and groups through the console.
Creating a New Group
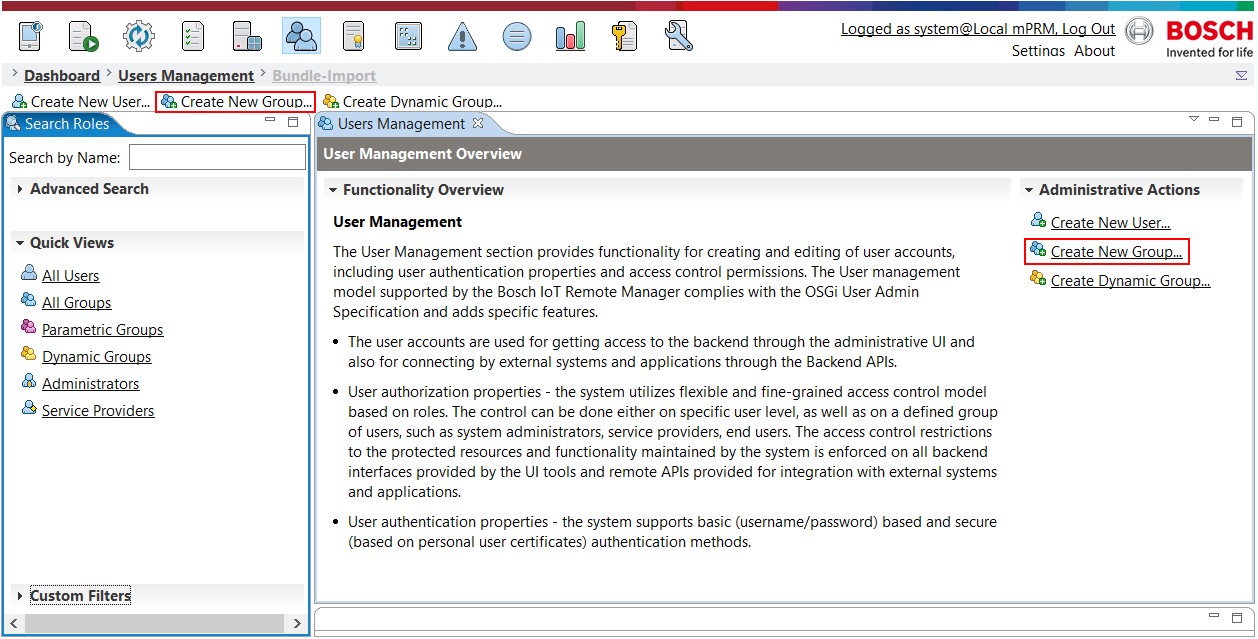
To create a new group, go to the Users Management view of the dashboard and select Create New Group either from the toolbar or from the Administrative Actions list as shown on the screenshot below.
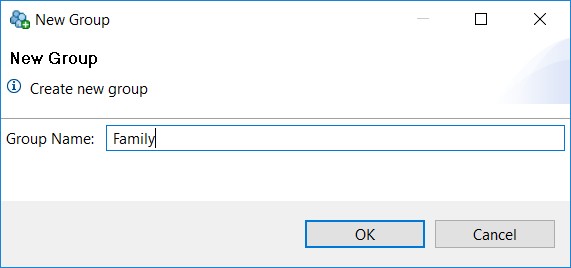
In the New Group dialog box that will appear, enter a name for the new group by which it will be identified in RM.
The newly created group will then appear in the All Groups list, but you can also search for it directly through Search Role, which is described in more detail in a subsequent section of this topic. When a group is selected, its properties, members and memberships will appear in a Group Info tab with its name, where these can be assigned, edited and saved.
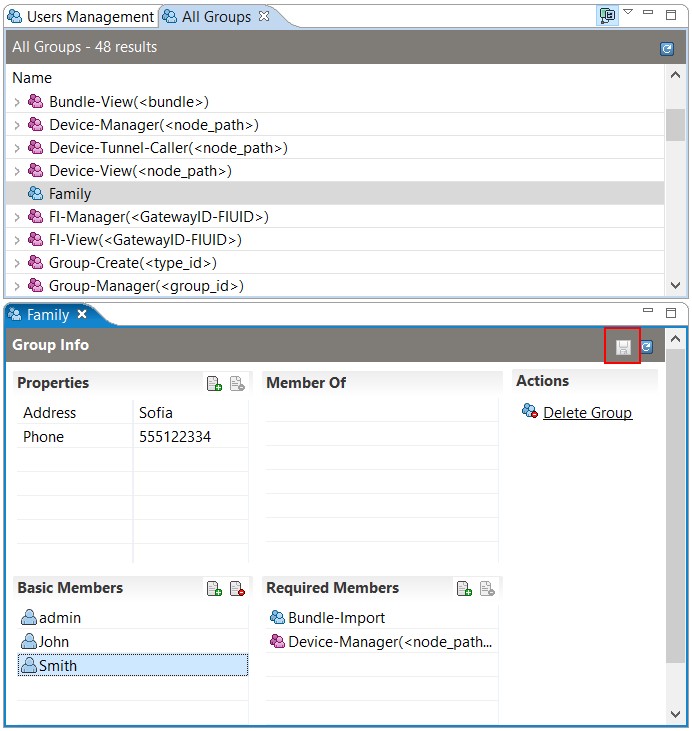
Following is a list of and some explanation about all group properties, out of which only the general group properties Group Name and Group Type cannot be modified.
Do not forget to save changes using the Save button -  in the Group Info tab.
General Group Properties
Group Name
Group Type
Static Group Properties
Basic Members
Adding a Basic Member
Removing a Basic Member
Required Members
Properties
Dynamic Group Properties
Filter
General Group Properties
Group Name
The group name is the only compulsory field and must be unique among all the roles in the system, i.e. users and groups.
Group Type
Different group types are identified by different icons:
normal –
 .
.parametric –
 .
.dynamic –
 .
.
Depending on the group type, it may be possible to complete the group's detail fields at a later stage.
For normal and parametric groups members are defined statically, whereas for dynamic groups members are defined at run-time in accordance with a specified set of rules.
Static Group Properties
The following sections explain how to enter basic members, required members and properties in a static group, such as the group shown in the screenshot above.
For additional information refer to the Types of Groups topic of the Conceptual Guide.
Basic Members
This section contains all the basic members of a group, which can be both users and other groups, in accordance with the OSGi Specification.
Adding a Basic Member – Go to the Basic Members section of the Group Info tab and click on the
 button or right click anywhere in the section to get a pop-up with the commands.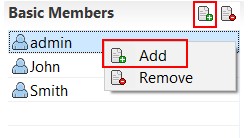
A dialog box will appear listing all roles - groups and users - known to the system. You can find the role you wish to add either from the lists in Quick Views or through a search filter which matches the role's name. The filter itself conforms to the LDAP syntax and allows wildcards before and after the search string. Type the filter in the Search by Name field and press Enter.
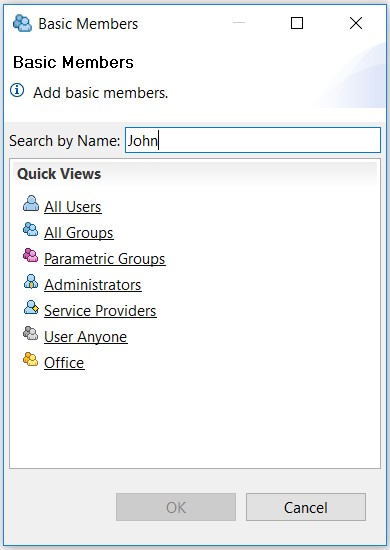
Roles can be selected in the lists one by one or several at ones. Use the Shift key on your keyboard for sequential selection or Ctrl for non-sequential selection.
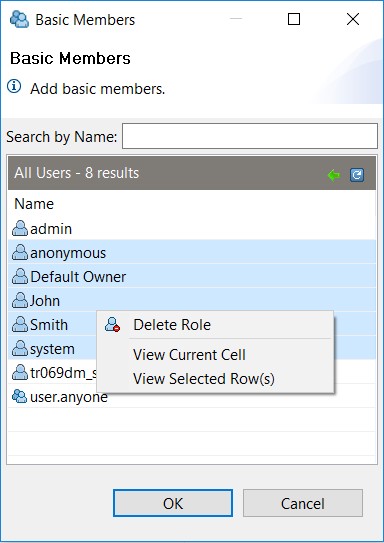
A role can be also permanently deleted and removed from the users database with the Delete Role command. To reach the command select the role(s) you wish to delete permanently and right click on it to invoke a pop-up as on the screenshot below.
Removing a Basic Member – Select the member you wish to remove from the group and press the
 button from the section's title bar or right click on the member to invoke a pop-up with the same button.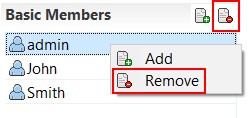
Required Members
This section contains zero or more required members, according to the OSGi Specification. To add a required member click the button in the Required Members field to open the list of groups. Select a group you want to be treated as required for this particular group and click the OK button.
Properties
This section contains any additional information about the created group, kept as property-value pairs. This field is optional.
To add an extra property:
Activate both fields by clicking on the
button from the Properties title bar or from the pop-up menu.Type its name in the left field.
Type its value in the right field.
Repeat this step until you have added all desired properties.
To remove a property, select its row in the table and press the
button at the top of the section.
Dynamic Group Properties
A dynamic group is a group whose members are not defined in advance, but are constantly updated to match an LDAP filter. The filter usually defines time, as this is the most dynamic property of a user. You may also define other requirements which should apply to the user properties. For example, a service may be delivered only to the members of a group called StockUpdate. This group is defined as dynamic, so that it will contain only users whose local time is between 09:00 AM and 06:00 PM and the day of week is between Monday and Friday. Another requirement for the members of this group may be that the user should have a property called StockOperator with value set to true.
Listing 1. Example of Dynamic Group Filter.
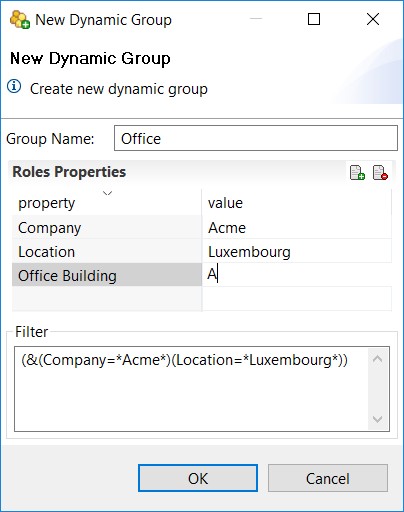
(&(local_time >= 09:00)(local_time <= 18:00)(day_of_week >= MONDAY)(day_of_week <= FRIDAY)(StockOperator = true))When you select the Create Dynamic Group button from the toolbar or from the Administrative Actions list (see the first screenshot), there will be a New Dynamic Group dialog where you may enter the properties relevant to this group. Entering the properties and their values will automatically create a filter.
Filter
This is an LDAP syntax filter used to select the member users. You can create it in one of the following ways:
Manually write/paste the filter in the Filter text area.
Use the standard properties and their corresponding values to generate a filter which will apply to all users in this group.
Combine the two methods - first use the roles properties to create a basic filter, then modify it manually.
Creating a New User
To create a new user, select Create New User from the toolbar or from the Administrative Actions list (see the first screenshot).
The New User dialog box will appear, requiring name and password for the new user set up. Click OK to add the user.
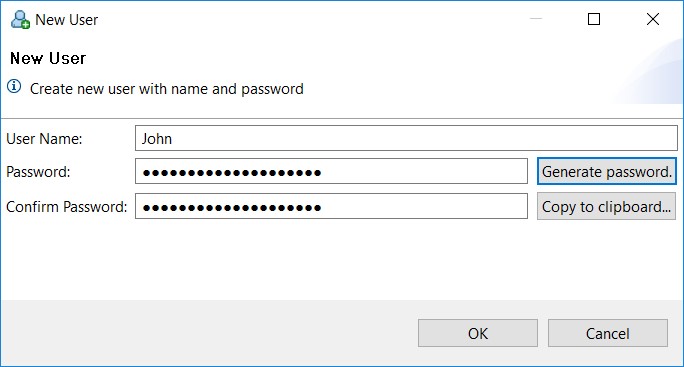
User Name – the name of the new user by which he or she will log into the RM system. It must be a unique identifier among all roles, both users and groups.
Password – the password which the user will use to log into the RM system.
Confirm Password – retype the password for confirmation.
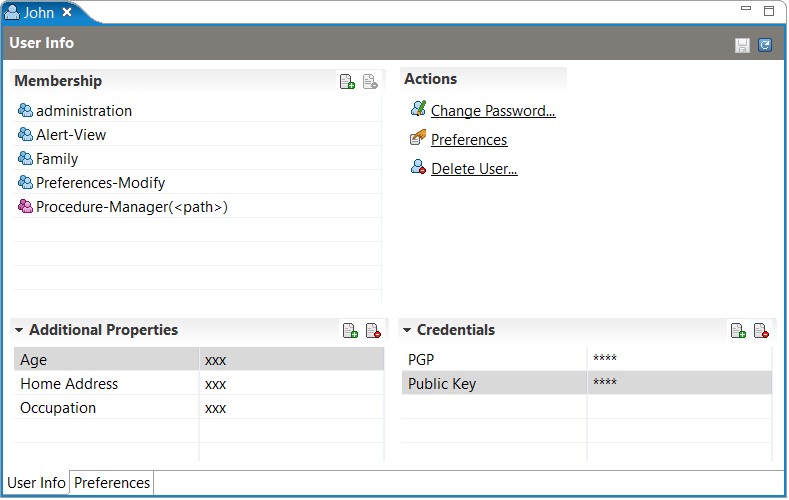
Once a user is created successfully and selected from the users list, the following properties can be defined:
Account Settings – these are the most essential properties needed by the system to authenticate and authorize the user, such as membership and credentials.
Personal Information – the optional additional properties providing information about the individual represented by the created user: full name, e-mail, employer, etc.
Account Settings
Of all the user properties, only the User Name is compulsory. Here is how to work with the membership and credentials sections:
Membership – It indicates the group(s) of which the new user will be a member. You can indicate zero or more groups.
To add a group to the list click on the
button in the section's title bar. A dialog box with a list of groups will open.To unsubscribe the user from a group in the list, select this group and press
the button. This list also allows multiple selection, so you may remove several properties at a time.
Credentials – This section is optional. It contains properties which allow the user to authenticate in ways different than by his password. After saving the entered properties, the values of the existing credentials are displayed as four asterisks "****".
To add a credential, click on a field in the Credentials section and type the credential's name on the left side and its value to the right. You can also activate the fields by clicking the Add button.
To remove a credential, select it from the Credentials list and click
button from the title bar or from the pop-up menu.
After finishing with all settings, you can fill the personal information for the user.
Personal Information
In the Additional Properties sections you can fill personal information about the user. This is not compulsory, but can be very helpful when creating dynamic groups or performing searches for a user. The personal information for a user may contain any type of properties.
Searching for a Group
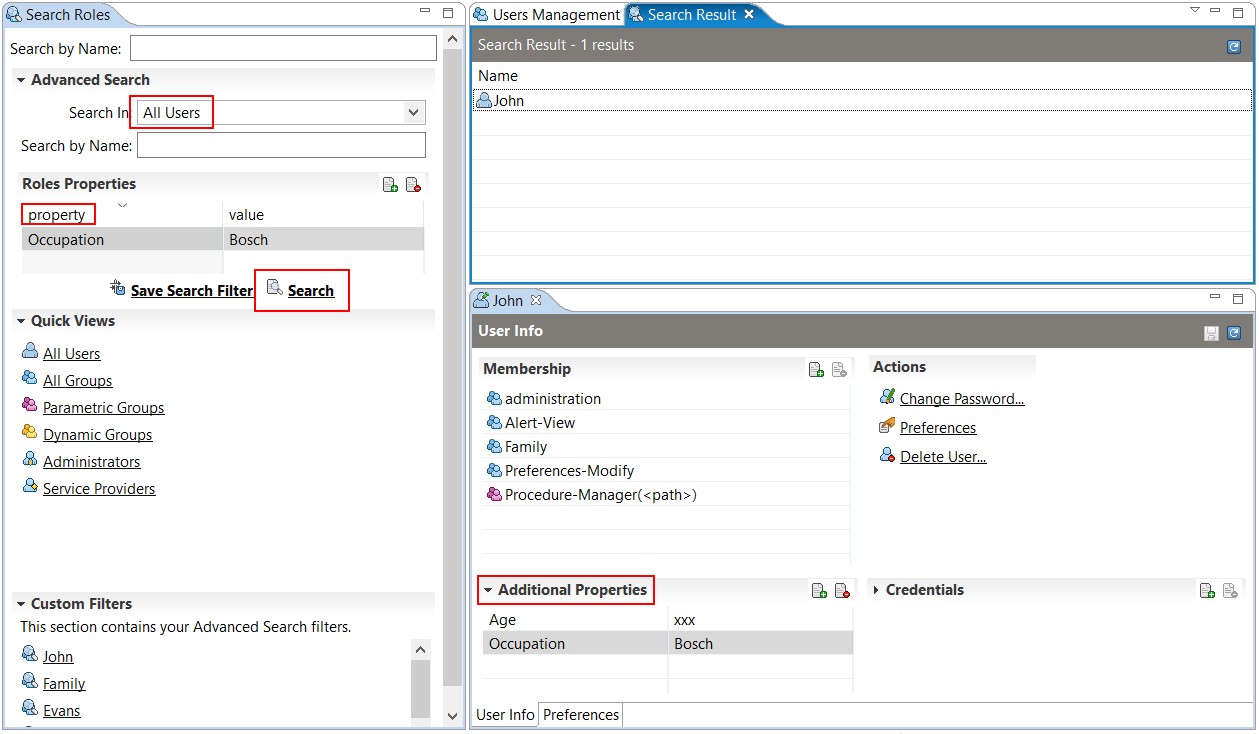
Go to the Search Roles tab in the left pane of the console, fill in the Search by Name field and press Enter or expand the Advanced Search section as shown below. The role search can be filtered by name and properties at the same time.
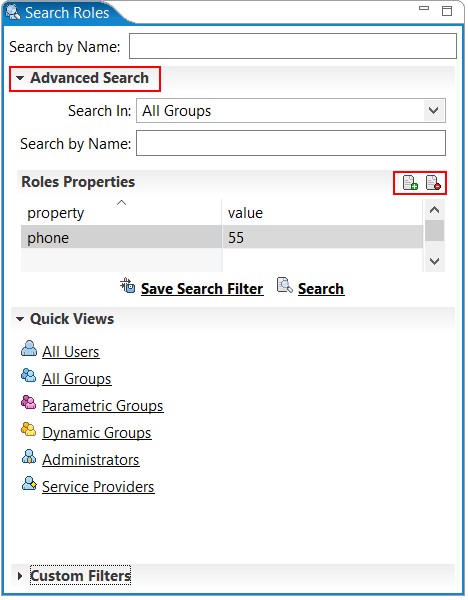
In Advanced Search, there is a Search In drop-down list from where you can determine the role type you want to find: All, All Users, All Groups, Parametric Groups or Dynamic Groups.
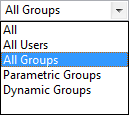
To facilitate the process, choose the appropriate group type to search in. To narrow the search further, use the or buttons in the Roles Properties title bar or click on a field in this section to enter the group properties which are most likely to be present in the group definition - see the figure with the "Search Roles" tab above.
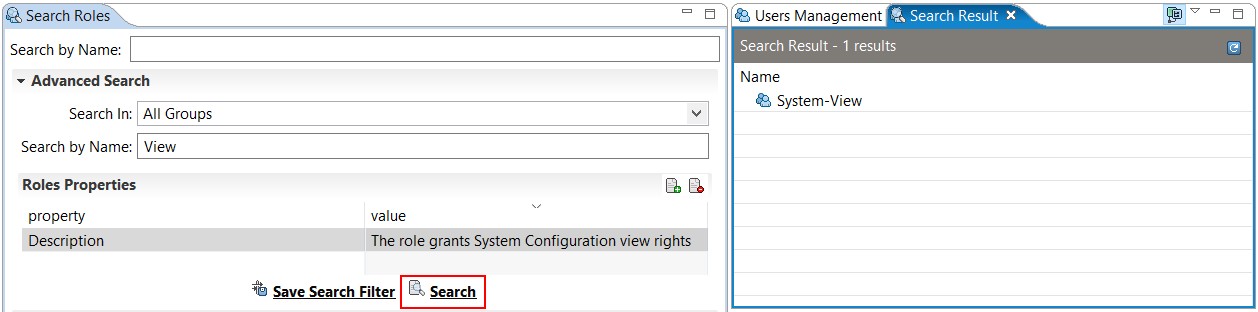
Select the Search option to get the result of your search filter in a Search Result tab to the right. The figure below shows the result of a search in "All Groups" by role name "View", property name "Description" and its corresponding value:
To save the search criteria into the Custom Filters expandable section for future use, select Save Search Filter and enter the New Filter Name.
Searching for a User
The procedure for user search is the same as for group search as described above. From the Search In drop down menu select All Users. Then you can filter users by name or by any of the properties that have been assigned to them in the User Info tab. Select Search to complete the operation and use Save Search Filter if you want to save the search criteria in your Custom Filters.