This document contains a user's guide to managing the RM Software Repository through the Management Console. More information about the main Software Repository concepts is available in "Basic Principles of the Software Repository".
General Description of the Software Repository
The content of the Software Repository is shown as a dashboard view in the console. To open it, select the  button from the toolbar at the top or from the navigation bar select Dashboard and then - Software Repository.
The Software Repository view offers a convenient look over the stored client bundles. It has two main areas - Search where you can use filters to list only specific components, and component area which lists the components matching the filter from the Search one and shows details about them below the list.
Each client bundle is represented as a separate entry of the corresponding concrete type and is displayed in the Software Repository with its Display name.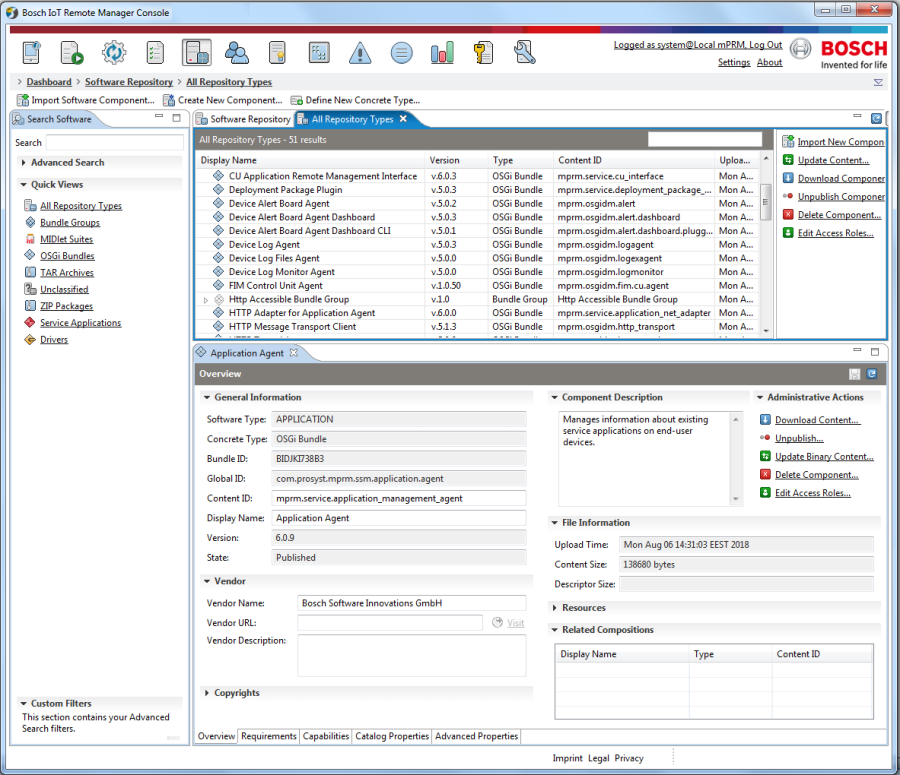
Figure 8: . General look of the Software Repository in the mConsole.
Common Deployment Unit Attributes
General Information
General information about client bundles is displayed in the General Information expandable section of the Overview tab at the lower part of the Software Repository view. It shows general characteristics about a selected unit including its general and concrete type, content ID, name, state, description, upload time, version and vendor.
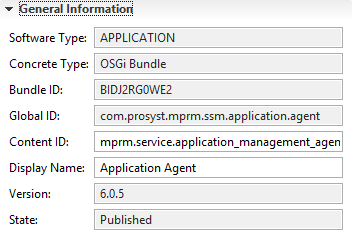
Figure 9: . General information about a deployment unit.
Deployment Unit Requirements
The requirements of a client bundle determine the device capabilities on which it can be deployed. Deployment unit requirements are specified from the Requirements tab for the selected unit.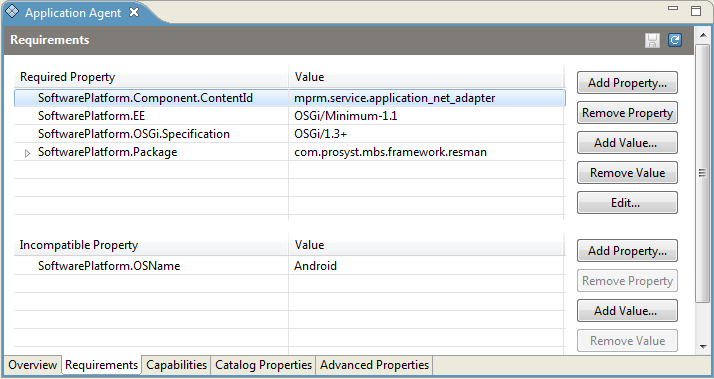
Figure 10: . Deployment unit requirements.
To define a required capability:
1. Click the Add button in the upper pane. The Define New Requirement dialog will appear providing a convenient UI for setting a requirement property, e.g. for SoftwarePlatform.Component.ContenId requirement you can conveniently browse the content of the repository and select the target component.
2. In the Define New Requirement dialog specify the following information and click OK to apply the changes:
- Choose the requirement property from the Property box.
- In the Value box specify a value by typing it or choosing from pre-defined list.
- (Optional) Select one or more checkboxes to define bundle resolving mechanisms:
- Extended – Indicates that this client bundle serves as an extension to the client bundle specified with the requirement value
- Optional – Indicates that the client bundle dependencies can be resolved even if this requirement is not met.
- Multiple – There can be more that one solution for this requirement and all are used during the dependency resolving.
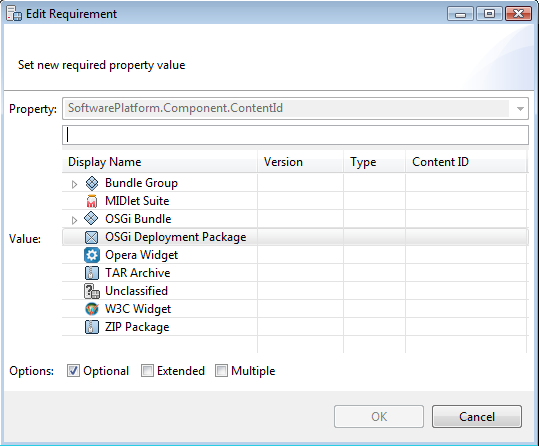
Figure 11: . Adding or editing a requirement value.
3. (Optional) To add more values to a property, repeat the steps above but setting the same requirement property but different value.
4. Click Save to save the changes.
To define an incompatibility relation:
1. Click the Add button under the lower pane. A dialog with two fields appears.
2. Type the property name and value to the incompatibility property and click OK.
3. (Optional) To add more values to the incompatibility property, repeat the steps above duplicating the property name but with different value.
4. Click Save to save the changes.
A client bundle can require another client bundle in order to work properly on a device. Such dependencies can be expressed with the three ready RM platform properties: SoftwarePlatform.Component.BundleId, SoftwarePlatform.Component.ContentId and SoftwarePlatform.Component.GlobalId. These platform properties can also be used to define the incompatibility requirements of a client bundle. For more information about the client bundle requirements and capabilities, refer to the Basic Principles of the Software Repository Conceptual Guide. To specify such client bundle dependence, follow these steps:
1. Click the Add button from the Requirements pane.
2. In the Define New Requirement dialog select one of the above mentioned bundle requirements from the editable combo box on the left. A repository browser appears.
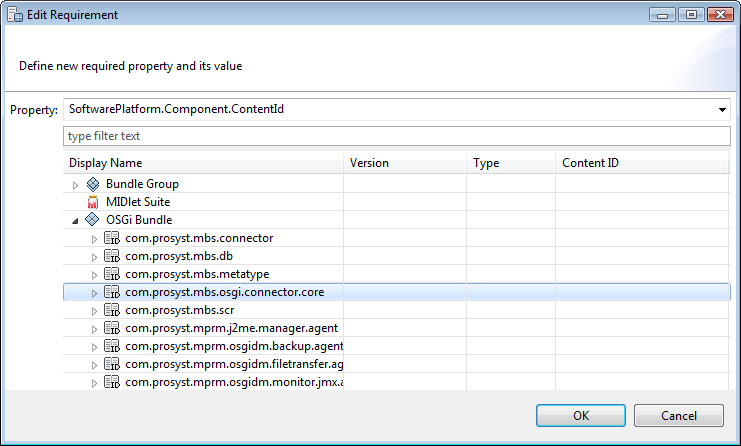
Figure 12: . Specifying the client bundle dependence from another software component.
3. (Optional) Select one or more of the checkboxes to define the resolving mechanisms.
4. Choose a bundle from the dialog and click OK to confirm your choice.
5. To save the changes, click Save in the Requirements tab in the Software Repository view.
To remove a property/value pair, select it from the Requirements pane and use the Remove button.
Capabilities
The deployment unit capabilities describe the functionality that a client bundle adds to a device when it is deployed on it. For example, packages and services that an OSGi Bundle exports, define the new capabilities that a device will acquire after unit deployment.
You view and modify provided capabilities of a unit from the Capabilities tab.
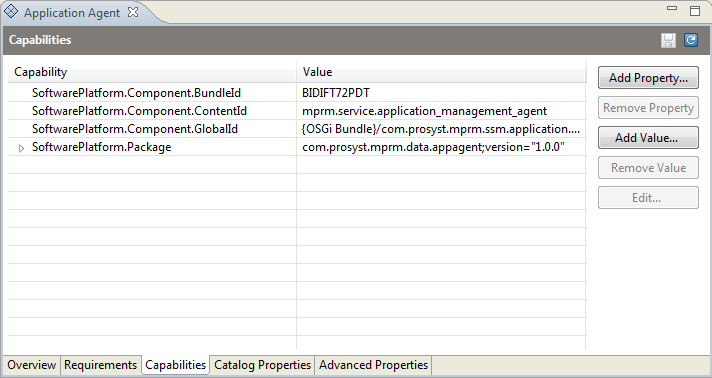
Figure 13: . Deployment unit provided capabilities.
To define a new capability:
- Click the Add button in the Capabilities pane.
- Enter the property and value in the dialog that appears and click OK.
- (Optional) To add more values to the property, repeat the steps above duplicating the property name but setting different value.
- To save the changes click Save in the Capabilities tab.
To remove a provided capability from a deployment unit, select it and click Remove.
Catalog Properties
Deployment units can be organized in user defined categories by using their catalog properties. For example, the bundle category of an OSGi bundle serves as a criterion for adding it to a specific group.
You view and edit catalog properties of a selected deployment unit from the Properties tab of the unit's details.
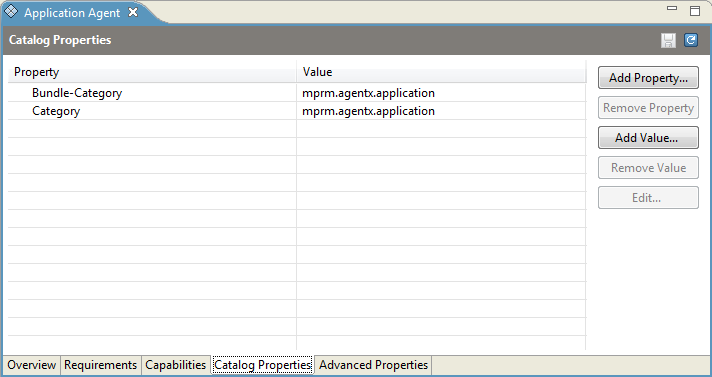
Figure 14: . Deployment unit catalog properties.
To define a new catalog property:
- Click the Add button in the pane of the Properties tab.
- Type the property and its value in the dialog that appears and click OK.
- (Optional) To add more values to the property, repeat the steps above duplicating the property name but setting different value.
- To save the changes click Save in the Catalog tab of the unit's details.
To remove a catalog property and its value from a desired deployment unit, select it and click Remove.
Manipulating Client Bundles in the Software Repository
Adding Client Bundles to the Software Repository
You can add client bundles to the Software Repository by specifying their location on your computer or in the LAN. To import a file:
1. Initiate the "import" operation in one of the following ways:
- Click the Import New Component view toolbar button.
- Select the Import New Component action from the Administrative Actions list.
An Import Component wizard dialog appears.
2. Click the Add button to specify component(s) for import. Click Next to process the importing of the selected file.
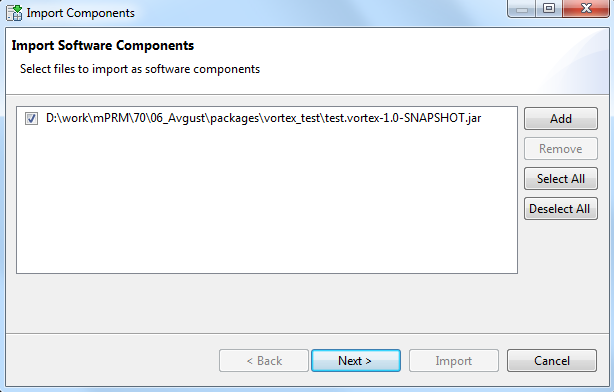
Figure 15: . Including components for import.
3. The next screen of the wizard appears, showing you the components of the file(s) identified during the import process. Optionally change the content ID of a selected client bundle, if needed, contained in the file before adding it to the Software Repository. Click Next to confirm importing the file with the changes made to its components.
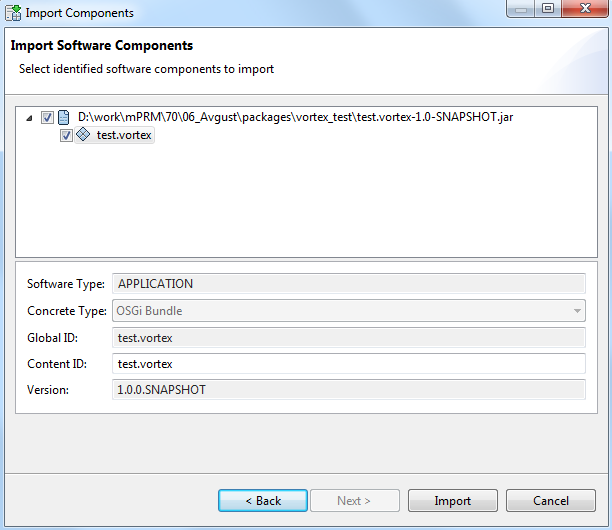
Figure 16: . Viewing the client bundles of the file before importing it in the Software Repository.
4. Information about the result of the import process appears in the next screen of the Import Component wizard. Click Finish to complete the importing of the file.
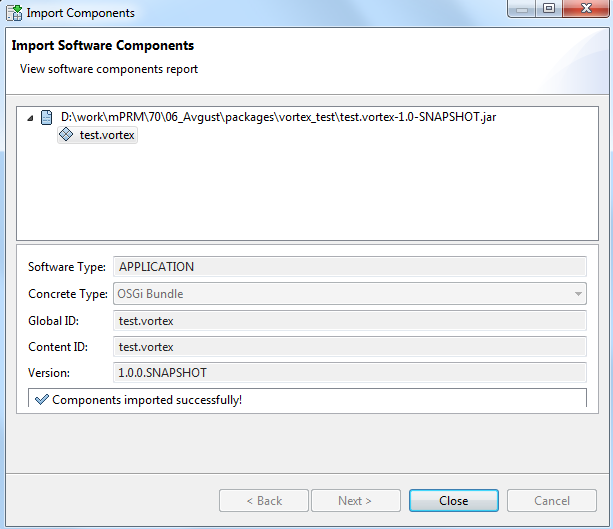
Figure 17: . Viewing the results of the import process.
The imported client bundles appear in the Software Repository view.
Updating Client Bundles
To update a specific client bundle, follow the instructions:
1. Select the desired client bundle in the Software Repository component list on the right.
2. Use the "update" command of the Software Repository:
- Invoke the Update command from the actions list on the right.
- Right-click on the deployment unit and select the Update Content command option from the popup menu
An Update <concrete_type> file chooser dialog appears.
3. Specify the location of the update client bundle.
4. Click OK to confirm your choice.
As a result, the specified client bundle is updated with the one selected from the file chooser.
Removing Client Bundles from the Software Repository
To remove a client bundle from the Software Repository:
1. Select the deployment unit from the Software Repository list on the right.
2. Use the "delete" command option of the repository:
- Call the Delete command from the actions list on the right.
- Right-click the specific client bundle and select the Delete option from the popup menu.
A confirmation dialog appears.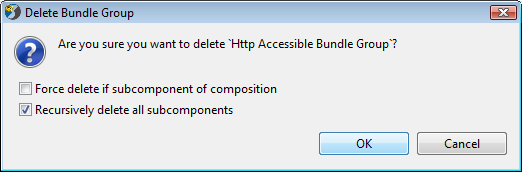
Figure 18: . Confirming a client bundle removal from the repository.
3. Set forced removal options and click OK.
The result of this operation is the removal of the selected client bundle and its components (if any) from the Software Repository list.
Downloading Client Bundles to the Local File System
All client bundles available in the Software Repository for a specific user account can be easily downloaded to the local file system. To do this, follow the instructions:
1. Select the desired client bundle from the Software Repository component list.
2. Invoke the "export" command option of the repository:
- Use the Download Component command from the actions list on the right.
- Right-click on the node of the selected deployment unit and select the Download Content option from the popup menu.
3. Specify a location in your file system where the selected software component will be saved.
4. Press OK to finalize the download operation.
As a result, the desired deployment unit is saved to the location you specified.
Publishing and Unpublishing Client Bundles
The state of a deployment unit indicates whether it can be deployed on a client device (refer to the "State" section of the Basic Principles of the Software Repository conceptual guide).
The console allows you to change the state of a client bundle. To accomplish this, execute the following operations:
- To publish a deployment unit that is in an imported state:
- Select the entry that represents it from the Software Repository component list.
- Use the "publish" command of the Software Repository:
- Select the Publish Component command option from the actions list on the right.
- Right-click on the selected client bundle and use the Publish option from the popup menu.
The state of the client bundle changes to published.
- To unpublish a deployment unit which is in a published state:
- Select it from the entries of the Software Repository component list.
- Use the "unpublish" command of the Software Repository:
- Select the Unpublish Component option from the actions list on the right.
- Right-click on the deployment unit and select the Unpublish command from the popup menu.
The state of the selected client bundle changes to imported.
Managing Bundle Groups
You may define bundle groups to arrange client bundles according to your preferences.
To view the bundle groups in the Software Repository dashboard view, from Quick Views select the Bundle Groups shortcut. A Bundles Groups pane will appear on the right. A group may contain bundles as well as other existing groups.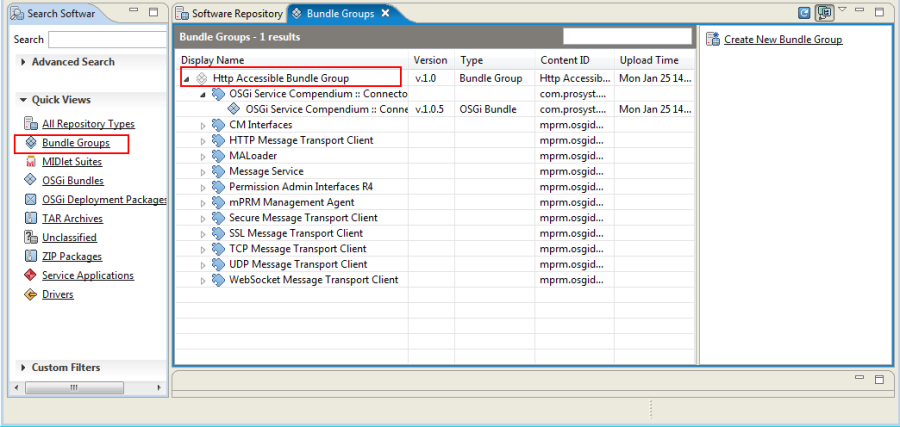
Figure 19: . Bundle Groups view.
To manage bundles groups, right-click on a group and use the popup menu, or select the relevant action from the action list on the right of the Bundle Groups pane.
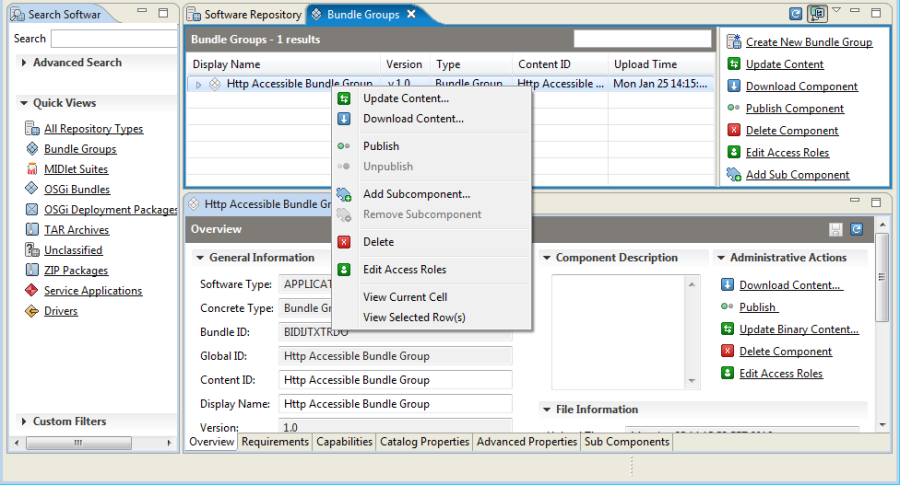
Figure 20: . Bundle Groups actions.
Each component in a bundle group has additional properties (see "Composition" section from Basic Principles of the Software Repository guide) – startup order, optional component, lazy start.
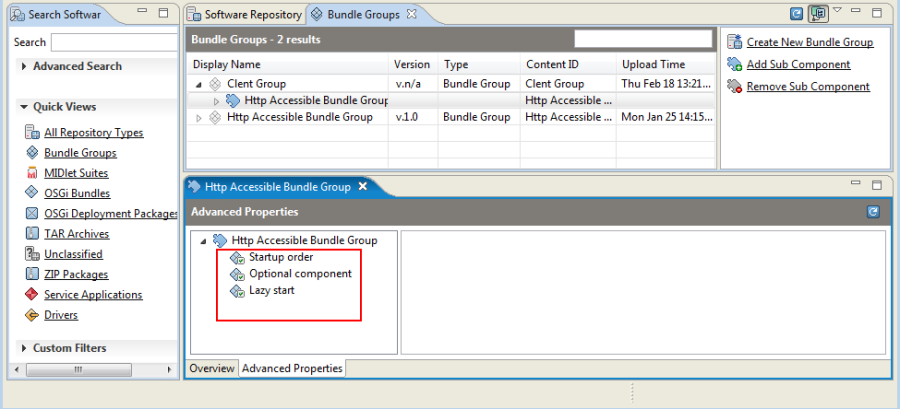
Figure 21: . Component properties.
Managing External Client Bundles in the Software Repository
RM Software Repository supports access to external OBRs and management of external client bundles. For more details about the OBR integration in the repository and how it is configured to link to external OBRs, refer to the "OBR Integration" section of the Basic Principles of the Software Repository Conceptual Guide.
Once linked to an external OBR, the Software Repository adds sub-nodes representing the external client bundles in its management tree. The external client bundles are represented in the repository with the  overlay icon. You can edit only the common deployment unit attributes, access rights and sharing options of an external client bundle (all of them are described in the current guide).. External client bundles can be downloaded to the local file system, published and unpublished using the RM repository commands described above.
Handling Client Bundle Access Roles
RM provides users with specific rights to access a client bundle represented as an entry in the Software Repository. Depending on the role (see "Access Roles" section in Basic Principles of the Software Repository Conceptional Guide) that had been assigned to a user, he can:
- View the general and custom properties of a client bundle.
- Change the client bundle properties.
- Import a new client bundle to the Software Repository.
The console allows you to manage the access roles on a client bundle from the access roles modifying dialog. To modify the access rights of a specific client bundle in the repository:
1. Create in advance all users and groups that will be provided with access rights to a node, e.g. by using the Users Management dashboard view of the console.
2. Select the entry representing the desired client bundle under the Software Repository dashboard view.
3. Call the modifying dialog in one of the following ways:
- Right-click on the selected node and use the Edit Access Roles option from the popup menu
- Select the Edit Access Roles option from the actions list on the right
As a result, an Access Roles dialog appears.
4. In the shown access roles dialog, specify the roles which will be allowed to access the node as well the access type for the roles and click OK. In this way one can define user access rights for a specific client bundle.
- To add a new role, click the Add button, and select user(s) and/or group(s) from the RM user management system.
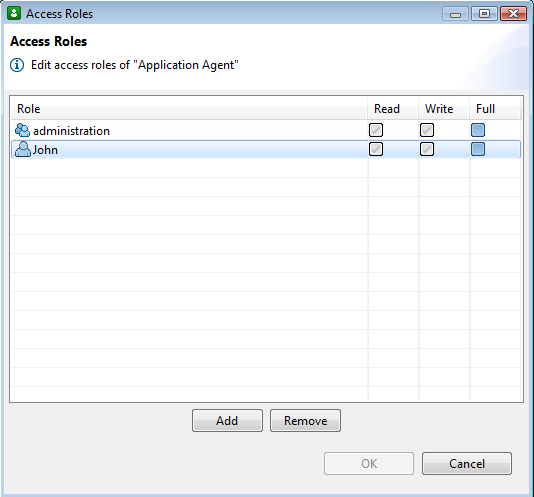
Figure 22: . Adding a new role that can access the selected client bundle.
On success, the new role appears in the upper pane of the dialog and now its access type can be edited by selecting the desired check boxes.
- To change the access type of a role that already has access to the selected client bundle, select it from the upper pane and click the corresponding check boxes.
- To remove a role from the list of access rights for the selected client bundle, select it from the upper pane of the dialog and press the Remove button.
5. Press OK to confirm your choice. Otherwise, use Cancel.
Sharing Client Bundles between RM Users
RM allows its users to share access to software components between each other. This functionality is accessed through the Sharing Options node that appears in the Advanced Properties tab of the component details.
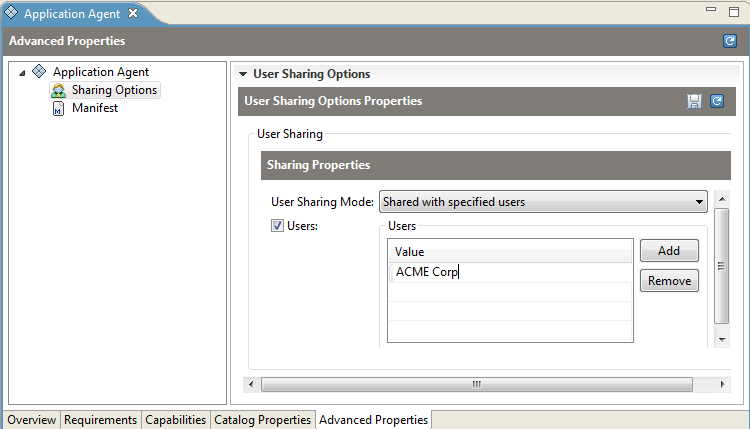
Figure 23: . Sharing client bundles between RM users.
To change a client bundle sharing:
Go to the Sharing Options node within the Advanced Properties tab under a selected deployment unit in the Software Repository component list.
Select one of the three available sharing options in the User Sharing Mode drop-down list in the User Sharing pane:
Private (accessible only by the bundle owner) – Default value. Only the RM user who added the software component to the Software Repository can view and manage it.
Public (accessible to all users) – All RM users can view and manage the specific software component
Shared with specified users – Only RM users available in the Users pane can have access to this client bundle. To add a specific RM user:
Check the Users check box.
Click the Add button in the Users pane. An empty row appears in the pane.
Type the name of the RM user you want to share this resource with.
(Optional) Use the Remove button to delete a selected user from the "share list".
Click Save to apply the changes made to the client bundle sharing options.
As a result, the sharing options of the client bundles set through the console are used to define the deployment unit visibility scope of a logged in RM user.
Introducing Concrete Types
You can statically define new concrete types and extend the features of the Software Repository.
To define a new concrete type:
1. Select the Software Repository node.
2. Select the Define New Concrete Type button from the Administrative Actions section.
A Define Type dialog appears.
3. Specify the properties of the new concrete type:
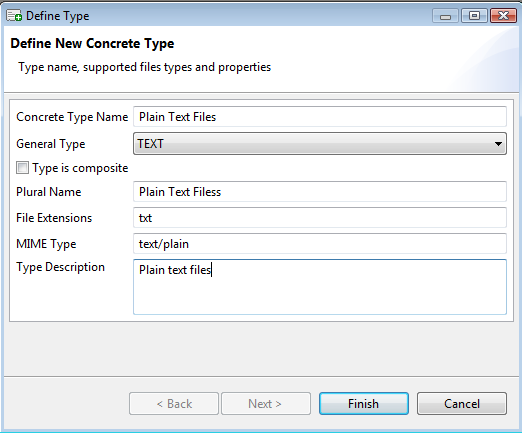
Figure 24: . Define a new static concrete type.
- Concrete Type Name – Indicates the name of the new concrete type.
- General Type – Indicates the general product or media type of the deployment units managed by this concrete type.
- Type Is Composite – Shows whether the new concrete type is a composite one. In case you check this option, click Next in the wizard to select concrete types which are recognized as components of this concrete type.
- Type Plural Name – Specifies the name of the node that will represent the new concrete type in the Software Repository management tree.
- Mime Type – Specifies the MIME types of the deployment units that belong to this concrete type.
- Extension – Indicates the extensions of the files that are recognized as members of the new concrete type. To define managed filer extensions:
- Type Description – Contains the description of the new concrete type.
4. Click OK when ready with the parameters of the new concrete type.
On success, the new type will appear in the Quick Views section of the Software Repository view.
To remove a statically defined concrete type:
- Select the concrete type from the Quick Views section of the Software Repository view.
- Click the Delete <concrete_type_name>Type action from the actions list on the right. A Delete Concrete Type confirmation dialog appears
- (Optional) Check the Delete Also All <Concrete Type> option to remove the available client bundles with such concrete type.
- Click OK to confirm.
The result of this operation is the removal of this concrete type from the Software Repository. In case the Delete Also All <Concrete Type> option is NOT checked, the available client bundles of the removed type, if any, are associated with the Unclassified concrete type and are placed under the Unclassified shortcut of the Quick Views section. If the option is checked, all client bundles associated with the deleted concrete type are removed from the Software Repository database.
The new statically created concrete type is represented in the Software Repository list with the  default icon. To set an icon for the created concrete type, if not set during the process of defining the new concrete type, follow the instructions:
1. Select the new concrete type shortcut from Quick Views.
2. Select the Change Type Icon action from the actions list on the right.
3. Locate the icon on the local file system.
4. Click OK to complete the operation.
As a result, the icon will appear in the Software Repository list distinguishing the new concrete type.