Azure Storage - HTTP Connection
Send telemetry data to an Azure Storage account (Blob Storage/Data Lake).
Forward device / digital twin events to an Azure Storage Blob container
The easiest way to forward device / digital twin events from Bosch IoT Device Management to an Azure Storage is through:
an Azure Shared access signature (SAS) authorization, and
an HTTP connection within the digital twin layer of Bosch IoT Device Management which will forward the events via HTTP PUT requests.
The required steps are described below.
Configure your Azure Storage
Prepare your Azure Storage account and create a container within it.

Make sure that the Shared access signature expiry setting is not too restrictive.
You can adjust this in the Azure Portal> Storage account settings > Configuration section with the option Allow recommended upper limit for shared access signature (SAS) expiry interval.
We recommend that you set it to 400 days here and make sure that you rotate the SAS token every year.Create a Shared access signature (SAS):
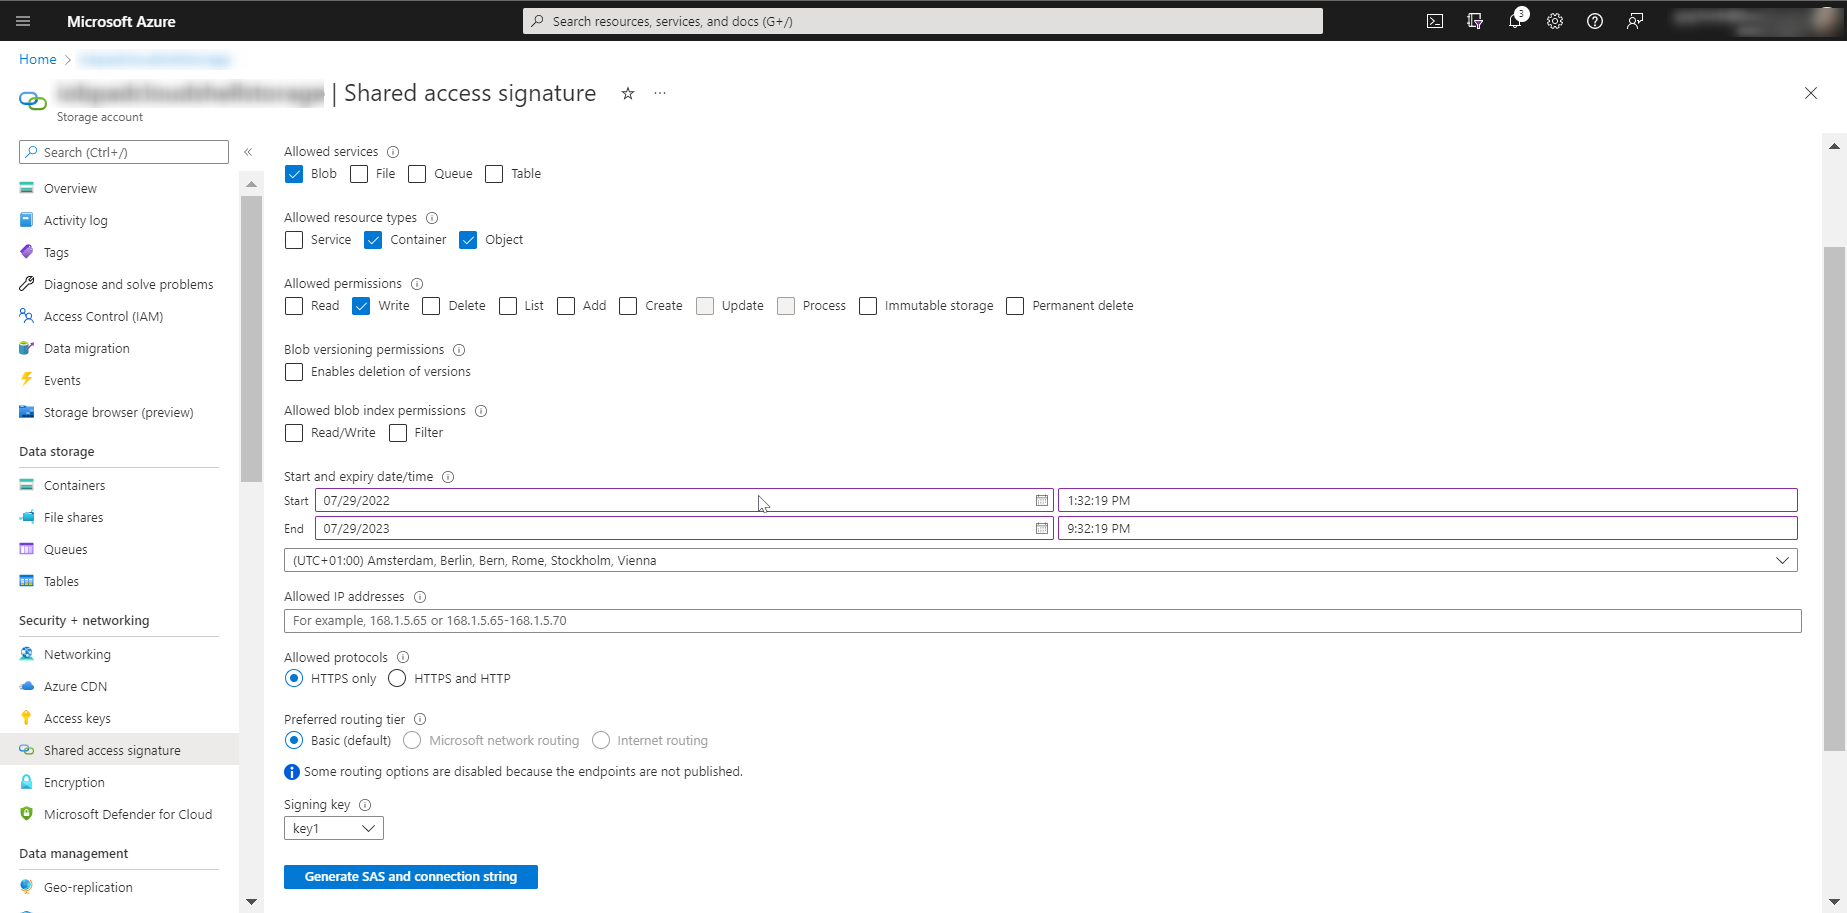
In the Azure Portal, navigate to the Security + networking section on the left sidebar and select the Shared access signature entry.
Apply at least the following setting:Allowed services: Blob
Allowed resource types: Container+Object
Allowed permissions: Write
Start and expiry date /time: enter an expiry date of 1 year ahead.
After clicking Generate SAS and connection string, you will obtain the information needed for the next steps.
Copy the server host name part of the Blob service SAS URL (something like “xxx.blob.core.windows.net”) and copy the whole SAS token (“?sv=…”).
Configure your HTTP Connection
In your Bosch IoT Device Management service instance, you need to create and configure an HTTP forwarding connection.
To do that:
Open the Suite UI and navigate to Connections on the left sidebar.
Click the plus icon to add a new Connection.
From the dropdown, select HTTP as connection type.
Set a name of your choice for your new connection, e.g. AZURE Storage.

On the next dialog, scroll down to the Coordinates section and expand it.
From the dropdown of the Credentials Type field, select anonymous.
In the Host field, enter the server host name which you copied earlier after creating the SAS.

Then, scroll down to the Targets section and expand it, then click + Add target.

In the HTTP verb field, select PUT from the dropdown.
In the HTTP path field, enter a path which includes your Azure storage container name and constructs a file name using an appropriate pattern.
Then, append the full text of the SAS Token (“?sv…”), which you copied earlier, to the end of the path.A path like /mycontainer/{{thing:id}}/{{time:now}}.json would indicate to create a Blob with the name of the current timestamp with a .json extension within a directory which is specific for each device/thing and has the name of the whole thingId.

In the Authorization section, add a New authorization subject.
Enter an appropriate suffix name e.g. forwarding.
Then click Add subject.
With that, you have defined an authorization subject which should be listed within the policies of all relevant things, in order to be allowed to forward data of these things to the Azure Storage.Copy the whole subject value for later use (see the policy section below).
Then, select the Topics (= event types) to be forwarded.
For standard use cases, we recommend that you activate:Thing twin events (property changes) and
Thing live messages (custom events).
Add a Header mapping to the target.
For Azure Storage blobs, this must map the header name x-ms-blob-type with the value BlockBlob.Confirm by clicking Save new target. After the target has been added, it should look like this:

Finally, we recommend that you use a simple Payload mapping that normalizes the contents of the events for the forwarding.
This way your JSON documents in the Azure storage would always include the change property values in normalized representation.
For that, in the Payload mapping section, select the option Enable normalization of outgoing event payload as thing JSON including contextual data.Click Create to finish creating your connection and check that it is opened correctly.
Adjust the thing policy
As a final step, you need to prepare your thing policies to ensure that the data forwarding is allowed through read access.
If you are using just one or a few devices, you can do this interactively in the Bosch IoT Suite UI.
Otherwise, you have to include this in your application logic.
Policy update via Bosch IoT Suite UI
Navigate to Things (or Devices) from the left sidebar and select the thing whose policy you are going to adjust.
Open its Policy blade and click the + icon to add a new Entry that will use the authorization subject which you defined in the Connection Target (see above).
In the Policy entry view that opens on the right, start with the Label field.
There, enter the authorization subject suffix which you defined in the Connection Target, e.g. FORWARDING.Then click the +icon in the Subjects section.
In the Issuer field, select integration from the dropdown.
In the ID field, enter the rest of the authorization subject, i.e. the part after integration.
In the Type field, specify the kind of the subject (for information only), e.g. http.Click the + icon in the Resources section to add a new resource.
Enter a path, e.g. thing:/
In the Permissions section, check the box to Grant Read permissions, as a minimum.Click Save. Upon that, the newly created entry will appear on the list of Entries in the mid column.
Result
Your policy entry could look like this:

Upon that, you are ready.
From now on, every property change of the device/thing should be forwarded as BLOB to the Azure storage account, where you can use Azure data management tools to process it.
The described approach uses SAS authorization with expiry.
If this is not suitable for your production scenario, some feature extensions of Bosch IoT Device Management could be discussed with regard to extending the HMAC support to include Azure Storage as well.