Create a rule
To create a mass management rule, go to the Dashboard of the IoT Manager Console (the console for short) and select the Rule Management perspective. You can also use the permanent shortcut icon for this perspective, namely ![]() available in the upper left corner of the Dashboard.
available in the upper left corner of the Dashboard.
Once there, click ![]() in order to start the wizard which will navigate you through the necessary steps. These are: define the rule name and action script (dialogue 1), scope (dialogue 2), trigger(s) (dialogue 3), and execution options (dialogue 4). Each step is explained below.
in order to start the wizard which will navigate you through the necessary steps. These are: define the rule name and action script (dialogue 1), scope (dialogue 2), trigger(s) (dialogue 3), and execution options (dialogue 4). Each step is explained below.
Define rule name and action script
On the first dialogue of the wizard:
Enter a user-friendly name for the new rule, which will help you identify it later on when you monitor and potentially control its execution
Enter the Groovy action script which will be executed by the rule, then click Next.
For detailed explanation on how to write action scripts for Bosch IoT Manager, refer to the conceptual guide section dedicated to Groovy Actions. When writing the action script, consider also the scope with which it will be executed.
For example, this is an action script, which executes а Stop command for the Fileupload bundle on all devices with an installed Edge Services, then gets the Fileupload (Bundle/Feature) on all bundle things and if it is stopped - starts it.
target.exec('Bundle:org.apache.commons.fileupload', 'stop', [].toArray() )bundle = target.feature('Bundle:org.apache.commons.fileupload')if (bundle.state != 0x20) { bundle.start()}
Define execution scope
On the next dialogue of the wizard, you have to select the scope with which the rule will be executed - device scope or system scope.
Regardless of the name, both scope options can be used for device management and the difference lies in the way in which the action script will be executed. Generally, it is recommended to use device scope, unless you have a specific use case which requires system scope. Our sample action script above is intended for device scope.
For details, refer to Action execution depending on the scope.
Creating a rule with device scope
Device Scope is selected by default as shown on the screenshot below. The Scope Selection Mode dropdown menu at the top of the dialogue provides three ways in which you can pick out the relevant devices which will be included in the scope. These are choosing a pre-defined group of devices, specifying individual device IDs, and filtering devices through a Groovy script. This process is described in detail and illustrated with examples in Create a task. Once you have selected the relevant devices, click Next to move to the next dialogue.

To choose system scope, click System Scope and then click Next.
Define rule trigger(s)
On the next dialogue of the wizard click Add to specify the relevant type of rule trigger - manual, timer or event-based. It is possible to add several triggers for the same rule.
At this step or later on while you are still on the same dialogue, you can define a general condition which will apply to all added triggers.

Manual trigger
To add a manual trigger, click Manual Fire and then click OK. Optionally, you may add a trigger condition in the dedicated field.
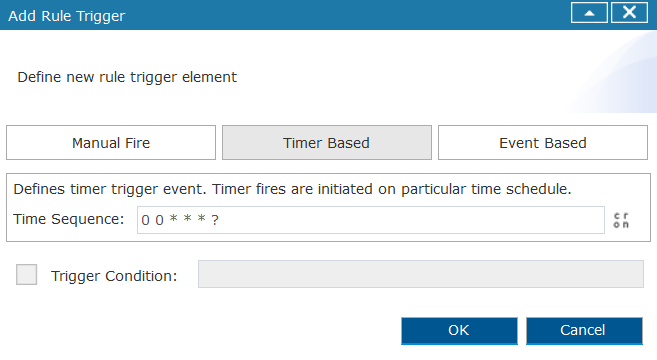
Cron trigger
To add a Cron trigger, click Timer Based and then either:
type the Cron expression into the Time Sequence field, or
select the Cron expression generator icon to the right which will help you enter a time sequence for the rule execution.
This is an expanded view of the Cron expression generator:

If necessary - enter a trigger condition, then click OK to confirm the trigger definition.
Device event trigger
To add a device event trigger, click Event Based and then either:
type the event name into the Event Type field, or
click the Browse Events icon to the right which will open a list of the available events to choose from - DeviceOnlineEvent or FeaturesEvents. The FeaturesEvents option can be further expanded.

The expanded tree of supported events to choose from is presented on the screenshot below. For convenience, you can search and filter events as well.

Once you select the relevant event, the curly brace button to the right of the Event Type field will become active. When you click it, it will display the structure of the event object, which you can later use in conditions or action scripts.

The following screenshot shows an example trigger condition based on the structure of the selected event.

The trigger condition is optional and will be evaluated against the selected event. Once you are ready, click OK.
All triggers added for the rule along with their trigger conditions will be listed as part of the Rule Triggers dialog. You can add, edit or remove triggers from the list using the Add, Edit and Remove buttons.
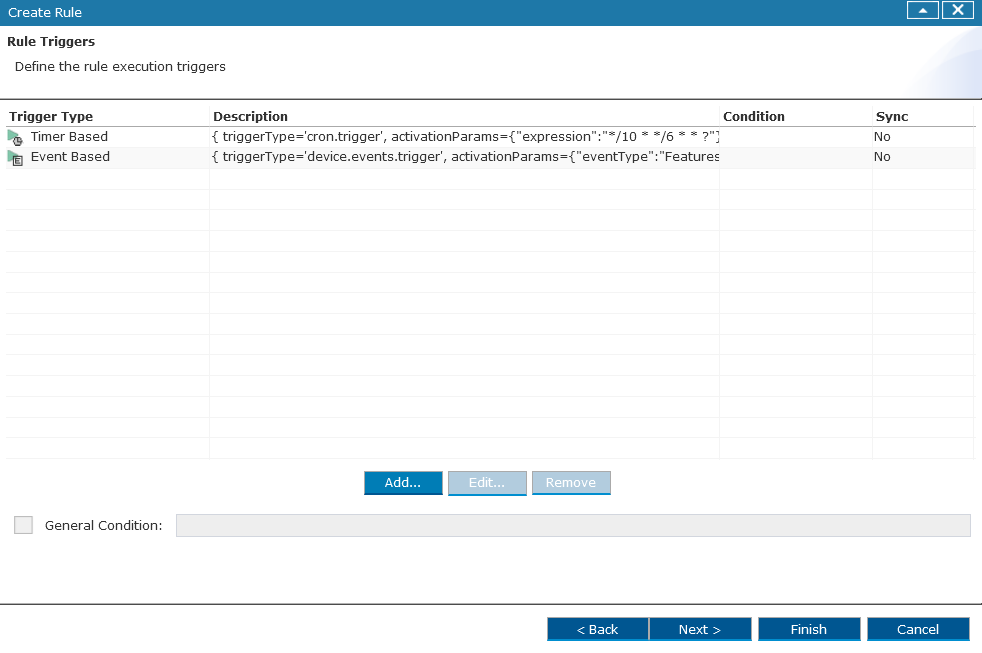
You can still define a General Condition applicable to all the triggers on the list, if necessary. Click Next to move to the next dialogue.
Define еxecution оptions
On the last dialogue of the wizard, optionally define Execution Options. For details on how and when to apply execution options, refer to the Rules conceptual guide.

Enable the rule
After you have completed all the steps in the wizard, you will be prompted to enable the rule, upon which it will start listening for events.
If you do not enable the rule, it will remain in the list of defined rules and you can enable it later on.