Step 2 - Configure the Octopus
In this tutorial part you will make use of the Arduino IDE to prepare the sketch which will be flashed to the Octopus board.
Prerequisites
-
If you are behind a proxy,
configure the proxy settings: File > Preferences > Network and
add SSL certificates (e.g. Bosch-CA-DE.crt from C:/Program Files (x86)/Java/jre8/lib/security)
to ${ArduinoDirectory}/java/lib/security/cacerts
Add the ESP8266 Platform to the IDE, see ESP8266 Arduino Platform (tested with 2.7.4)
Configure ESP8266 board support
Install the following libraries (Sketch > Include Library > Manage Libraries)
Adafruit Unified Sensor library (tested with 1.1.2)
Adafruit BME680 library (If your board has a BME680 instead of BME280) (tested with 2.0.1)
Adafruit BME280 library (If your board has a BME280 instead of BME680) (tested with 2.2.2)
Adafruit BNO055 library (tested with 1.3.0)
Adafruit NeoPixel library (tested with 1.4.0)
PubSubClient library (tested with 2.7.0)
ArduinoJson (tested with 6.18.5)
ESP8266-Ping (tested with 2.0.1)
Please make sure to use the released versions of the libraries,
as we encountered difficulties with some beta versions (e.g. of ArduinoJson).
Edit the file ${ArduinoDirectory}/libraries/pubsubclient/src/PubSubClient.h
and set the MQTT_MAX_PACKET_SIZE to 2048.
If you cannot find the file instantaneously, try to find the file in ${USERHOME}\Documents\Arduino\libraries\PubSubClient\src\PubSubClient.h
Change the board
Tools > Board > Adafruit Feather HUZZAH ESP8266
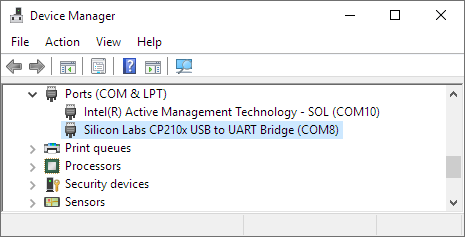
Find the Octopus com port
Attach the Octopus board to your development machine via USB cable.
In case you never used the board before, first of all try to find out on which COM port it communicates.
In case the driver is not installed yet, check https://www.silabs.com/products/development-tools/software/usb-to-uart-bridge-vcp-drivers.
Check via Device Manager in Windows that a correct driver for COM port is installed.
If not, install a driver from ${ArduinoDirectory}/drivers
In Arduino select Tools > Port > the port of your device.
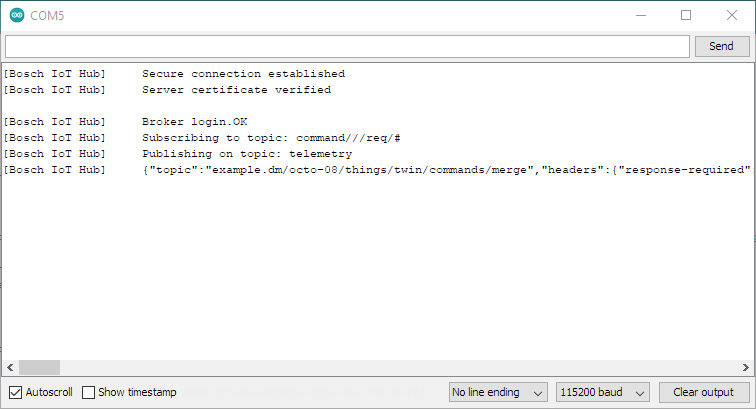
Then, open the Arduino serial monitor, which will later display what the device is sending.
Check via Device Manager in Windows that a correct driver for COM port is installed.
If not, install a driver from ${ArduinoDirectory}/drivers
Use our sketch for the Octopus to communicate to Bosch IoT Suite
Our examples at GitHub provide ready-to-use package
https://github.com/bosch-io/iot-things-examples/tree/master/octopus-firmware
In your Arduino IDE open octopus-hub.ino (see folder /octopus-firmware/octopus-hub/octopus-hub.ino)
Configure settings.h
Use the template (see /octopus-firmware/octopus-hub/settings-template.h) and create a file called setting.h in the same folder.
Complete the file settings.h with the content as shown in the pattern below.
You must keep the quotation marks, e.g.
#define WIFI_SSID "myGuestWLAN"
#ifndef SETTINGS_H#define SETTINGS_H// ---- WiFi configuration ----#define WIFI_SSID "" // The SSID of the WiFi you want your octopus board to connect to.#define WIFI_PASSWORD "" // The password of the WiFi you want your octopus board to connect to.// ---- Things registration properties ----#define THINGS_NAMESPACE "" // The namespace you created in your solution.#define THING_NAME "" // This is the thing id without the namespace.// ---- Hub registration properties +++ you can look up these values in the json file downloaded after provisioning ----#define HUB_TENANT "" // The tenant ID of your Bosch IoT Hub instance#define HUB_DEVICE_ID "" // The device ID #define HUB_DEVICE_AUTH_ID "" // The auth ID #define HUB_DEVICE_PASSWORD "" // The device password that was used for the device provisioning API request in plain text.// ---- Update rate of sensors ----#define SENSOR_UPDATE_RATE_MS 60000 // Print updated sensor value every 60 seconds. Faster update rates mean more transactions, // which might exceed your Free plan capacities of your subscription quite fast.#define LOOP_DELAY 100// ---- Hub MQTT configuration ----// Do not change this#define MQTT_BROKER "mqtt.bosch-iot-hub.com"#define MQTT_PORT 8883//#define BME280 // uncomment this line if your board has a BME280 instead of BME680extern const unsigned char mqtt_server_ca[];extern const unsigned int mqtt_server_ca_len;#endifVerify the sketch and upload to the Octopus board
The Arduino IDE knows the board as "Adafruit Feather HUZZAH ESP8266”.
Use the Arduino tooling to verify that the project compiles. Otherwise fix the issues.
Use the Arduino tooling to flash the Octopus.
Upon success the Octopus LEDs should light up in blue and green color .
Check your work
The Arduino serial monitor should show which data the board tries to send to the Bosch IoT Hub.