Register a stand-alone device via the Bosch IoT Suite Console
With this example we describe how you can provision a device, which will connect directly to Bosch IoT Hub, without any gateway.
Table of contents
Navigate to the Bosch IoT Suite UI
The Bosch IoT Suite user interface supports various use cases related to device and software management.
One major use case is device provisioning. You will be able to register a device and create a digital twin representation of this device called thing.
Navigate to the Bosch IoT Suite portal.
Click Go to Developer Console for your subscribed instance.

The Suite UI will open in a new browser tab.
Provide provisioning settings
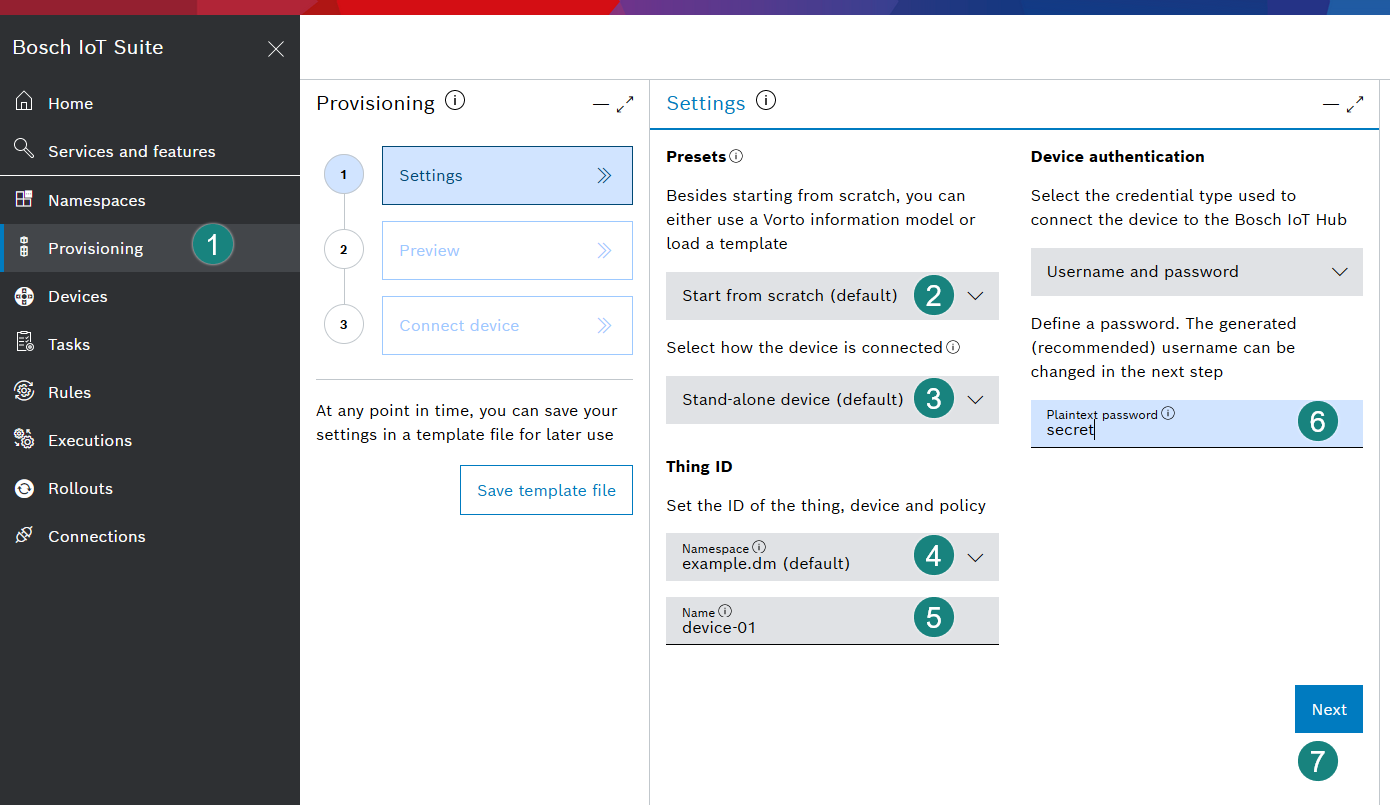
Click Provisioning in the left sidebar.
The opened view shows the 3 steps required for provisioning:Settings: this view is opened by default
Preview: view and manage the data which will be used to provision the device
Connect device: prepare the connection of your device by saving the response data and configuration properties
The preset option Start from scratch is pre-selected by default and you can continue with this one.
If you prefer to start with a device based on a Vorto information model, go through the following examples for more information, depending on your use case:
for virtual demo device, see Device connection - demo device
for real hardware, see Physical device connection - Arduino
For devices based on a private Vorto model definition, see Configure access to a private Vorto repository first.
Select how the device is connected, e.g. as a stand-alone, gateway, or edge device via gateway.
The Stand-alone device is pre-selected and you can continue with this one.In section Thing ID you will need to specify the ID. This will be used for the device, thing, and policy.
In case you have not defined a namespace yet, you will need to do it now - otherwise the namespace field will be populated with the namespace we just created.Enter a unique Name.
The full identifier that Bosch IoT Device Management will register is your.namespace:your-device-name.Provide a password for your device in plain text.
Confirm with Next.
Preview and send the provisioning request
Before sending the request, you can review, and if needed, manage and refine the data (thing ID, device credentials, attributes, features) according to your needs.
Check whether all provided data are correct and ready for provisioning.
The Manage tab will indicate all valid sections with
 .
.In tab Request body you can preview and adjust the content in JSON notation.
Click Send request.

Save the response and prepare the connection of your device
The Connect device view provides information needed to connect your device (e.g. credentials) which should be saved.
Save the response of the provision request containing properties which you will need to pass to the physical device or gateway, which will try to connect.
A file called provisioning.json will be downloaded to our local machine.Copy your password in plain text and store it at a safe place.
Note, that your password will henceforth only be displayed in encoded/hashed form.Click Go to device to see the digital twin representation.

As soon as your device will need to communicate with the device connectivity layer, it will need to know the results of this provisioning.
You have provisioned the following entities:
A device in the context of Bosch IoT Hub, associated with credentials.
A digital twin called thing.
The twin is associated with a policy.
Please take into account that the protocol adapters of the Bosch IoT Hub have a caching mechanism in place for devices and their credentials. That means if you make changes in the device's or credentials' properties, it takes some time until the protocol adapters apply the changes. Currently the cache setting is configured to 10 minutes.
Such a device will be visible also at the Bosch IoT Manager UI by default.
To make your device visible at the Bosch IoT Rollouts UI, add the SoftwareUpdatable feature,
see https://github.com/eclipse/vorto/tree/development/models/org.eclipse.hawkbit.swupdatable-SoftwareUpdatable-2.0.0.fbmodel.
Of course, the firmware of your device will need to support such feature too.