Automatic thing creation for devices authenticating with device certificates
In this example, we assume that you want your devices, which authenticate with device certificates, to be automatically registered with our services.
These will be most probably stand-alone devices.
By default, all devices which want to communicate to Bosch IoT Suite need to be registered.
In this case, however, we assume that you don't want to register your device using the provisioning API or UI, but instead you want to create the "trust" via a device certificate, that is accepted by the device connectivity layer - Bosch IoT Hub.
To prepare such a setup, please proceed with the steps described below in the following sections:
Step A - Configure a CA certificate for your tenant
In case of multiple subscriptions, make sure you are acting in the context of your relevant subscription.
For that, in the header bar of the Bosch IoT Suite UI, click the folder icon, which opens the Service Subscription dialog.
If the displayed Instance name is not the proper one, click the Switch subscription button and select the relevant subscription from the list that is displayed.
Then:
Open the Certificates UI feature from the left navigation.
In case it is not there yet, click Search Services and features, then click the star icon in the Certificates tile to pin the entry to the left navigation.
Click the + icon to get the Add root certificate entry fields.
Enter a unique name for the certificate.
Provide the content of the root certificate in PEM format: load it from a file or paste it directly in the editor.
If you choose to load it from a file, click the Load PEM file button.
Select an existing PEM file from the local folder where you have stored it and confirm with Open to upload it.
The certificate entry field will be filled with the Base64 encoded certificate.Enable the automatic provisioning by activating the toggle button Auto-provisioning enabled.
Enter a template for the generation of the device ID in the format your.namespace:{{subject-dn}} or your.namespace:{{subject-cn}}. Please, keep the placeholder in exactly the notation given in the context sensitive help.
Since your subscription could potentially have multiple namespaces, please notice that the Device ID template must contain one specific namespace within your subscription.
Click the Add button.
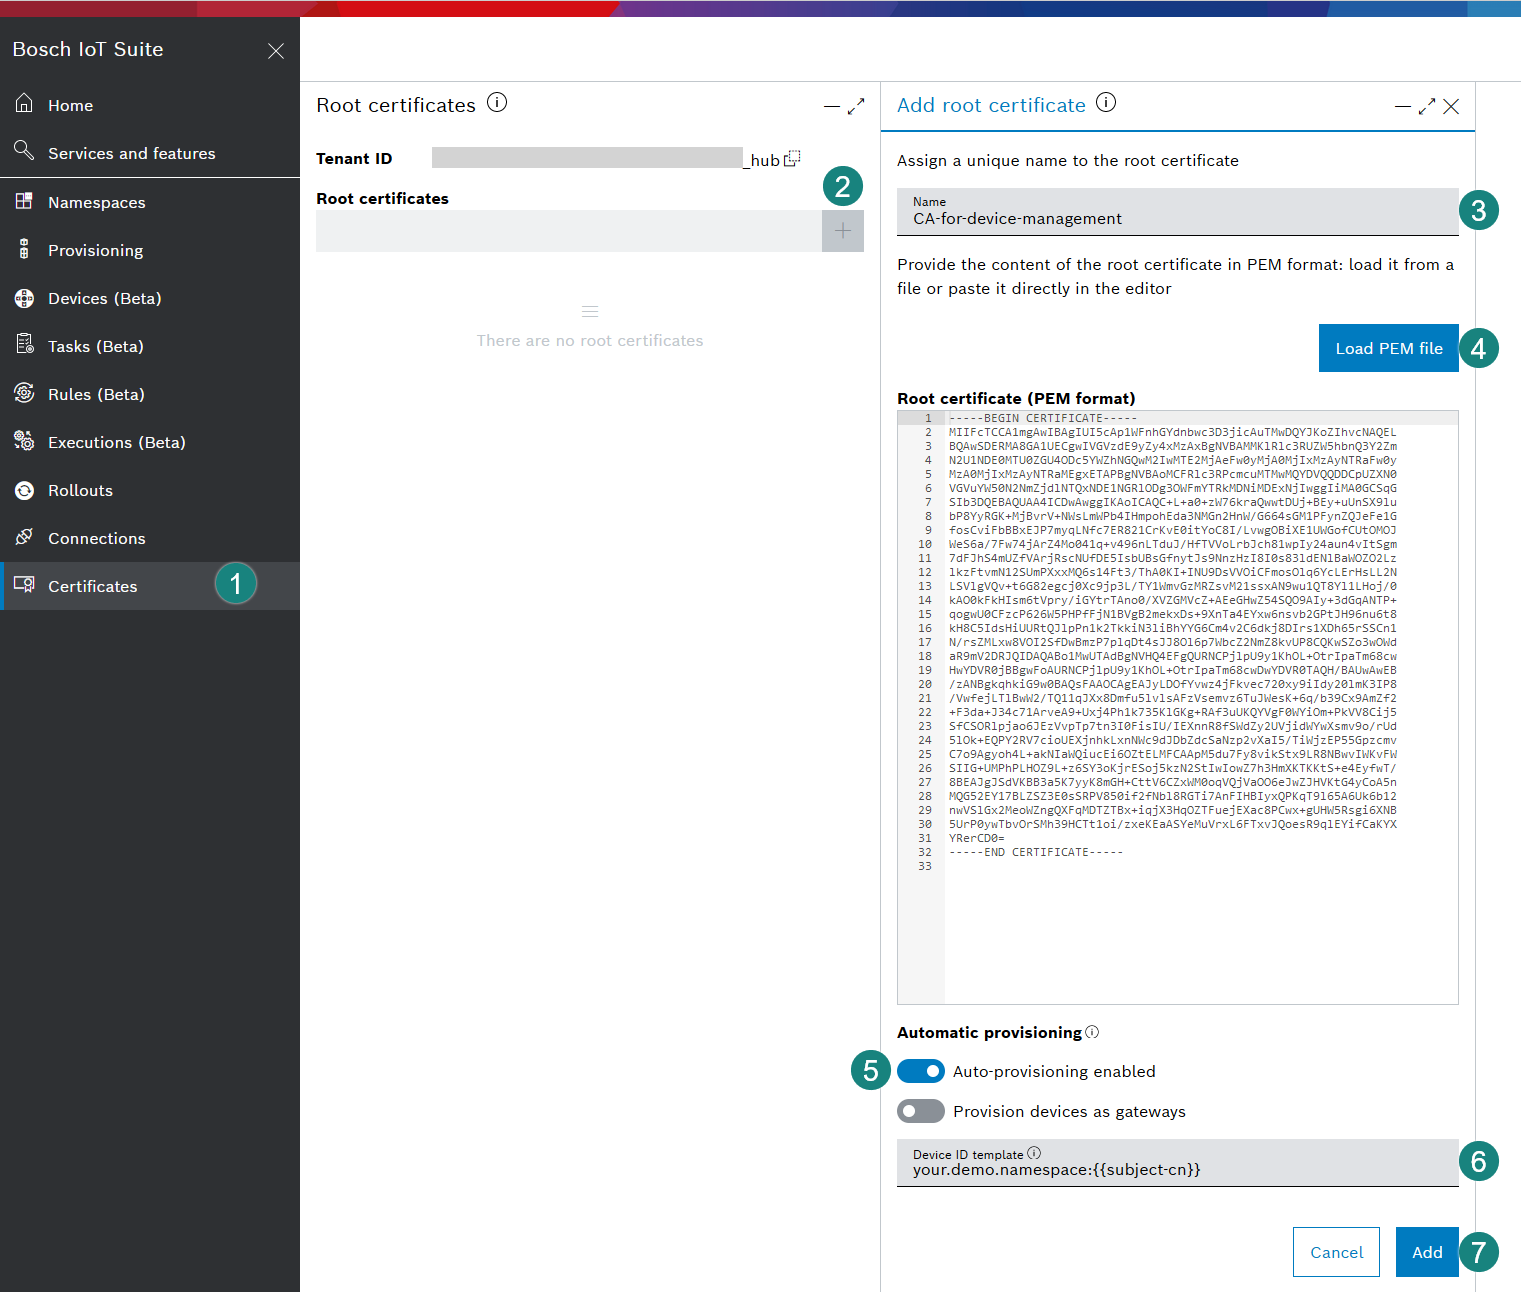
As a result, the certificate is stored. Click the name to see the details.

Step B - Configure the Devices via Bosch IoT Hub connection
By default, the "Devices via Bosch IoT Hub" connection was generated automatically at the time of creating all service instances of this service subscription.
This connection provides default templates for creating stand-alone devices as well as gateways or devices which communicate via a gateway.
However, in case the default template does not fit your needs, feel free to customize it.
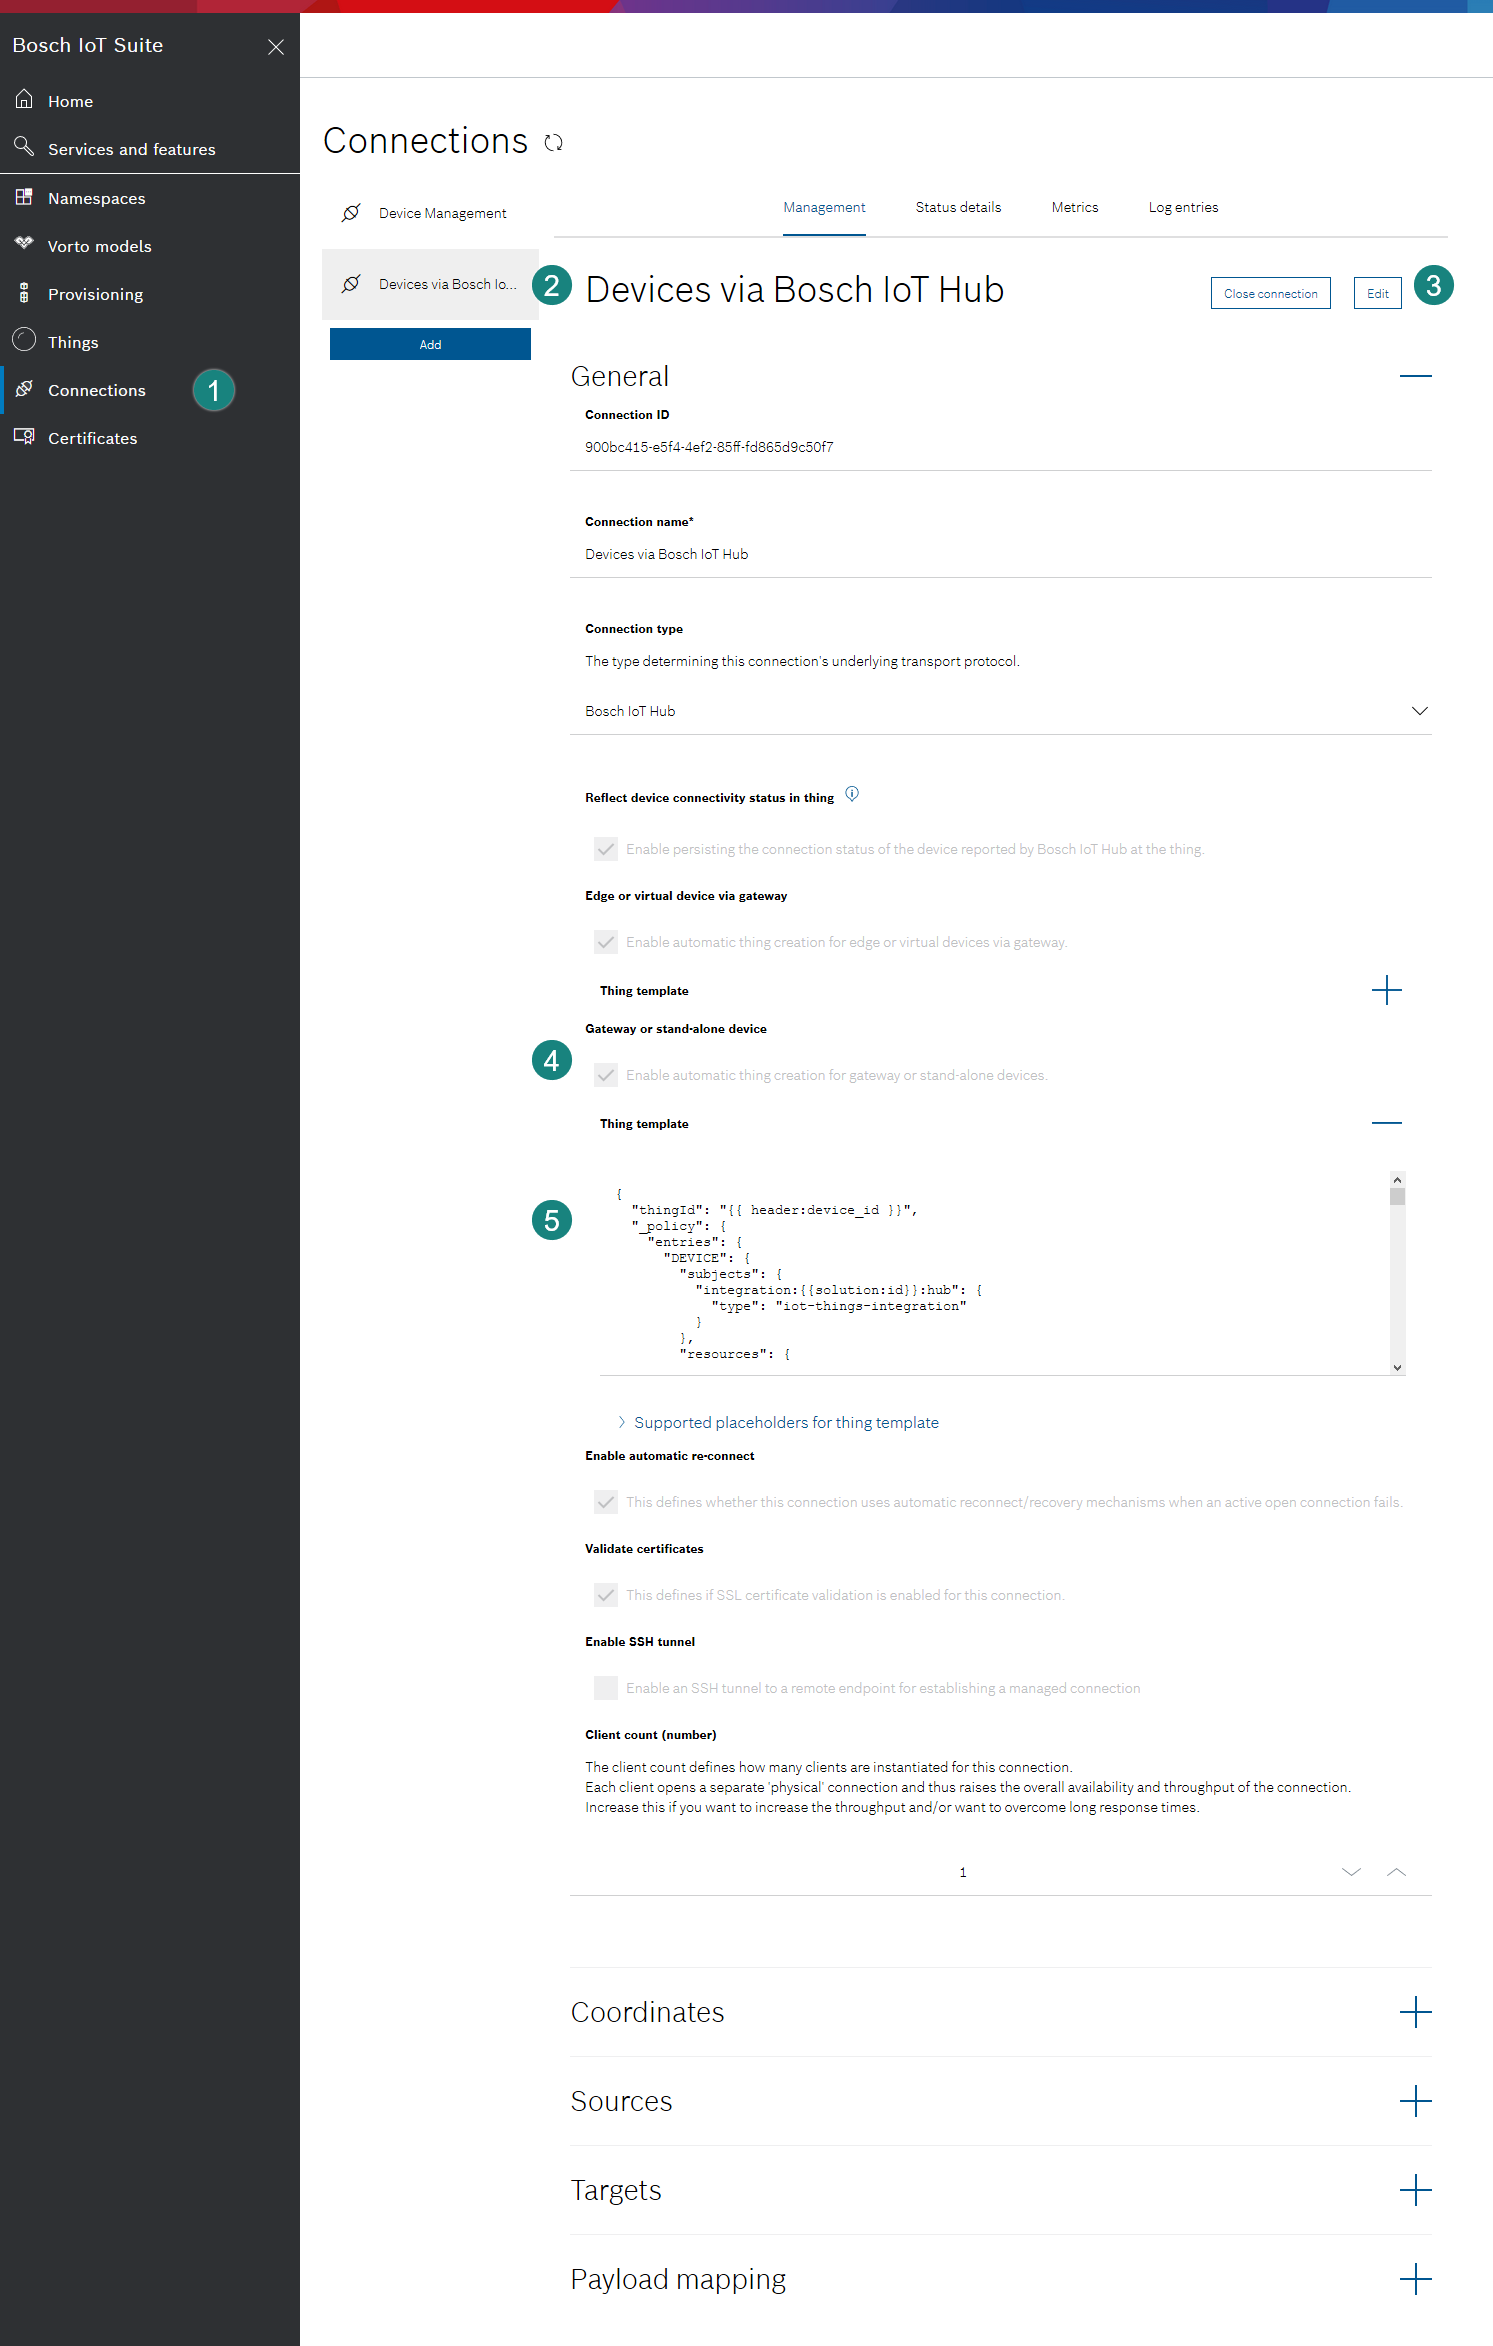
From the left navigation of the Bosch IoT Suite UI click Connections.
(If this item is not visible in the left menu bar, open the section Services and features, and click the star icon in the Connections tile to pin the entry to the left menu bar.)Open the connection "Devices via Bosch IoT Hub"
Click Edit to access the details.
In the General section, part Gateway or stand-alone device, check the checkbox for Enable automatic thing creation for gateway or stand-alone devices.
Optionally, adjust the Thing template of how the implicitly-registered things should look like.
By default we will create a thing with the given device ID.
By default the policy will have the entries DEVICE, DEFAULT and DEVICE-MANAGEMENT, just like if you would provision the device via the Device Provisioning API.
Additionally you can define other entries or use the function to copy another policy, which already exists.
Scroll back to the top of the connection and Save the changes.
Step C - Use Eclipse Mosquitto - to simulate a new device that needs to be registered implicitly
The mosquitto_pub command is installed. See Eclipse Mosquitto.
Download the server certificate for MQTT TLS encryption.
curl -o ISRGRootX1.crt https://letsencrypt.org/certs/isrgrootx1.pemSend an event from the device to simulate a change.
In case the device can authenticate properly (i.e. the device-cert is valid within the range of the CA cert which you have uploaded at step A) but does not exist yet, this would result into a new device registration.The content of the message must additionally respect the notation of Eclipse Ditto protocol.
In our example we simulate updating the value if the manufacturer attribute, thus the request body looks like in the following snippet:mosquitto_pub -h mqtt.bosch-iot-hub.com -p8883-t event -m'{"topic":"<your.namespace>/device-name/things/twin/commands/modify","path":"/attributes/manufacturer","value":"my company"}'-q1--cert demo-certs/certs/device-cert.pem --key demo-certs/certs/device-key.pem --cafile ISRGRootX1.crtIf your like to reproduce, please replace <your.namespace> in the "topic" part - with exactly the namespace edited at step A, nr 6.
The device-name will be substituted with the {{subject-cn}} form the device certificate.
Check your work
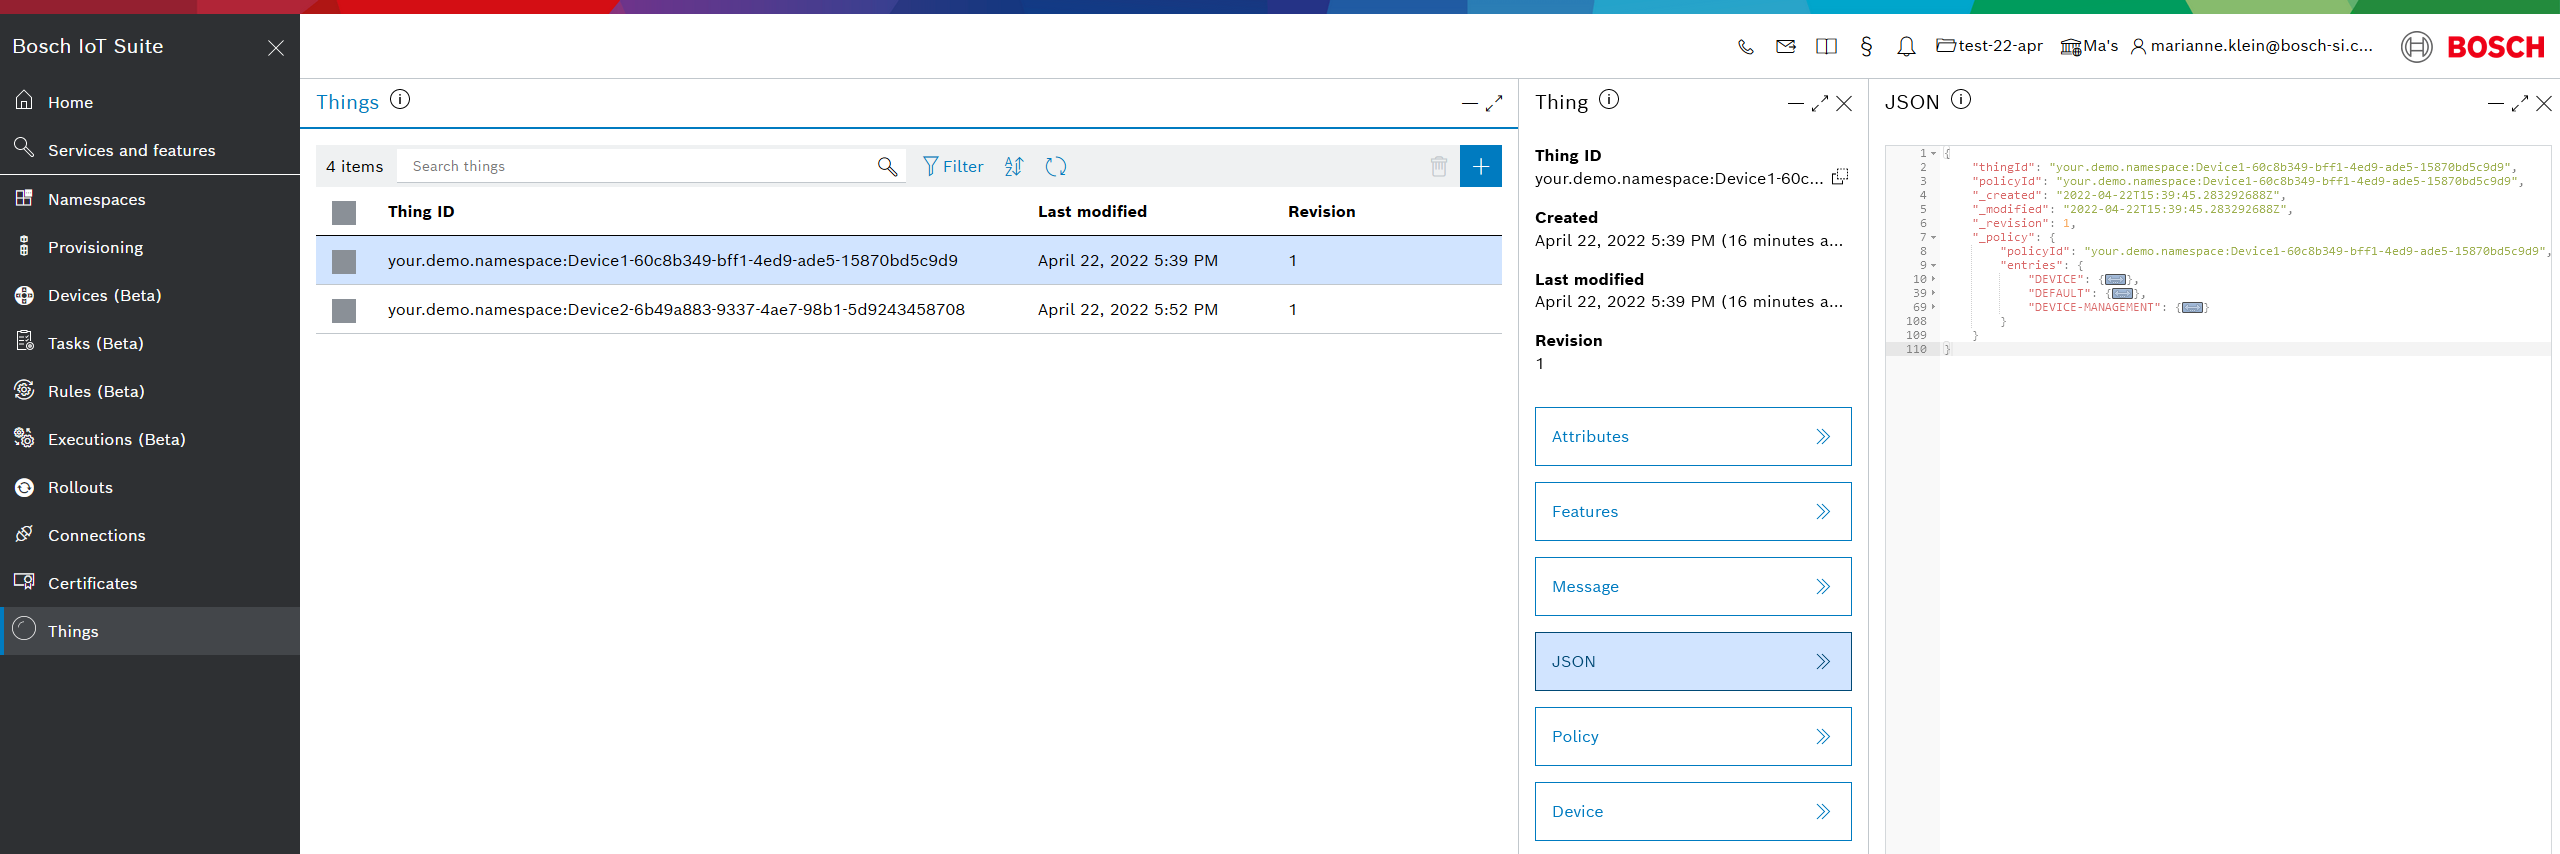
The mosquitto_pub command is forwarded to Bosch IoT Things, the digital twin layer of Bosch IoT Device Management. Due to the fact that it is passed through the connection configured at step B, a payload mapping will be applied.
The device is automatically created with the respective template - which excludes the attribute.
Please take into account that the protocol adapters of Bosch IoT Hub have a caching mechanism in place for devices and their credentials. This means that if you make changes in the device's or credentials' properties, it takes some time until the protocol adapters apply the changes. Currently the cache setting is configured to 10 minutes.